The 9 Essential Car Adhesives:
All but 2 of these you might just already have in your garage – and if you do – make good use of them. As always, there may be better or worse things which you can use but these are what I recommend and use myself on any car I blueprint or blackprint for R32 racing. There are 9 adhesives or ‘connecting’ helpers which I consider essential and which are available at most local retailers and hobby shops in Mississauga. Here they are:
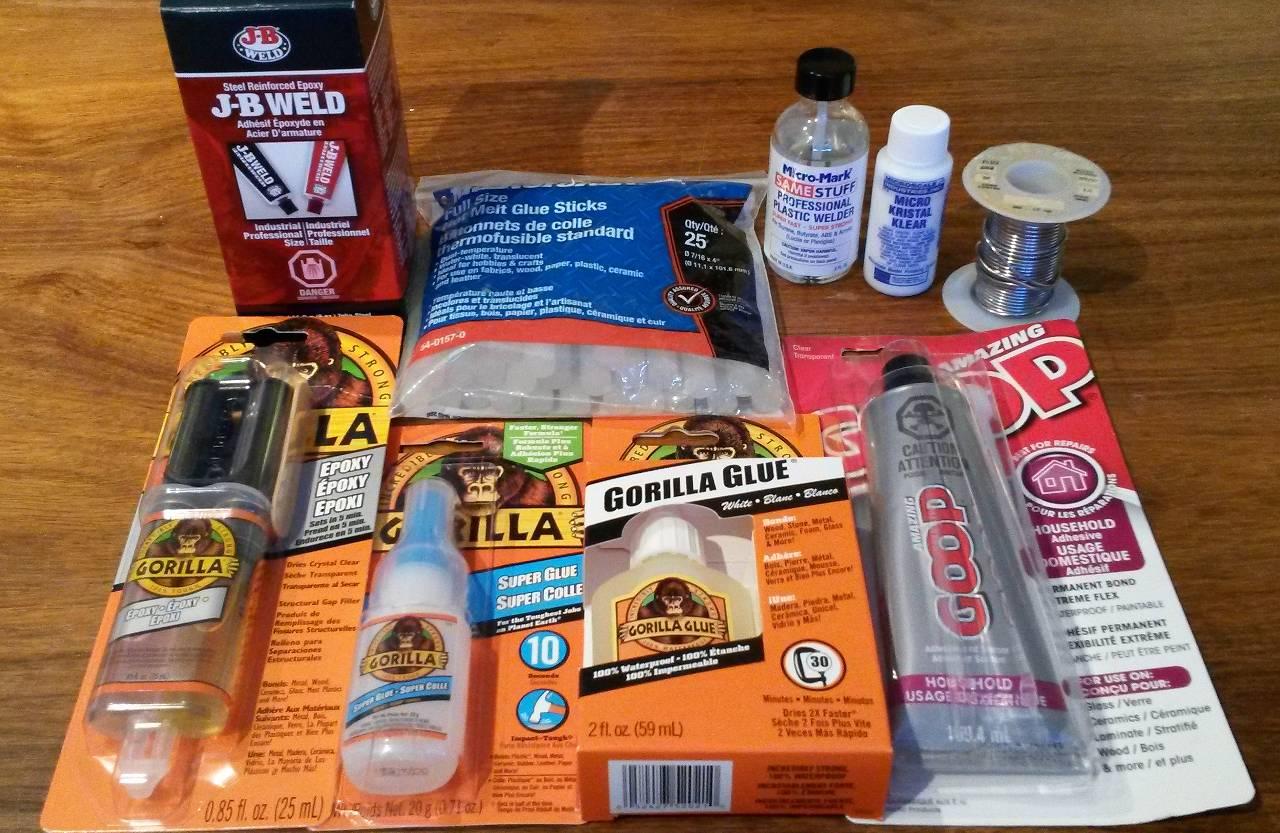
1) Gorilla Super Glue – I was a big believer in Black Max but at just $8 per bottle I was a convert. My new favourite super glue is flexible yet permanent and fills gaps well. Easily dispensed on a clean scrap of paper and applied using a toothpick I use this adhesive for gluing plastic wheels to axles, bushings to chassis (or slot.it bushings within the pod bushing holders), bushing filling (to prevent axle slop on stock classes) and when initially positioning body posts. On occasion I also use this to reinforce the outer edges of tires to the wheels in our fastest classes if the tire begins to pull away from the wheel. Do not use this near clear plastic because it will ‘haze’ the clear plastic. If you need to remove a part later apply Acetone (or nail polish) carefully with a Q-tip until the glue dissolves. The nose and cap are well designed, durable and easy to maintain which means you will use up all the glue before tossing it.
2) Gorilla White Urethane Glue – The regular formula is fine but I’ve switched to the white urethane glue which is supposed to dry faster and doesn’t need a ‘wet’ mate surface – it does expand like the original so use it sparingly. I apply this to my wheels (again using a toothpick) to glue all of my tires to the rim. Apply it VERY SPARINGLY but make sure you fully coat the entire surface. Keep some bent axles for this purpose and mark them – they are great to use when gluing the tires… also make sure that the tire is ‘true’ before setting it aside to dry (not wobbling on the wheel). Others in our group use only super glue or nail polish to glue their tires – it is a matter of preference. The dispenser on the smallest size (pictured) is also very good and easy to keep clean but chances are the glue will go off before you use it all up so don’t waste your money on a larger size.
3) Gorilla Clear Epoxy – The best way to fix a windshield is with a clear epoxy and this is what I prefer to use – but it is permanent so make sure the part fits first. It doesn’t haze clear plastic and it is also great for fixing and reinforcing LEDs to/behind lenses. I also use this to reinforce or glue piano wire to chassis (where permitted). It can also be used for permanently fixing body posts but this is not my preferred adhesive for that purpose. Mix and apply with a toothpick.
4) J-B-Weld – To fix a crack or fill a gap or to strengthen a chassis nothing beats JB. I use this to glue or ‘fix’ most of my pods in position. I also use this liberally to permanently fix body posts after they are positioned using super glue. Again, mix and apply with a toothpick. Remember that this epoxy contains iron filings and therefore it will ‘pool’ or be drawn to magnets if any are close by – so don’t use this near any magnet (unless you wish to). Since this dries overnight leave this for last.
5) Hot Glue (Sticks) – I am not the expert on hot glue nor do I really enjoy using it but it is relatively easy to use, easy to remove and has some resiliance which makes it a perfect gap filler, adhesive for pods and motors, and chassis/pod stiffener. You can glue just about anything to anything using hot glue, even if the pieces are miles apart. I use it to reinforce a glued motor to the pod or chassis along the ‘sides’ of the motor on faster classes since there are usually gaps which the more viscous adhesives cannot bridge. It also can be used to reinforce the gaps between the motor and bushing upright(s) on Group 5 motor pods.
6) Household/Automotive Clear GOOP – I use this to fix my motors in ‘snap in’ plastic chassis on both the drive and endbell (front and rear) sides which are in tight contact with the motor mounts. To remove a motor which is glued this way simply use a sharp X-acto to ‘cut’ the adhesive along the joints and after removing the motor just peel off the adhesive from the motor and from the chassis. A black coloured version (automotive version) can be used to coat LEDs after they are fixed in place to ensure durability and prevent light bleed, fix wires in place and fill gaps or reinforce interior components or trays where needed. It is also useful for fixing mirrors or other body components which may be subject to abuse…
7) Micromark Same Stuff Plastic Welder – I use this to repair or fix plastic/styrene bodies and all body components, including interior trays. This does not however work with the resin parts that I cast. Be careful since this will eat any painted finish and runs like crazy but it will fix any broken plastic piece to near original condition. I like the Micromark stuff since it comes with an applicator brush unlike Tenax or some others.
8) Micro Krystal Klear – Similar to a white glue on steriods this is great for fiddly windscreens and to fill or fix imperfect windscreen/window application borders. I also use this stuff to fill in body post holes when chassis screws do not stay in place and to fix inserts inside aluminium wheels. [BTW – never use Loctite on body posts – it eats the plastic.]
9) Solder – Your typical flux (282) filled electronic solder 63/37 to fix motor wires (preferrably silicone shielded) to motor leads – apply to the wire and to the motor leads separately then join with more heat… I use an acid flux with solder to fix no. 2 DuBro steel washers to solid steel axles for my independent axle set up but that is a topic for another subforum…
Furthermore, not mentioned here are scenic adhesives (for which I use four: LePages White Glue, Super 77, Hydrocal and double sided adhesive tape) or fixing agents for decals (Krylon Crystal Klear or Matte Finish) and decal application helpers (Micro Set & Micro Sol)…
Hope this helps a little…
Cheers! :good:
Attachments:
You must be
logged in to view attached files.
The Happy Canadian Scale Modeler!
