• Creator
    Topic
  • #14603

    Well I started work on the ’57 Caddy Brougham.

    Ken’s comparison pic with his Nascar reminded me that I had a little used scratch chassis under my Petty Plymouth so I thought I could probably re-purpose the chassis to fit under the Caddy.

    Wheelbase needs a bit of a stretch but fortunately I can add an additional axle tube in front of the existing tube so I can convert the chassis back and forth if needed.

    Cheers!

    Bill

Viewing 13 reply threads
  • Author
    Replies
    • #14605
      Avatar photoKen

        Looks fantastic Bill! :good:

        I can’t wait for this class to start racing! :yahoo:

      • #14608

        Thanks Ken.

        Unfortunately this build has stalled as I don’t have any 1/4 inch brass tubing to sleeve the bearings with.

      • #14610
        Avatar photoKen

          Don’t give up so easily. Some stores have curb-side pick up if you pay in advance. I’ve been buying hobby supplies the entire time or I would have stalled long ago. You need to call around your area to check. Everyone is still trying to survive while practicing proper social distancing.

        • #14691

          I managed to find some smaller diameter oilites so I’ve continued to almost completion.

          Still some detailing and polishing to do but thought I would post a progress report.

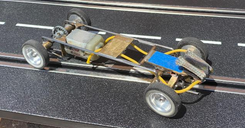
          Here is the chassis which I had built a few years ago. Added a new front axle tube for the longer wheelbase as well as patented D’Art design wire body mounts. Thought I would give that method a try and it works quite well. It will also allow me to revert the chassis to fit the nascar body without much work.

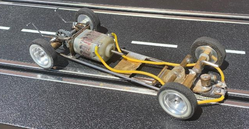
          The car is now a mix of vintage and new parts utilizing 1/8th axles to accommodate the larger aluminum rims along with a 60’s die cast crown gear.

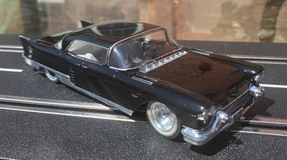
          I scratch build a replica of the glove box bar service option which you can see if you look closely through the passenger window.

          Complete with a full ice bucket and tongs.
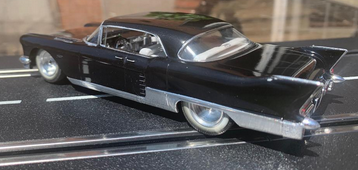
          Front

          Unfortunately I knocked the mirror off a few times and made a bit of a mess of the inside windshield but I’m hopful that a coat or 2 of future may minimize the glue smudge.
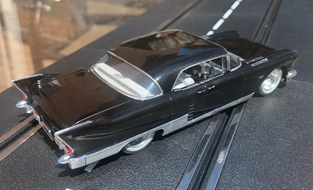
          Driver’s side

          Lower chrome and upper wing chrome were done using aluminum duct tape which can be a bit tedious but cheaper and more readily available than bare metal foil.

          It is not perfect but acceptable.

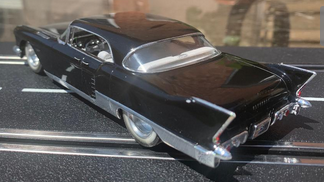
          Roof should also be brushed stainless but I decided to leave it black unless I can figure out a way to do brushed stainless effectively.

          Cheers!

          Bill


        • #14694
          Avatar photoKen

            Nice job on the Caddy Bill!

            Self adhesive aluminum is also available from some hobby shops for stuff like P-51 Mustang aircraft. It’s thinner and lighter than duct tape products because RC aircraft can’t afford the extra weight. Being thinner also helps go over compound curves. You won’t need much to cover that small roof. But it’s not cheap because of the weight savings.

            I can’t wait to see it run. :good:

          • #14695
            Avatar photoKen

              May I ask what the weight of the car is including the fully stocked custom bar? Nice touch by the way. :yahoo:

            • #14696

              Thanks. Weight is 109 grams which is a little heavy but the interior is probably as heavy as the body. I used all of the interior except the lower part of the rear seat for motor clearance.

            • #14700

              Great detailing F1Nutz; I don’t think I’ll even attempt a bar in mine!


            • #14710

              What a nice work Bill

            • #14735

              Again, excellent work all around, Bill.  I’ve been planning ahead and looking at my copy of the body.  I see four very small dimples/ indentations in the surface of either side of each fin. (Probably a consequence of curing contraction at thick parts of the plastic.) Not very visible, but will become more apparent with the light metallic colours I am considering.  I used to apply body putty when I built 25’th scale static kits as a kid, but I’m hesitant to try it on track bodies, worried that it may crack. (Lately I have tried my own concoction, a solution of liquid cement and polystyrene, but the adhesion is not perfect along the perimeter.)  Did you notice any such effects on your copy?  Either way, any suggestions for a solution?  Anyone else have any advice?

              Thanks.


            • #14752
              Avatar photoKen

                Hi Felix,

                Many of our cars have mold indentations. It’s a part of our hobby that difficult to avoid. I might fix a really bad spot with Tamiya modelling putty if forced because of some extreme mark. But I’ll leave most dents in the plastic and prefer to make another car rather than get stuck on trying to perfect one car. Everyone else’s car usually has the same imperfections. At a certain point, you just need to over look the odd imperfection and be happy

                I would suggest… make sure the car runs fast so no one can see the imperfections. That’s what I try to do. :yahoo:

              • #14756

                Thanks for the compliments guys.

                Hi Felix

                Yes my body had the mold indentations as well, mostly on the inner wings. You can see in my rear 3/4 pic if you look closely. If it were to be a static model I probably would have filled them but decided not to bother as running around the track they won’t be noticed. I did remove and sand most mold lines though as I usually do this as part of my prep stage and it isn’t too much work.

                When I do fill mold depressions where colour matching the plastic is not a concern I usually use crazy glue and drop in some plastic sanded filings sanded from the kit sprue. It isn’t ideal as the glued area dries much harder than the plastic kit but the drying time is very quick so it allows me to continue the project immediately.

                I have used plastic cement/filings method in the past to match plastic colour when the model is not going to be painted but find the drying time takes way too long and often doesn’t harden as much as the original plastic.

                Interestingly my kit came with 2 dashboards which allowed me to do the glove box conversion. It also came with 2 side details that would fit on the fins to make a different Caddy version?

                Maybe some of these kits shared trees which allowed some flexibility for a few variations?

              • #14762

                Thank you for your thoughtful and practical advice, Ken, Bill.  Unfortunately, I just can’t leave a defect, (especially when it will give a deeper layer of translucent metallic paint at the indentations).  It’s just a standard I set for myself, not trying to outdo anyone; I don’t impose it on others. It’s my character flaw!  An idealist by nature, a theorist by training; it’s my strength and my weakness, mainly a weakness lately!


              • #14782

                Weigh tolerance with timelines and go for it. It takes me a deadline to get things finished. I’ve never finished a model that I could say there wasn’t something else I could have done to it to make it better – every model I’ve made I’m cursed to only look at the imperfections and incomplete areas… so be it. On to the next one! Keep it up!!!

                The Happy Canadian Scale Modeler!

            Viewing 13 reply threads
            • You must be logged in to reply to this topic.