
Forum Replies Created
-
AuthorReplies
-
Nice work DB – lot’s of classes covered here… and a bird pilot too! :good:
The Happy Canadian Scale Modeler!
May 30, 2020 at 8:47 am in reply to: New User Accounts & Editing New Forum Topics and Replies… #14894Thank you for your detailed breakdown Felix. Looks like your replies are now posting automatically. Hopefully the same will happen with your next new topic…
Despite the fact that I may not communicate much about any of the background stuff which makes this website run there is a lot going on server side – usually at least one update or upgrade to the server, server software and or applications every couple of days and I’m also regularly tweaking things too.
The Happy Canadian Scale Modeler!
Perfect model for the SP+ class Ken! I’ll need to wear my sunglasses when you race it!
The Happy Canadian Scale Modeler!
I find that one of the most enjoyable aspects of this hobby is trying to solve these sorts of challenges oneself and discovering how others have tackled the same problem. Thanks for sharing this Felix!
The Happy Canadian Scale Modeler!
Thanks for the info Felix!
I believe Jimbo has made one of these. Now I know what model it is… 🙂
The Happy Canadian Scale Modeler!
Excellent diorama piece Ken! :good:
The Happy Canadian Scale Modeler!
May 27, 2020 at 7:32 am in reply to: New User Accounts & Editing New Forum Topics and Replies… #14824Hi Felix,
Thank you for your reply.
2, 3 and 4 appear to me at least to be consistent with my understanding of forum roles and permissions as I’ve described above. 1 is still baffling to me but I will look into it if I have time. There would appear to be some anomaly with your account since earlier I noticed a new topic you recently created that still required approval.
The first topic and the first reply by a new account require approval – subsequent topics and replies should not. If an account continues to have issues then I may need to address the settings for that account. If that doesn’t work then I might delete and re-create that account which would force a server side software reset for all permissions for that account. Beyond that I am not sure what more I can do.
The rationale for requiring approval for the first topic and the first reply from a new account is security/spam related – no more – no less. Any server side breach that would flood the website with ads or offensive topics/replies would create such a mess that I would likely have no choice but to revert to restoring an earlier backup of the forum contents.
Every day our website gets bombarded with hacking attempts and there are three user accounts which are relentlessly targeted. I can only assume that those user accounts may have been targeted because of client side malware or other malicious software, but thankfully the website security is able to defend against those attacks. Server updates occur regularly and server application updates even more often – so strange things can and do happen. :negative:
The Happy Canadian Scale Modeler!
May 19, 2020 at 9:54 am in reply to: New User Accounts & Editing New Forum Topics and Replies… #14810I would like to add the following to the first point I raised in my post from April 30, 2020 (above):
- It appears that if a new forum member has their first topic approved they can subsequently reply to their own topic (or other replies to their own topic) without requiring approval. They still however need approval for their first reply to any OTHER topic.
Hope this helps… :wacko:
The Happy Canadian Scale Modeler!
Well, its been a year now and time to update our written Scratch32 rules to reflect the changes implemented last summer… as noted above. Prior to our next Ringwood I will remind everyone of the first point regarding our 1.5L Grand Prix class… please remember to update your models (if necessary) and submit your up to date on-line model forms when the time comes. We will also check every model prior to the race.
Those of you who are on top of things will note that R32 rules do not yet restrict the 1.5L motor to just the BWMS050… this is something that in future I would like to canvass with all regular R32 participants to gauge whether or not a uniform application across both sets of rules is possible – which would be my preference…
The Happy Canadian Scale Modeler!
Ask Helmut Marko… an Austrian and one of the drivers in ‘Speed Merchants’ whose promising racing career was cut short when he lost an eye in a Grand Prix…
The Happy Canadian Scale Modeler!
Weigh tolerance with timelines and go for it. It takes me a deadline to get things finished. I’ve never finished a model that I could say there wasn’t something else I could have done to it to make it better – every model I’ve made I’m cursed to only look at the imperfections and incomplete areas… so be it. On to the next one! Keep it up!!!
The Happy Canadian Scale Modeler!
Again, excellent find Ken! I’m sure it will look and race exceptionally well! BTW, how did you get this one since the border is still closed?!?
The Happy Canadian Scale Modeler!
Excellent tips and candid honest recall that most would never admit to. Well done and Cheers Ken!
The Happy Canadian Scale Modeler!
Looks great Chris!
The Happy Canadian Scale Modeler!
‘Racing to Line’ rewards consistency – which is a characteristic the best slot car racers all share. It is more important to be consistent than just fast. Those that are consistent usually are so because they also minimize their exposure to unnecessary risk.
The Happy Canadian Scale Modeler!
April 21, 2020 at 3:25 pm in reply to: Slosh Cast Parnelli Jones Watson Willard Battery Special #14589Looks really nice F1nutz! Well done! :good:
The Happy Canadian Scale Modeler!
That’s a very nice Shelby build Ken! Did you paint & decal the body too? And are those D11 tires on it?
The Happy Canadian Scale Modeler!
Great work Ken! Have you found some decals that will work?
The Happy Canadian Scale Modeler!
Very nice build Ken! Street racing here we come!
The Happy Canadian Scale Modeler!
Looks very nice Luis – and ready for when we can finally race the Coppa!
The Happy Canadian Scale Modeler!
Excellent Luis! Can’t wait till the next Ringwood to see it in action!!!
The Happy Canadian Scale Modeler!
Very nice Luis! The penelope pitlane body shell is quite nice too!
The Happy Canadian Scale Modeler!
A very nice SP+ eligible build DB! :good:
The Happy Canadian Scale Modeler!
Looks great and is sure to be a very good runner Ken! Can’t wait to see it on the track. :good:
The Happy Canadian Scale Modeler!
Looks like the carbide tipped etching tool I have somewhere in my workshop but can’t find… hmmmm… are those sharpening/cleaning blocks hard or are they made from rubber?
The Happy Canadian Scale Modeler!
Excellent choice of livery!
The Happy Canadian Scale Modeler!
That is a great looking model Luis! How does it run?
The Happy Canadian Scale Modeler!
Progress looks great DB!
The Happy Canadian Scale Modeler!
Thank you for the insight Felix… and for showing us your tyre cleaning system. I never really gave any thought to the implications of using spit… but these are sobering times which will necessitate change to how we do things… some also just rub their tires with their thumbs too which seems to work… I agree and think as part of a covid19 response and moving forward we should eliminate saliva as a method of tire cleaning… Since we are not allowed to use tools or equipment to do anything to models trackside or during a race those that wish to clean their tires may need to settle for simply rubbing them with their thumbs if at all. Prior to a race and before one places their model in the paddock using your tyre cleaning system or any other system with water should be the only ticket from now on…
The Happy Canadian Scale Modeler!
Looking great DB! :good:
The Happy Canadian Scale Modeler!
April 6, 2020 at 7:25 am in reply to: And now for something completely different F1 Racing Sim #14456Pretty Cool f1nutz! :good:
Funny how the only ‘sporting activity’ right now is virtual…
The Happy Canadian Scale Modeler!
This model is a superb find Ken! I agree with F1nutz – glue it together then Dremel/cut most of it out… that’s often the process I use when making a body kit shell… just make sure to reinforce any joints that appear thin or weak with some epoxy at the openings before cutting…
The Happy Canadian Scale Modeler!
Looks like a great runner Ken! Well done! Plus the spring seems to be the best solution so far too since it will never fail unlike the BIC ink reservoir…
:good:
The Happy Canadian Scale Modeler!
A very good portable solution racer68!
The Happy Canadian Scale Modeler!
That’s a great looking police cruiser! :good:
The Happy Canadian Scale Modeler!
Your project is coming along nicely F1nutz! What is the wheelbase on that?
The Happy Canadian Scale Modeler!
Gents,
This looks to be a class with a lot of potential. Since it seems like we are building momentum with this here are my thoughts:
1) Will this also be an R32 class or just a Scratch32 class requiring a scratch built component? Assuming it will be just a Scratch32 class then…
2) Are alternate heavy slush poured resin bodies a welcome alternative because there may not be many plastic kits available? I’m not sure the plastic kits are all exhausted…. but they may be soon – who knows? If they will be then a minimum weight may be necessary…
3) I’m not convinced we need limits on wheels or even on motor configuration…
4) Two classes – A low power motor (any configuration) and an unlimited motor (any configuration) would make it easy to integrate the ideas suggested and the models presented so far… if it were to become clear that a particular motor configuration has an advantage then we can further divide the classes based on motor configuration (ie. front, mid, side/angle)…
5) Race Numbers – Whether like hot rods or no number I’m not really convinced we need a visible number… I am inclined to suggest for the purpose of the database we do have a number associated with each model – but that number can be made visible just on the chassis somewhere for identification purposes…
It may be fun to change the format for these street racers – using something that Ken and I discussed – a chase format where two boulevard cruisers are on the run in gutter lanes and a period appropriate police cruiser gives chase in the middle lane. Number of laps until a crash or being caught by the police determines the heat result…
…if we start off with no numbers and no minimum weight those can always be added easily if needed…
…these are just a few ideas to add to the discussion for consideration… cheers! :good:
The Happy Canadian Scale Modeler!
Excellent!
The Happy Canadian Scale Modeler!
Some fantastic models!!! :good:
The Happy Canadian Scale Modeler!
Great idea! I never thought to do that – excellent!
The Happy Canadian Scale Modeler!
That’s cool! :good:
The Happy Canadian Scale Modeler!
For some classes this was the MINIMUM distance between the motor (from the can or endbell) to the rear axle – so if a caliper set at 40mm can fit between the motor can and the rear axle then that model qualifies as a front motor model – how you transmit the power is up to you… I don’t believe we ever set a minimum distance for this series…
The Happy Canadian Scale Modeler!
Thank you for your accurate and inspirational post regarding this proposed class racer68.
The front motor configuration will allow for a nearly full interior/pilot which all participants would be STRONGLY encouraged to include in their models. The minimum weight is designed to level the playing field somewhat for heavier slush poured resin bodies. Since many bodies do not have the space to accommodate a larger S-can motor the BWMS050 motor becomes the logical choice and it doesn’t hurt that they are so cheap.
The goal here is to have a diverse field of realistic period appropriate models. If you have extra time for this build the emphasis should be on adding more detail to your model – not on how to make it lighter or faster.
Hopefully this will take off like our pre-war class has.
The Happy Canadian Scale Modeler!
Looks good Ken!
Any plans for a rollbar & fire extinguisher? I suppose while cruisin’ up and down Miami beach he’s rollin’ on his great looking alloy 5 spoke rims – which I presume he’ll swap out for steel wheels when he arrives at the oval…
Orange will be a welcome colour to the classic NASCAR stock car field too! Well done! Can’t wait to see the body finished!
The Happy Canadian Scale Modeler!
Great work on the aluminium chassis Ken! Bending the rear of the chassis to hide the post in the back makes for an elegant solution… Can’t wait to see the body when it is all finished! Keep up the great work! :good:
The Happy Canadian Scale Modeler!
Looks good – I like the blue on blue! Cheers!
The Happy Canadian Scale Modeler!
Excellent! This is on my ‘To Do’ list…
The Happy Canadian Scale Modeler!
Ken,
If you have time it would be great if you could post something in our resources ‘chassis eligible bits & pieces’ sub forum with a link to the seller/part of the scaley motor with price – it is great to have a reliable source for any ‘stock’ or motor restricted class – takes out the guesswork for everyone… and any resulting confusion. Just a suggestion of course…. :yes:
The Happy Canadian Scale Modeler!
Looks great Ken! :good:
Remember, nothing wrong with a higher COG, especially when using beefy rear tires with lots of ‘built in’ suspension. Also keep in mind that with bodies that hug the motor and chassis there may not be a need for two mounting posts – you may find that eliminating the rear post is not such a bad thing – and why not try other methods of mounting your body… Cheers!
The Happy Canadian Scale Modeler!
A personal scheduling conflict arose this Sunday and I can no longer host it – so it must be postponed to a date to be announced. My apologies for any confusion. I took the event off line until I can confirm another date.
The Happy Canadian Scale Modeler!
The update was applied plus a few enhancements – I am not aware of any breaks/changes but should anyone notice anything not working or different than yesterday please let me know – the earlier the better just in case I need to restore a prior backup…
Thanks!
The Happy Canadian Scale Modeler!
Cheers Ken!
The Happy Canadian Scale Modeler!
Looks good so far! :good:
The Happy Canadian Scale Modeler!
Looking good! :good:
The Happy Canadian Scale Modeler!
This is a good tip. Remember to also remove the motor bushings from the discarded motor – since they are better than the nylon bushings for the extended shaft.
The Happy Canadian Scale Modeler!
Hi Racer68,
For this one we’ll take another few weeks to sort things out and then give a minimum 3 months notice of the requirements prior to the race. I am looking at adding this to the schedule sometime in December – so lots of time to build. The biggest points of discussion right now are what, if any, limits do we need on overall width and maximum tire diameter – front motor inline configuration (minimum of 40 mm), plastic body, BWNC1 or BWMS050 and DArt tires are looking good. And it looks like we might open up liveries to include period correct fantasy liveries too (in addition to real ones)…
Those of you who have emailed me thank you for your input too. :good:
The Happy Canadian Scale Modeler!
There will be lots of time to explore drive shafts etc. – thank you for the offer – and I do agree – front motor models should never compete with mid inline configurations… just not fair.
As for tire width and overall dimensions no rule was proposed – so use whatever you think reflects best the model you are racing…
The Happy Canadian Scale Modeler!
Hi Racer68,
The remaining open wheel series has always captivated me and repeatedly sparked ideas of implementation. I thought that later this fall was ideal to drop an inaugural attempt given the success of Ringwood and Coppa to date…
Ringwood began many years ago with nothing else on the map. Just getting anyone to make a chassis/model was quite an ask.
More recently and many years later the Coppa focused on models with a height restriction of 5mm but for the streamlined models – I was told by some that this was crazy to do. Far more have embraced the challenge of building 5mm high models than streamliners so far – only 2 streamliners have ever been entered in a Coppa (to the best of my knowledge)… and as everyone has found out the 5mm high models run very well.
Natural progression (for the group) would suggest to me that a more accurate front motor placement is not too far a reach. I believe the past justifies this incremental change. I respect your view – but I respectfully disagree. Please remember that our Ringwood and Coppa classes remain as is and I would strongly encourage you to enter a model in either of them first to gain a foothold and learn from your effort. You are right – building a front motor model as your first entry in any open wheel (or any other series) will never be easy to do. Remember that there is nothing stopping you from entering your models 2, 3, 5 or 10 years from now once you sort out your building schedule.
I’m looking forward to your first scratch built open wheel entry regardless!
Cheers! :good:
The Happy Canadian Scale Modeler!
Luis, no worries – I’ll give you a printed set when I see you Monday night.
The Happy Canadian Scale Modeler!
Glad to hear that the turnout on Friday was good.
T.V. coverage is great these days but you don’t get the ear busting, chest pounding, fuel and burning rubber smells like you do at the track… although I never attended an original CANAM race I can only imagine just how much of an experience the start of any of those races must have been for every spectator… sensory overload! [like F1 was before the hybrid era – especially Ferrari and Lamborghini]
See you at the Coppa F1nutz! :yahoo:
The Happy Canadian Scale Modeler!
F1nutz,
Rogers moved most of the Tour stages to SN1 which isn’t included in our basic package – I was able to watch most of the race in previous years on the channels in the basic package but not now. At least they still have great F1 coverage. At this point I could care less about Indy especially now that they made it harder to follow. If F1 goes then I will cancel my cable and be happy just watching re-runs of Starsky & Hutch for free on CHCH. It is too bad but it seems that there is nothing left to check the greed of Rogers or Bell. It is one thing not to add a new event, it is quite another to take old ones away – which they are now doing.
I hope you enjoyed the racing on Friday. Hopefully I’ll see you Monday night at the Coppa!
Cheers!
The Happy Canadian Scale Modeler!
July 7, 2019 at 8:17 am in reply to: Scalextric 1963 Lotus F1 They are finally catching up with us. #11824They could have done better with their choice of pilot head on this one but at least there is now another RTR model for those that don’t have the time to build their own… always a good thing. Must give Scalextric credit for diving back into yesteryear yet again… thanks for sharing the link F1nutz!
The Happy Canadian Scale Modeler!
Well done!
The Happy Canadian Scale Modeler!
Looks great Ken!
My #4 is an inline Vanski and faster than my BWNC1 sidewinder #11 – go figure… must be the lubricant… that’s just how it is sometimes.
The Happy Canadian Scale Modeler!
Thanks for the link and info Bill! Cheers!
The Happy Canadian Scale Modeler!
Looking Great Ken!!! :good: What colour are you planning to do the wheels/inserts?
The Happy Canadian Scale Modeler!
June 1, 2019 at 12:00 am in reply to: Livery – Carrera Panamericana I – 1950 – #56 1949 Ford (Nieders MEX/Diener MEX) #11472I agree with Ken – Cheers Steve!
The Happy Canadian Scale Modeler!
May 27, 2019 at 1:59 pm in reply to: Livery – Carrera Panamericana I – 1950 – #56 1949 Ford (Nieders MEX/Diener MEX) #11461Looks great Steve! :good:
The Happy Canadian Scale Modeler!
May 25, 2019 at 4:24 pm in reply to: Livery – Carrera Panamericana I – 1950 – #56 1949 Ford (Nieders MEX/Diener MEX) #11452Great work Steve!
The Happy Canadian Scale Modeler!
May 19, 2019 at 7:28 am in reply to: Livery – Carrera Panamericana I – 1950 – #56 1949 Ford (Nieders MEX/Diener MEX) #11392Cheers! Can’t wait to hear more on your research! :yes:
The Happy Canadian Scale Modeler!
Thanks for the heads up MiA!
The Happy Canadian Scale Modeler!
When you have time let us know how the rest of the build is going Ken. Aluminium stacks or not I’m sure it will look great – don’t get hung up over one part, especially one which will likely be added at the end of the build…
The Happy Canadian Scale Modeler!
F1nutz,
Good news! I’ve got all the parts molded – I just need to make a new mold for the rear section of the bodywork (or the complete body). This will be the next and last thing I need to do apart from the helmet…
The Happy Canadian Scale Modeler!
Another picture of the M5A:
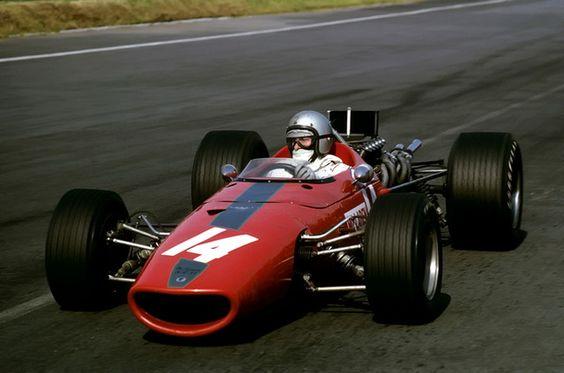 Notice Bruce McLaren’s helmet detail too…
The Happy Canadian Scale Modeler!
Practice day footage! Wow! Ickx in a Fiat (just a guess as to car) was marvelous too! We’ll expand our Targa years for the upcoming event – stay tuned!!!
The Happy Canadian Scale Modeler!
So far it looks like the logical period to target would be 1966 through 1973…
The Happy Canadian Scale Modeler!
Excellent model!!! :good:
The Happy Canadian Scale Modeler!
March 5, 2019 at 8:17 pm in reply to: 1934 Aston Martin Ulster kit for the Pre-War GP series in S32 #10822Hi Felix,
Yes – as of the new year the UPDART poke stopped but I’m glad to hear that it was just life that got in the way of your build – understandable my friend.
The Happy Canadian Scale Modeler!
Any car that raced in Trans Am in those years, any motor. I envy your energy and enthusiasm Ken. :good:
The Happy Canadian Scale Modeler!
Taking a closer look at the Trans Am series which started in 1966 it may be appropriate to have a cut off year – we should discuss that more over the next few events…
 The show tomorrow morning would be a good place to look for eligible models…
The Happy Canadian Scale Modeler!
Hi Ken,
Apart from the sniff test and if it looks right test we haven’t established boundaries for TA+ so there is nothing preventing you from using that car – and remember as a carry over from the R32 TA class fantasy period liveries are fine too – so as long as the make & model ran in a Trans Am race then why not?
The Happy Canadian Scale Modeler!
The axle clamps were too flimsy and one was already fatiguing so it was going to fail – likely just as Herr ‘One Eye’ Berger was speeding around the sweeper on his way to a call – and with very ugly consequences! Better safe than sorry!
Can’t wait to see your 550 build – will it be ready in time for the Meistershaft?
The Happy Canadian Scale Modeler!
Cheers MiA! I bailed on the two clamps around the rear axle sleeves and moved to use a single piece split styrene tube attached to the rear of the chassis. One of the photos shows the plastic body frame with the single styrene tube. I’ve used this method with several of my pre-war builds too.
The Happy Canadian Scale Modeler!
FYI: Classes haven’t changed for R32. Trans Am is still Trans Am in that group. Some of us in the scratch group have been discussing an open Trans Am class for quite some time now. :good:
The Happy Canadian Scale Modeler!
Thanks Porsche911! I think this will inspire some of us to finish building our unlimited Trans Am models now – no other restrictions but for club tires, 14mm wheels topped with a hard plastic body – anything else goes. GidddyyyUUUpppp!!!
The Happy Canadian Scale Modeler!
Not a bad looking CANAM model now that it is done – and it is very fast too. Cheers Tony!
The Happy Canadian Scale Modeler!
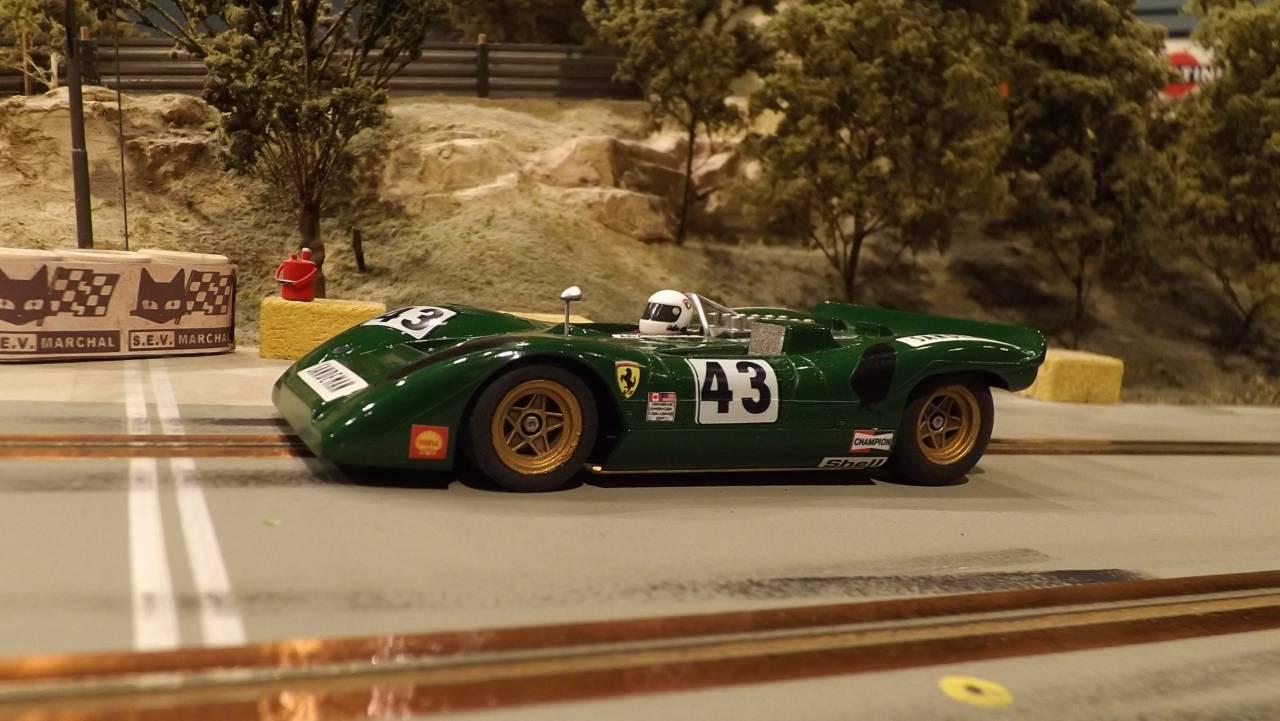
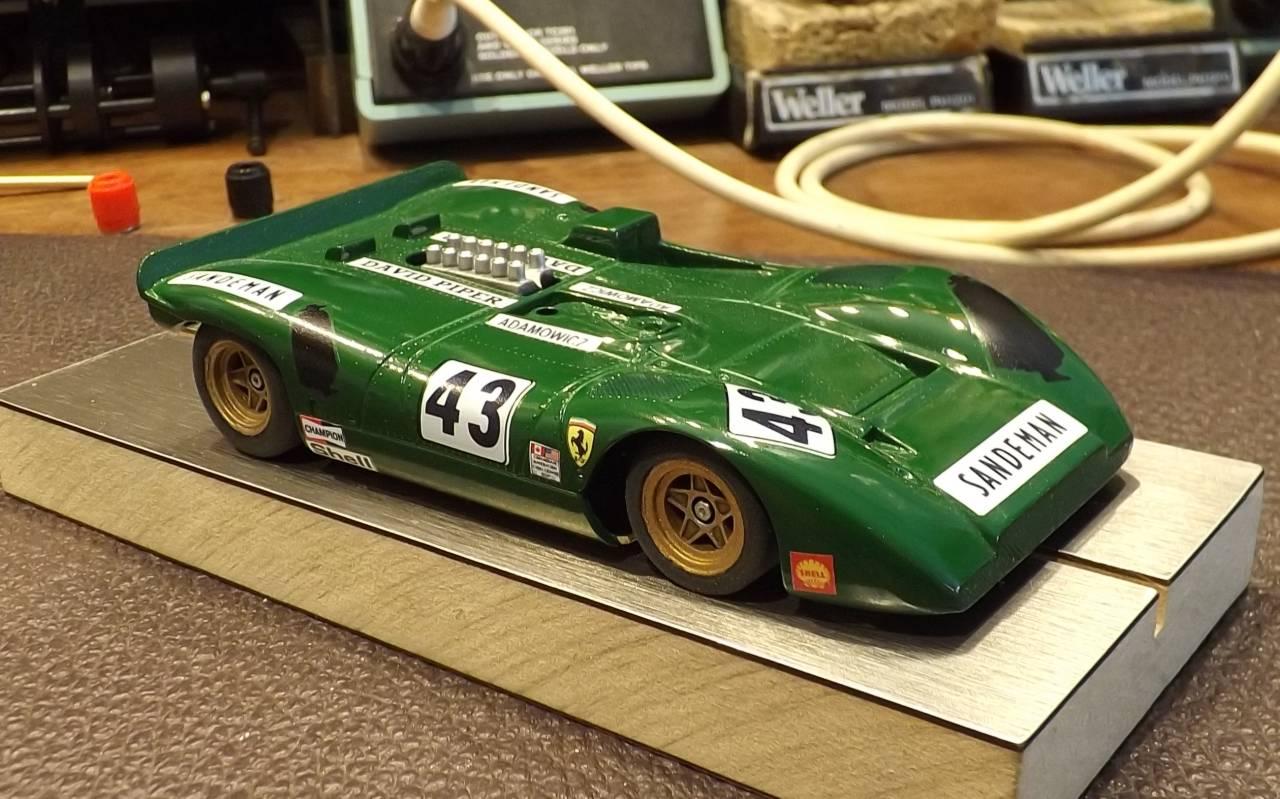
The way the body was mounted is convenient – but not optimal for performance – regardless it needs to be finished – so it was… DArt inserts were painted then weathered… here are some macro shots to help with the rest of the body detail – showing how things really look better than the naked eye can discern is most helpful – although not the most flattering…
 There is more room to lower or slam the body to the chassis but doing so wouldn’t reflect the reality of how it raced.
Radiator detail from an electronic device kept before being thrown away or recycled was fixed in place using epoxy…
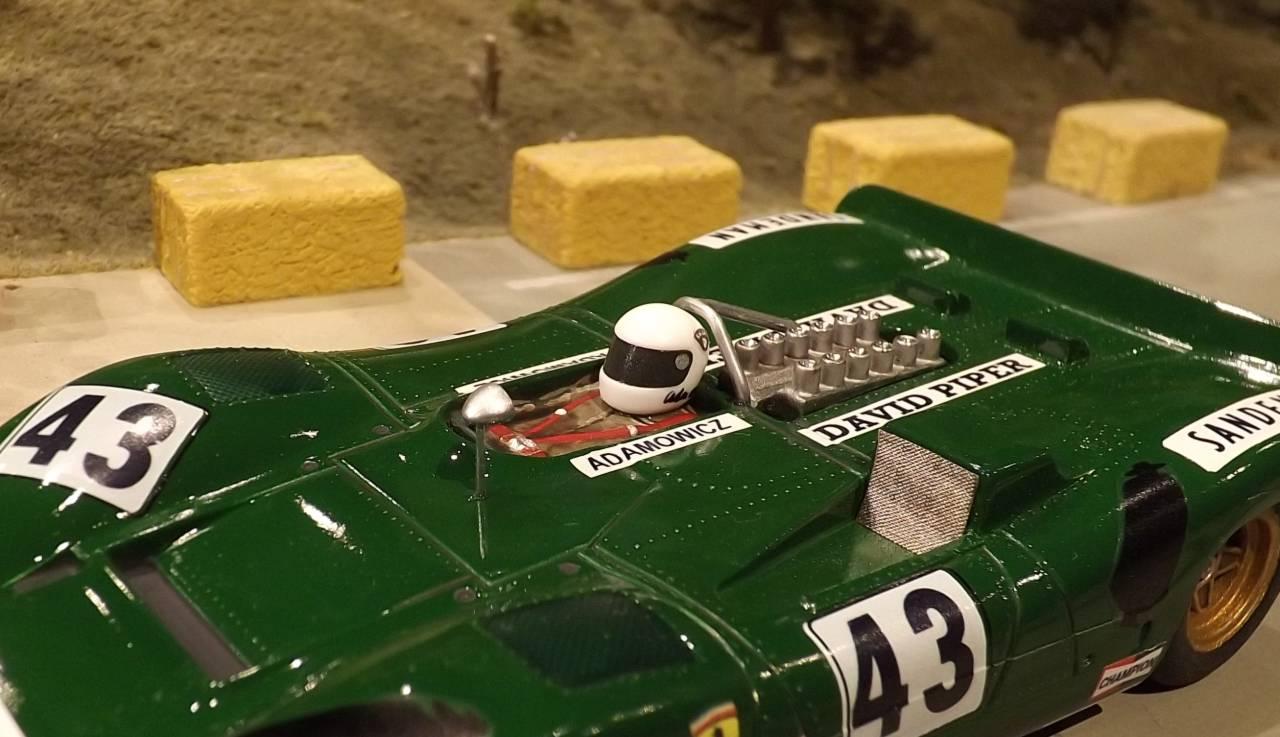 Tony Adamowicz was a famous Polish American race car driver who helped establish the PRDA – Polish Race Driver’s Association – and wore a white full face helmet (as soon as they became available) with only his name and the PRDA logo affixed. This model is a fantasy livery with Tony as the pilot.
 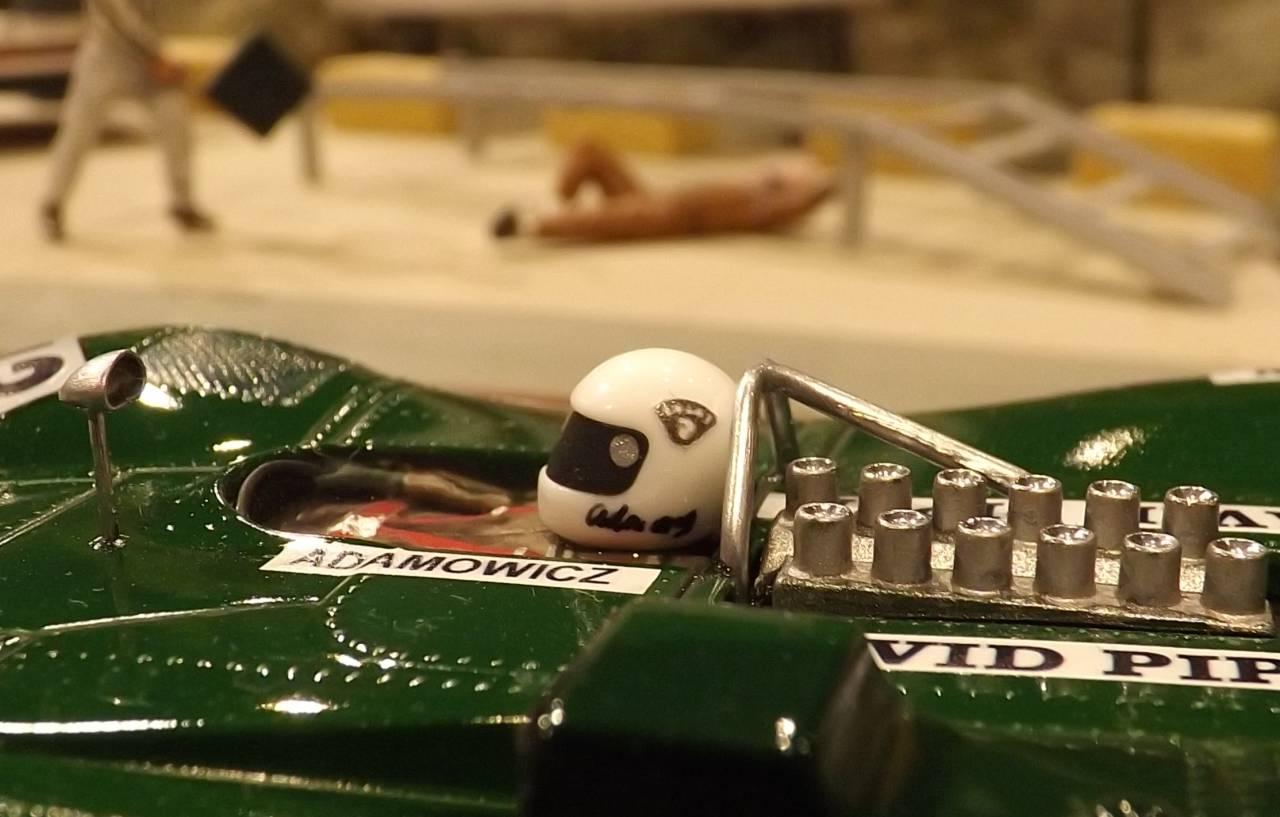 I didn’t have a PRDA logo printed so I used a Lotus black and white logo (upside down I think) to suggest the PRDA logo… it looks very close… for the mirror I cut off the plastic post, replaced it with a thin wire (drilled a hole into the base of the mirror to make it durable) and painted the whole bezel with Krylon Crystal Clear – then I hand painted the mirror portion a dark grey – and then dipped the whole mirror into Pledge acrylic floor polish to seal it… The same was done to the roll bar….
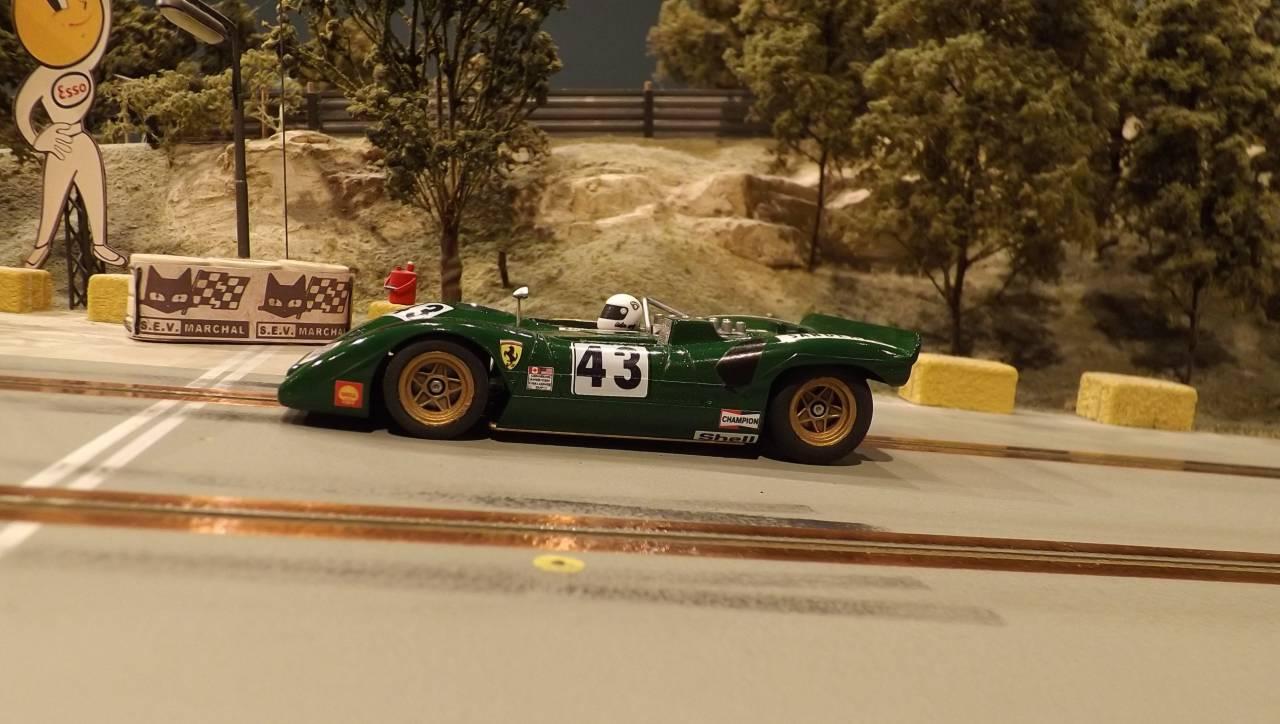
 Nothing was done with the front lower valence – it could be painted or removed but I didn’t… I added a Citadel Nuln Oil wash to several portions of the body to add realism…
  Body panel lines were also highlighted with the same wash…
  The same wash was also added to the pilots body – especially to his legs
 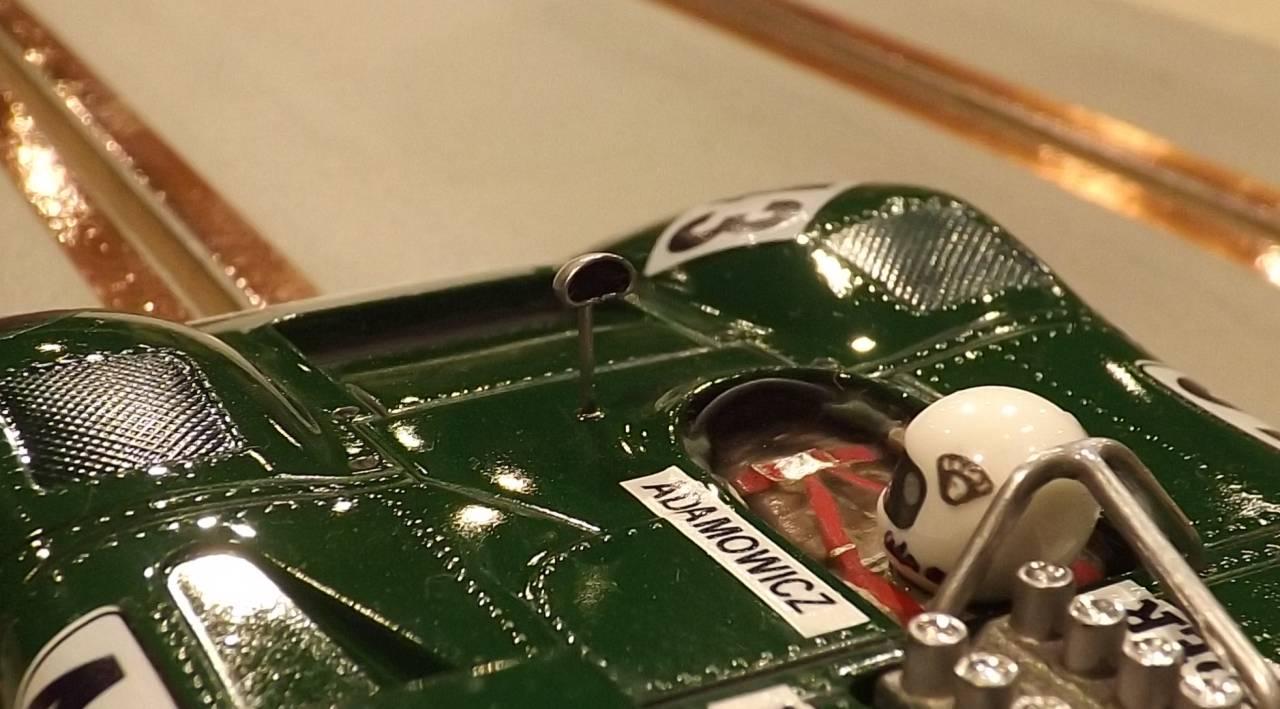 The tailpipes and transmission detail were painted – also with Tamiya acrylics – and weathered with more Citadel wash…
 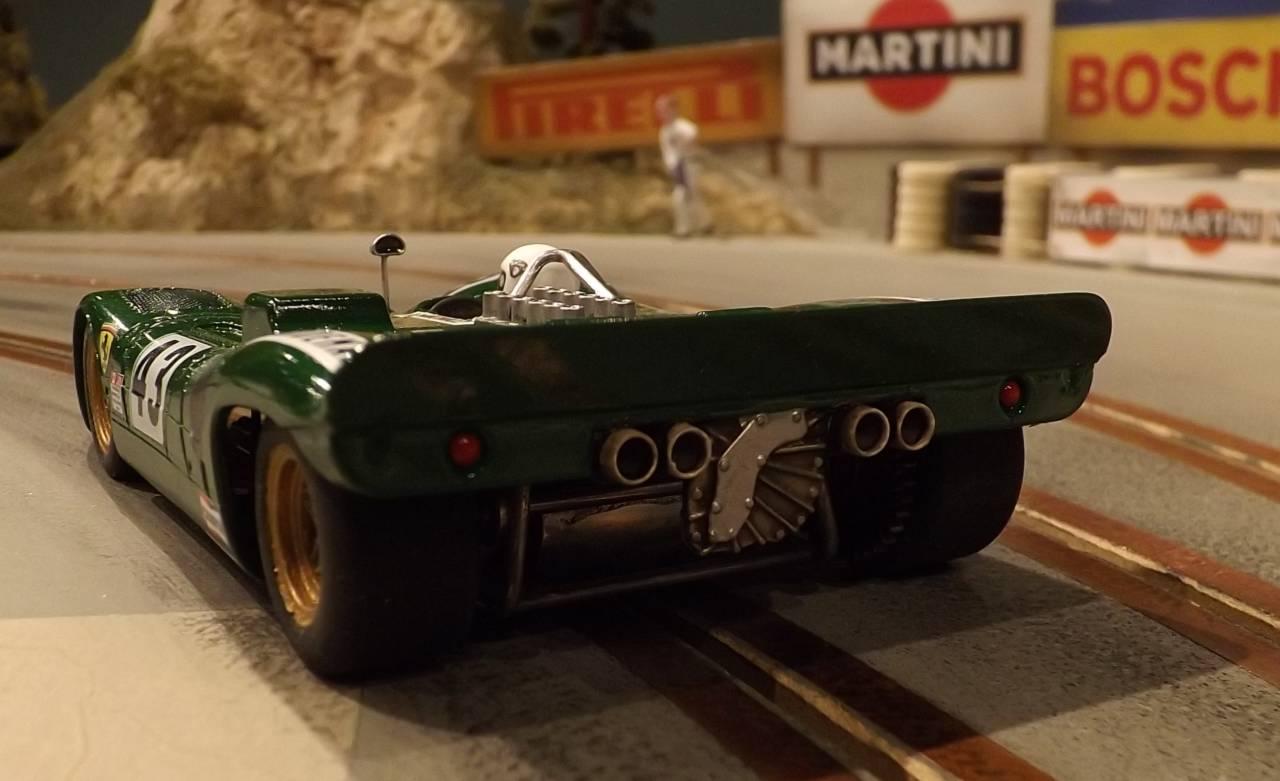 Tail lamps were done the same way.
All done.
The Happy Canadian Scale Modeler!
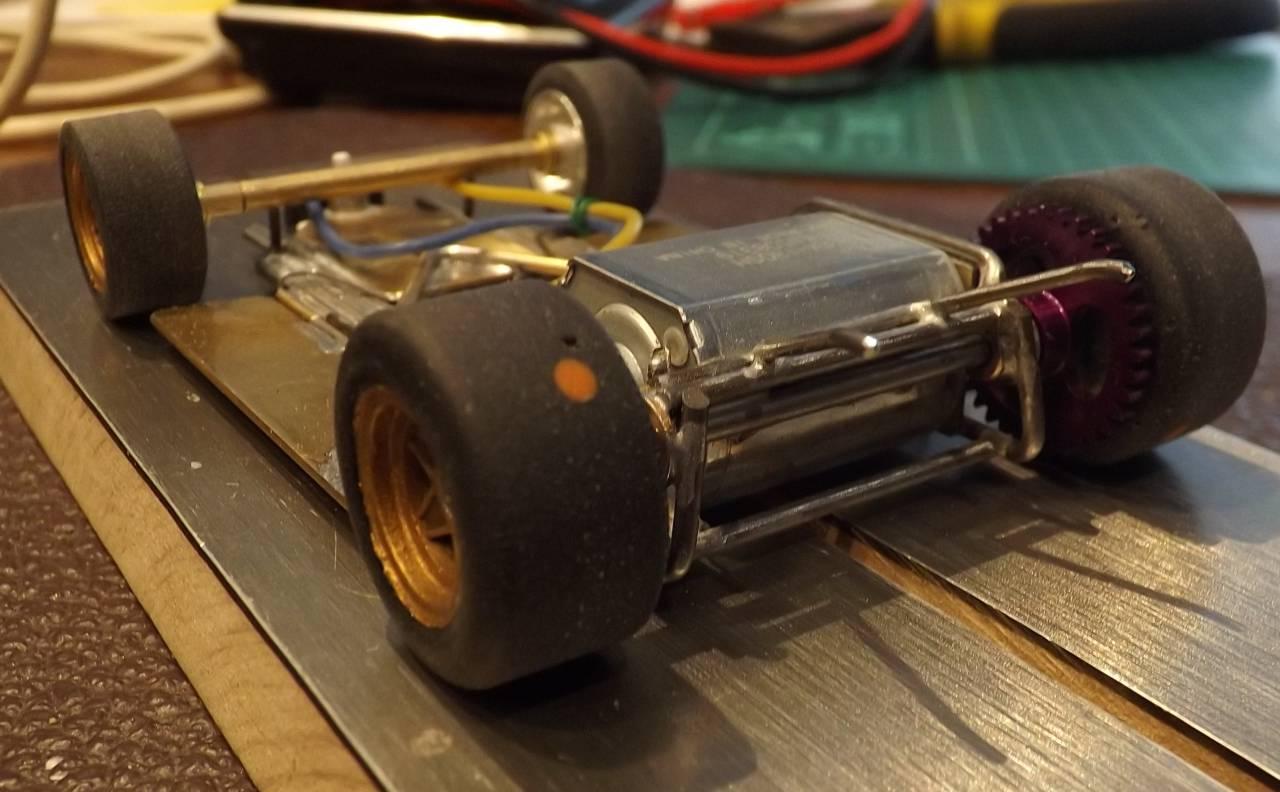
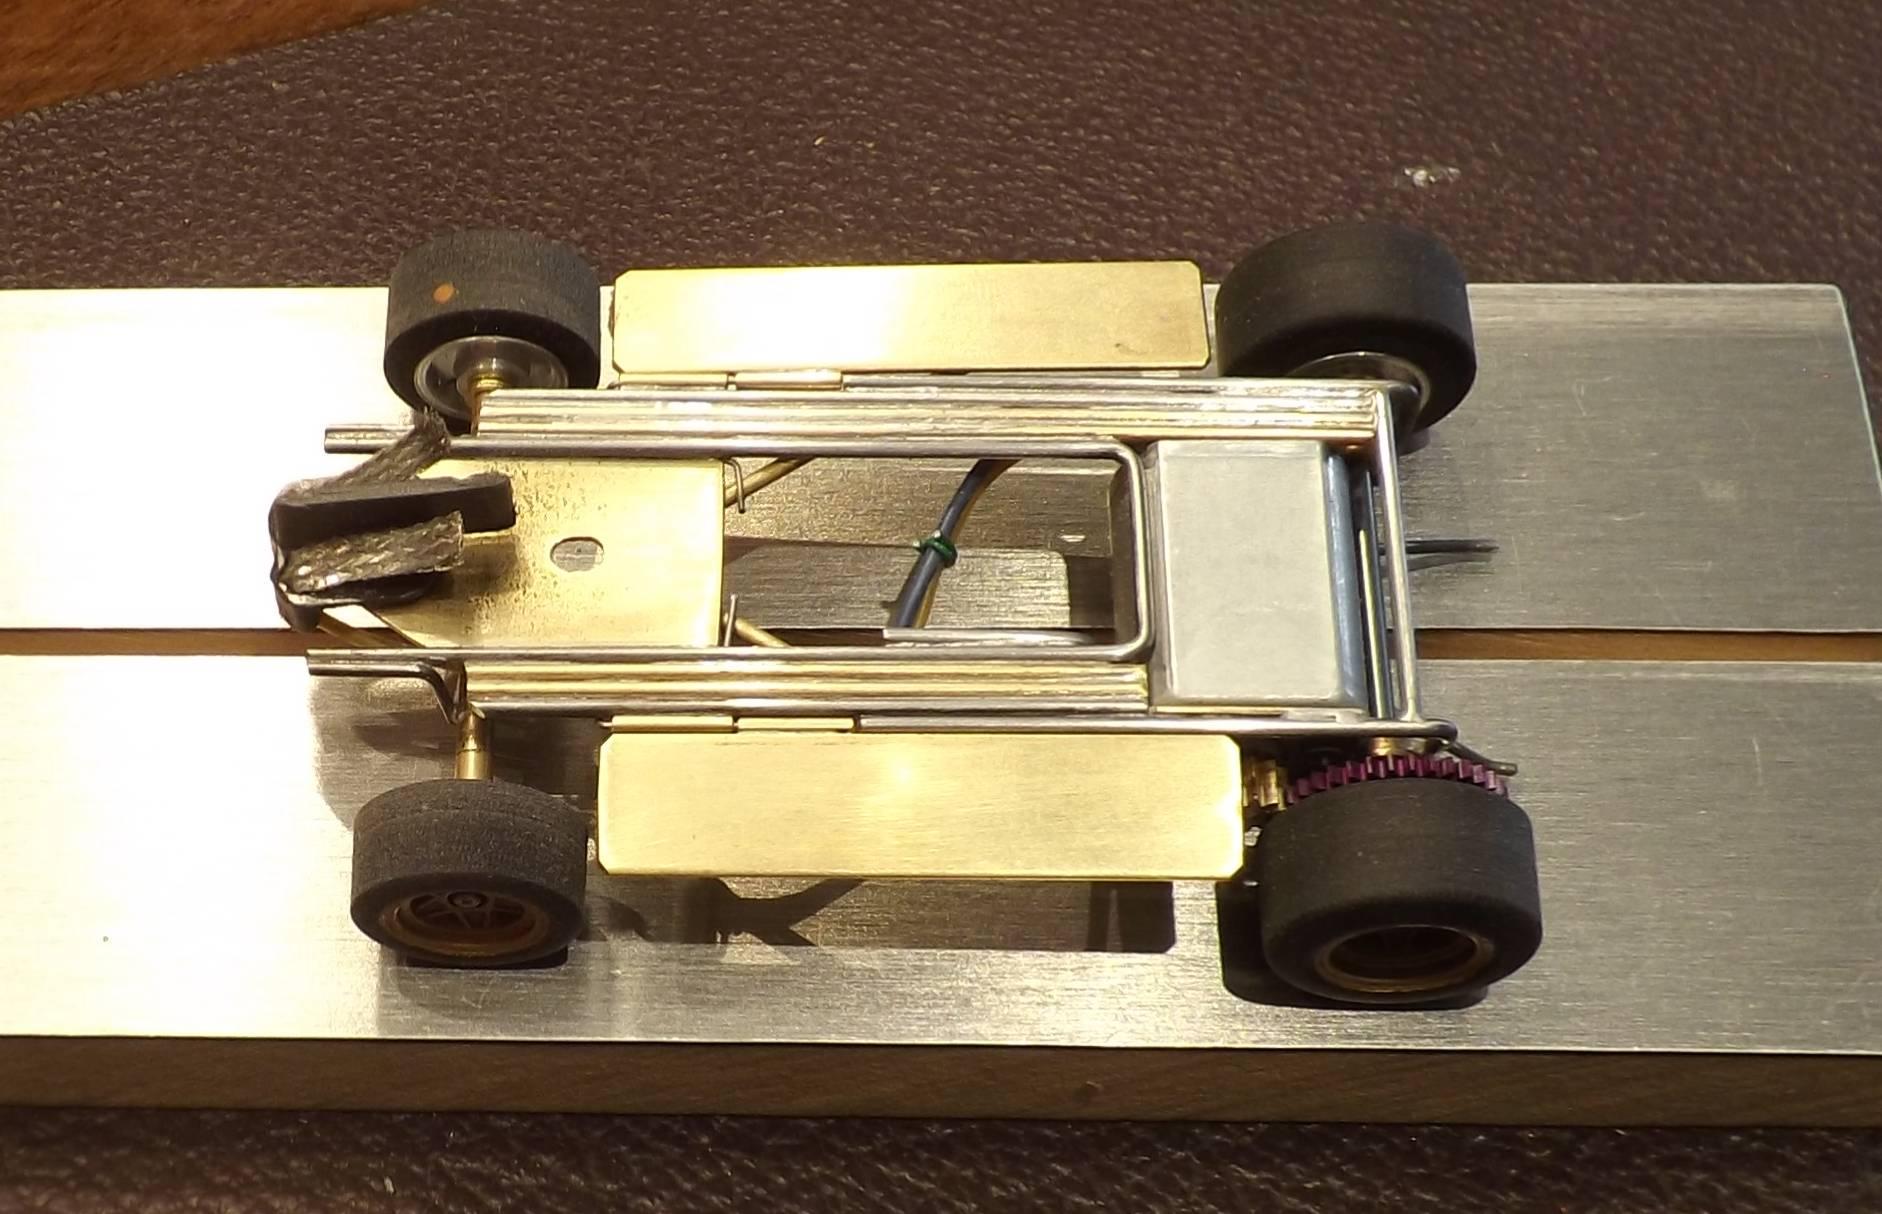
I decided to build the chassis next – then finish the detailing…
Here’s the sidewinder chassis using a Fox 10 motor:
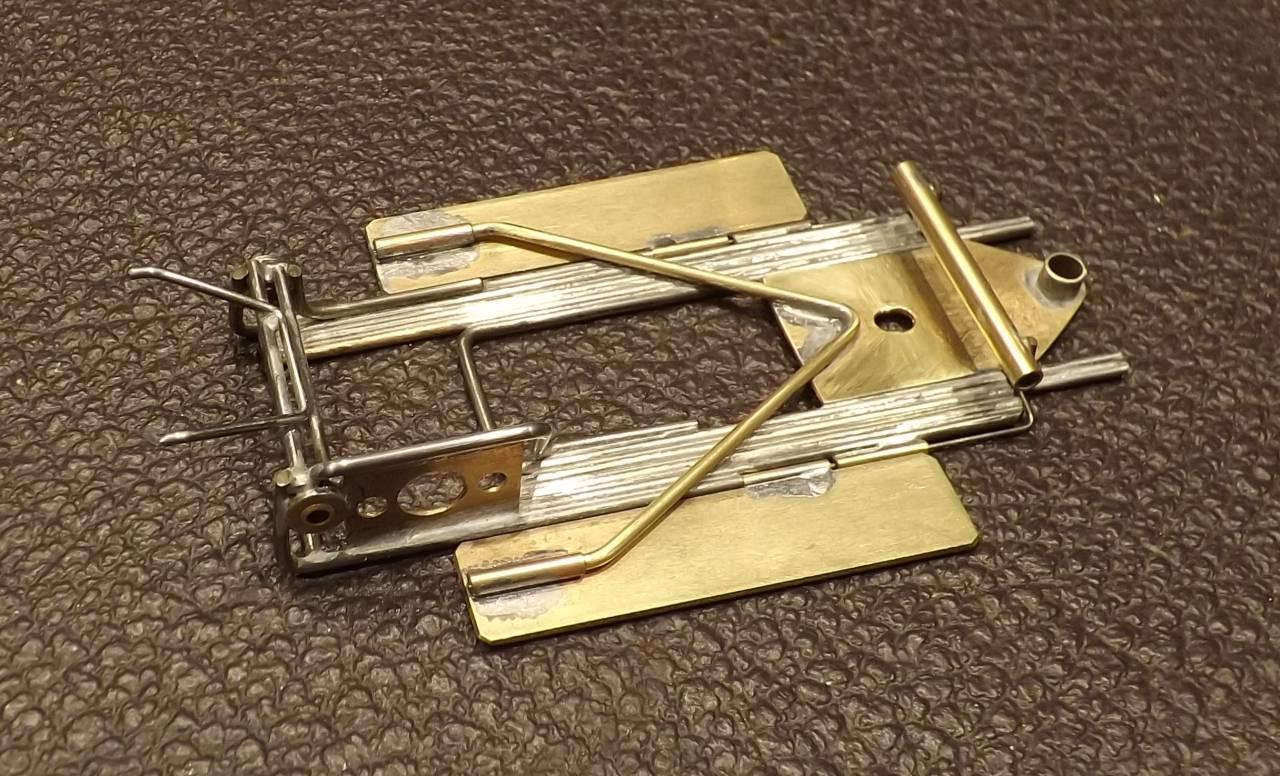
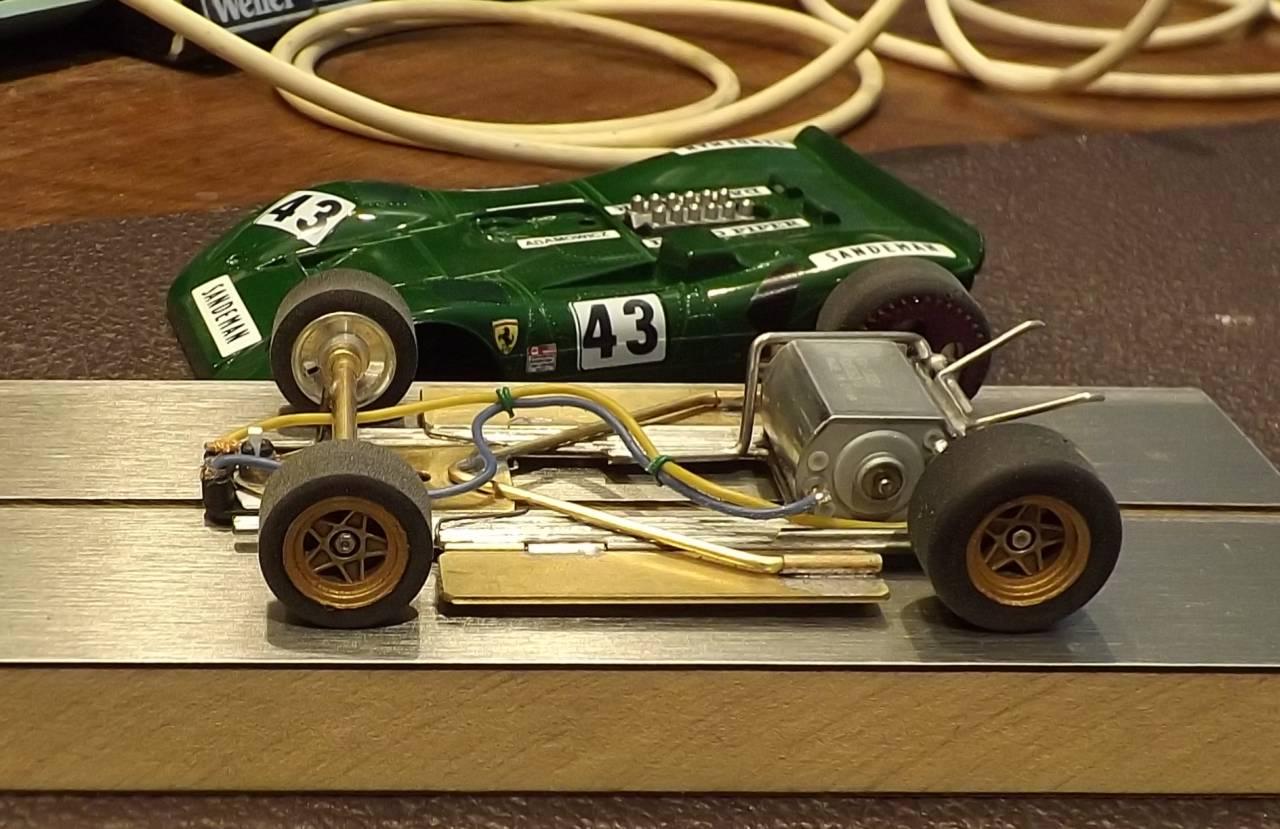

The Happy Canadian Scale Modeler!
February 17, 2019 at 1:34 am in reply to: Lotus 30 – DArt Body & Scratch Sidewinder Low Power Motor Chassis #10618Since I’m going to be taking the front end apart again I will also true the fronts down a bit and remove the spacer under the guide to lower the front of the chassis, plus since the front wheels will be a bit smaller lower the front of the body too… It is nice having those options when you originally build and err on the cautious side…

The Happy Canadian Scale Modeler!
February 16, 2019 at 7:40 am in reply to: Lotus 30 – DArt Body & Scratch Sidewinder Low Power Motor Chassis #10602Cheers Ken!
To my eye the Hawk body is a touch smaller and more shapely than the Strombecker which makes it a wonderful platform – but not without its challenges.
Following Up:
A little tweaking this week and the car became 2/10’s faster than on Monday. Then, as an experiment, I took away the negative camber and slight toe out (keeping the same stub axle setup) and re-tested the model. There was no change in overall performance or lap time. I suspect replacing the stubs with a solid axle would reduce friction if it stays this way, but…
I plan to go back to the negative camber since I like the look regardless of performance – but this time I’ll move the sleeves slightly further apart… stay tuned…
The Happy Canadian Scale Modeler!
February 14, 2019 at 11:14 am in reply to: Lotus 30 – DArt Body & Scratch Sidewinder Low Power Motor Chassis #10600Hand painted details
The rest of the parts were painted by brush using Tamiya acrylics and Citadel washes. Some were primed with white primer.
 The base of the tailpipes were given a blue wash using a diluted Tamiya metallic blue. The base of the intake was washed with undiluted Citadel paint, which sits nicely in all of the depressions to bring out the relief.
 The inside of each exhaust pipe was also given a liberal application of Citadel wash… then the Molotow chrome marker was used on the tips of the exhaust pipes and the intake stacks by dabbing it until an even ring of chrome paint was applied to each circle edge. After both parts dried overnight they were dipped in Pledge acrylic floor polish to seal the paint. Both were glued in place using 5 minute clear epoxy.
 The pair of tail lamps, mirror and windscreen were also dipped in Pledge floor polish. Before sealing the whole mirror casing I painted the round mirror dark grey. While the Pledge was drying I gave the seats a flat black wash, using Tamiya flat black acrylic diluted quite a bit with Tamiya Acrylic thinner. I added the shifter and linkage and secured the gauges – I cut off and used the tops of various gas caps. After painting the steering wheel, pilot and pilot’s head and test fitting them in the cockpit I glued the steering wheel into the pilot’s hands, shortened the steering wheel shaft and glued the pilot’s body to the seat with 5 minute clear epoxy. Next I cut off the mounting post for the pilot’s head and glued it in place.
 The swiss cross and two stripes on Siffert’s helmet are white decals – when I applied them they naturally curved and joined in the centre at the back of his helmet – and while not entirely accurate – I left it as is – since I thought it looked good – sometimes you are better just leaving things alone. Next in went the fire extinguisher (even if they didn’t carry one in 1964) and the roll bar. Then the tail lamps, windscreen and mirror – all with the same clear epoxy.
The gap between the windscreen & body was covered with two thin strips of nylon tent repair tape – I use a sharp box cutter blade with a hammer to slice the sections. I find the adhesive to be more than adequate to secure the tape permanently.

Here is the tape on the windscreen – it is navy blue and I left it that colour but it can be painted if necessary.

Turning back to the inserts – using the Molotow I painted the raised centre portion of each spoke and the knock offs. The centre of each wheel was given a gun metal wash, then the inserts were fixed in place using a little white glue. The knock offs were added and fixed in place with clear epoxy.

I mentioned earlier that I shortened and re positioned the lead wires.

The complete body now weighs 18.6g and the total weight is 76.8g.
 A note about the decals:
The J. Siffert decals at the rear are Pattos peel & stick, so is the Lotus emblem at the front. The rondel on the front is from Monogram (two were used, one on top of the other for opacity) and the #11 on the rondel was a “0” that I printed using my inkjet printer on clear decal paper (cutting off the top and bottom) and sealed with Krylon Crystal Clear. The Champion decal on the nose is also inkjet printed while the smaller STP, Firestone and Champion decals on the sides are from Monogram. The white #11 decals on each side were cut from Testor’s white decal paper.
Regarding performance:
To say I’m pleased would be an understatement. While the gearing leaves speed on the table the cornering is exceptional. This car will not de slot and even after one race and more than 200 laps I have yet to find the limits of this chassis. Who knows how much of a difference the front end makes, if any. It is smooth, shiny and quiet and now my favourite one – till the next one at least… :good:

The Happy Canadian Scale Modeler!
February 14, 2019 at 6:47 am in reply to: Lotus 30 – DArt Body & Scratch Sidewinder Low Power Motor Chassis #10599Back to the shell…
Since I was doing a period fantasy build and therefore could freelance a little I opted to use the taller stacks plus the tailpipes up through the bodywork. I cut out the openings for both – using a hand chuck and small drill bit.
 I also opted for the small hoop roll bar and drilled holes for it. I made a few channels underneath the holes to make sure the hoop stood as straight as possible…
The plan will be to glue all of these parts in place after paint, along with the rest – wrap around windscreen with mirror, interior details (including full pilot) and tail lights.
Paint
Now the body is ready for paint. I gave the body and parts a good scrub using a very diluted mixture of super clean and water. Then using my compressor I blew the body dry and let it sit for a bit. I would prime it first in white using Tamiya fine surface primer – after heating the can up in the sink with hot water… I sprayed a couple of light coats and then one final coat, checked for any blemishes and then hung the body to dry. I let the primer dry for 36 hours.
I would give this body a white stripe down the centre so I masked the stripe using Tamiya tape. I planned to use a white rondel for the number on the front but for the numbers on the rear quarter panels I would also make them white so I masked them too.
I decided at the last minute to paint this body black using Tamiya TS-14. Heating the can I gave the body a light coat to make sure there was no bleed under the tape – then a moderate coat and finally a pretty heavy coat – waiting about 10 minutes in between coats. I hung the body to dry for a few hours before removing the tape. Nothing had bled so I left it to dry for another 36 hours – hanging it above my workbench in the warmth of 4 four light bulbs the duration. [FYI: Had there been any bleeding at this stage I would have continued spraying it all black.]
Then I heated and sprayed a clear coat of Tamiya TS-13 – one moderate then one heavy and again, set it aside to dry among the bulbs. I took the lazy route and didn’t sand at all. Everything looked good.
The next morning I checked on the paint and there were a few runs in the black caused by the clear – likely because I hadn’t let the black cure fully. Not too big a deal since I could cover those small spots up with decals – but lesson learned.
While the body was drying I used Krylon Chrome to spray the tail pipes, intake stacks, inserts and separate knock offs. Since I was using the smaller wheels I needed to use the four spoke insert (375MCL4SPCA). I also cut off the knock offs from another set of inserts which I planned to glue into place at the end.
That would conclude the rattle can effort… next up – painting by numbers…
The Happy Canadian Scale Modeler!
February 14, 2019 at 5:51 am in reply to: Lotus 30 – DArt Body & Scratch Sidewinder Low Power Motor Chassis #10598Hi Joe, I tend to agree with you. Regardless, since I was planning on doing independent stub axles for the front I decided to try the negative camber as an experiment since at worst it couldn’t hurt and to my eye I think it looks really good. I hope to make several more models using this front wheel setup and time will tell. With where I find myself in the hobby doing these sorts of things helps keep me interested.
The numbers in brackets are the widths in between the wheels so I know how wide to set up bushings or sleeves – and they are on the conservative side.
Cheers!
The Happy Canadian Scale Modeler!
February 13, 2019 at 9:41 am in reply to: Lotus 30 – DArt Body & Scratch Sidewinder Low Power Motor Chassis #10596The Chassis (Part III)
I went with independent front stub axles up front and decided to throw in some negative camber as an experiment. I cut a pair of axles from 3/32″ piano wire (approx. 20mm in length) and soldered a No.2 steel washer on the end of each. I also cut 1/8″ brass tube in 15mm length to sleeve the stubs.
Setting the Jig:
I used two wheel blocks to set the angle of each sleeve, one larger, one smaller to give me the camber. I used the axle locating pins on the jig and slid a regular drill blank through both blocks untit the tips met at the centre above the chassis. The block which was butted up against the sleeve (on the outside where the wheel would rest) was the properly sized block for the wheels I selected. The larger block was placed against the outside of the pins and was set to give me the angle for the stub axle. There is no magic to the angle here – if it looked good then it was good. After eyeballing their alignment I soldered one “L” shaped piece of piano wire to support each sleeve. I then soldered another piece of piano wire to join the two sleeves – initially I did so across the top, making sure to leave enough clearance for the washer. [Later on I removed the top piece and used a “V” shape piece which was also soldered to the centre of the tongue to give the front axle a little more support.]
After soldering this you must make sure you have enough clearance to slide each stub axle into the appropriate sleeve from the inside out. I cleaned the front end again. Mounting the body is next.
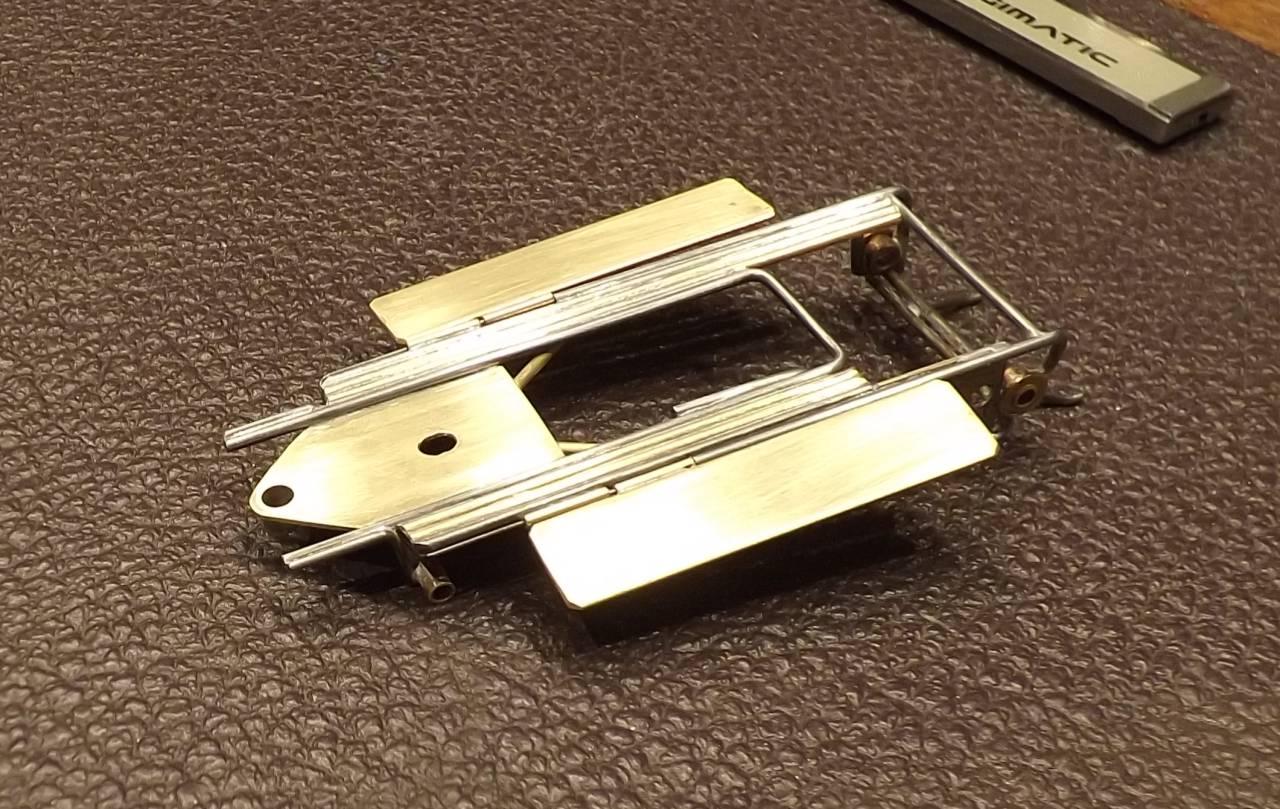
The Chassis (Part IV)
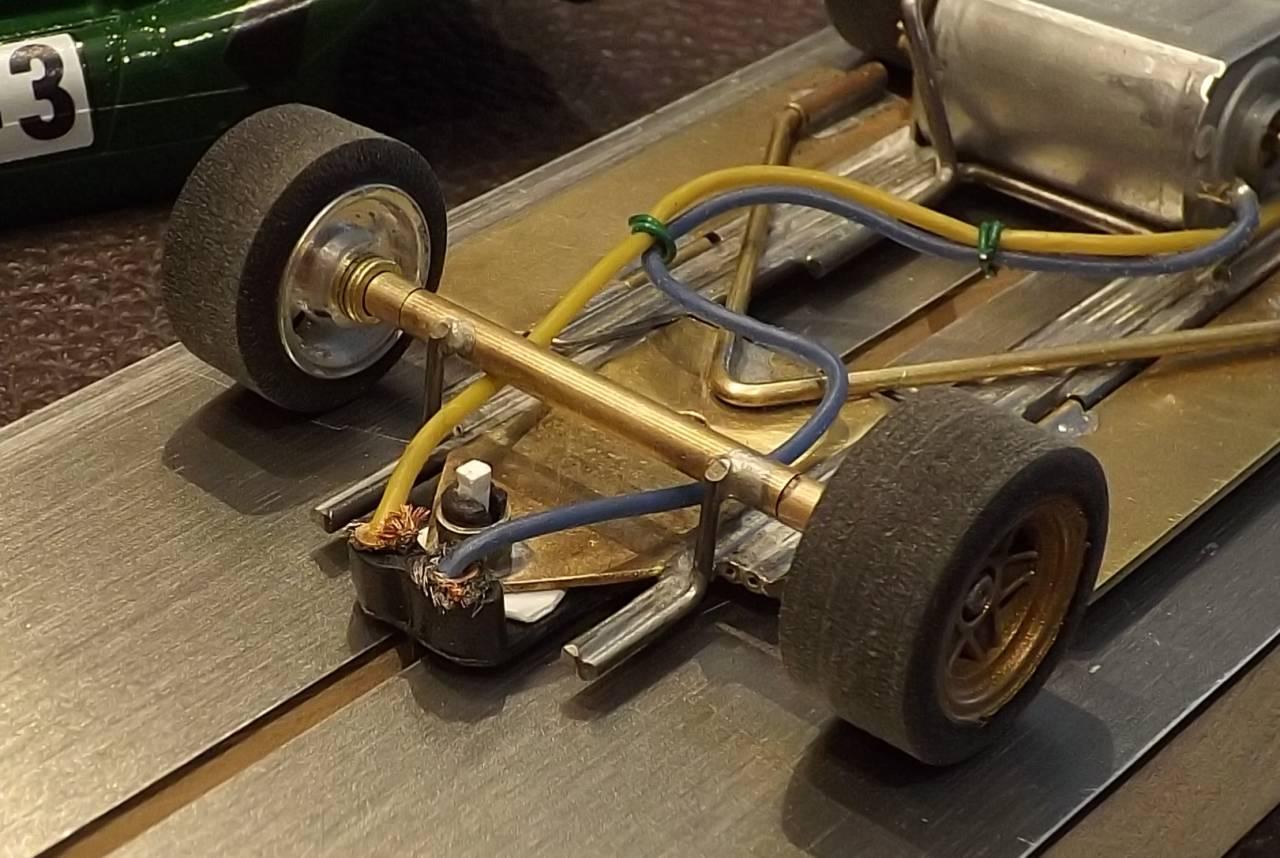
Placing the chassis against the body in its correct position I sorted out the best location for the brass rod to which a straight hinge (using 1/16″ brass tube) would be soldered to each side plate. The purpose of the hinge is to facilitate body float. I decided to run the rod along the outside edge of the plate and solder the hinges on the inside face. Later on the height of the front or back of the body could be adjusted by simply bending the brass rod.


Before tacking in the hinge I assembled everything to make sure the wheels would be exactly where I wanted them. Because the pins can be pulled out from inside the hinge I was able to remove the chassis from the side plates… each pin is bent into a “U” shape and secured around the foremost screw. Urethane washers above and below each pin help maintain the movement of the pins underneath each screw head. The back of the pins were cut flush with the rearmost edge of the hinge so that nothing stuck out.

I took everything apart, cleaned the portions of the chassis that were soldered plus the side pans and reassembled for testing.

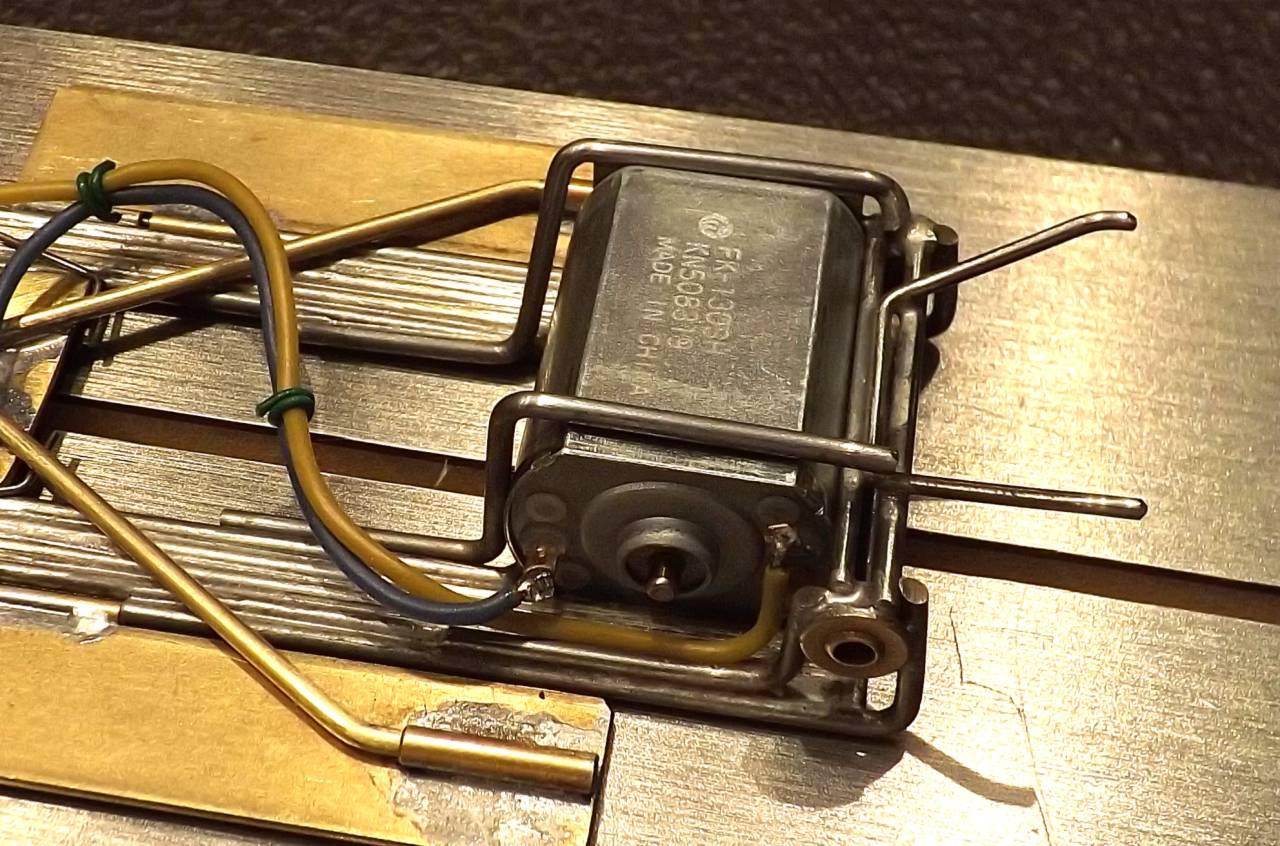
Wires were added. Here you can also see that I replaced the straight piece of piano wire holding the front sleeves with the “V” shaped wire secured to the centre of the chassis.
 The wire here was too long and ran over the can of the motor – and underneath one of the side plates – which I found out during its debut interfered with body float (and stance) – so it was both shortened and made to run up the bell end side of the motor directly to the motor tabs. (to be continued…)
The Happy Canadian Scale Modeler!
February 10, 2019 at 12:36 pm in reply to: Lotus 30 – DArt Body & Scratch Sidewinder Low Power Motor Chassis #10574The Chassis (Part II)
Since this is a ‘low power’ chassis it will be kept light. The finished and cleaned rear motor pod was yet again secured in the jig.
I fabricated the front tongue from .032″ brass plate and soldered a 4.5mm diameter brass tube into the hole, angled slightly back, to accommodate a salvaged guide from some RTR model. In the past I’ve sleeved two brass tubes and drilled them out to get a precise fit around the guide post but I’ve found that a little sideways guide movement doesn’t hurt as long as it doesn’t tilt in the post sleeve – to avoid this make sure there is no vertical guide movement… but that’s a subject for another topic/thread…
I set my jig’s guide post at the correct distance – double checking with the body – and place the guide plate (tongue) on the jig. So now I need to join the two parts. Later the front axle sleeves and body/plates will be soldered to the tongue. Since I wanted to do a torsion chassis whereby the front assembly rotates in relation to the rear assembly I would connect the two parts using just a single sleeved central backbone. I opted to use 3/32″ piano wire for this which is a little heavier but will minimize deflection. I used 1/8″ brass tube to sleeve the back portion. Since I wanted everything to lie flat on the block – because the 1/8″ brass tube is not as thick as the tongue – I filed down the underside of the piano wire which would be soldered to the tongue. When I was satisfied with the height of the wire/sleeve (that they were parallel with the block) I tacked it into place on the tongue and then bent and soldered the two “L” shaped wires to secure the sleeve to the rear end. After securing the sleeve I went back and finished soldering the front of the wire to the rest of the tongue.
 I opted to use .032″ wire to join the two halves of the chassis and to dampen the rotation of the two parts – which at the rear would be soldered to the sides of the motor pod and at the front inserted into a pair of 1/16″ brass tubes soldered to the sides of the tongue. I opted to bend the wire to account for the narrower tongue. Whether or not you bend the wires you MUST ensure that they are parallel with the base of the chassis to ensure the geometry of the front and rear halves is flat at rest (without any load). If you pick up the chassis and the front half twists slightly that is no good. When both halves of this chassis are finished & cleaned I’ll solder the wires into the 1/16″ brass tubes to make it one. But before I do that I have two more things to solder to the tongue…
The Happy Canadian Scale Modeler!
February 9, 2019 at 10:11 am in reply to: Lotus 30 – DArt Body & Scratch Sidewinder Low Power Motor Chassis #10571Cheers!
The Chassis (Part I)
Since this will be a sidewinder and the motor bracket will be the most important part of the chassis to get right that’s where I start. I don’t worry about the rest of the chassis yet. One thing at a time.
I scavenged a press on nylon 15T pinion (that has what looks to be a close enough pitch) from something I threw out years ago – now it comes in handy – so that was carefully glued and pressed onto the can side shaft leaving a slight amount of clearance. Since this is a low power motor I applied a tiny amount of Gorilla Super Glue to the tip of the motor shaft before quickly pushing the gear on – which should work fine in this application if done carefully. Since space is tight underneath the body and the spur gear would need to be right up against the motor I placed the pinion very close to the motor bushing leaving sufficient clearance to account for the thickness of the motor bracket (.032″). This was set aside to dry completely before I trimmed the excess boss from the outboard side of the pinion using a fine file while the motor was powered. This was done because I knew I needed enough clearance for the rear tire. [Cutting the shaft shorter was another option but I wanted to keep as much surface area for the inner race of the pinion since it would just be pressure fit/glued in place – had this been a brass/steel pinion soldered in place I would have cut the motor shaft.]

I then secure a dummy identical BWNC1 motor to a bracket which I made earlier. Using two ‘U’ shaped wires (.062″) I lock the bottom of the motor in place making sure the wire is very snug against the motor endbell. This will create a ‘snap fit’.
After this motor bracket is finished I need to align the drive side bushing. I remove the dummy, clean the bracket and then secure the motor with pinion to sort out the mesh. A Parma square oilite bushing will be mounted nearly flush with the bracket but only after I grind away most of one side of the bushing for proper mesh. Using the jig, rear axle pin and spur gear I check the size of the gap needed between the axle and the motor bracket and try different wire shims until I am happy with the spacing/mesh. With the bushing and wire shim cut/trimmed I remove the motor and gear and place the motor bracket back in the jig and solder the all three parts together making sure the motor is parallel with the rear axle pin and nearly flush with the face of the bracket.

Now I figure out how far outbound I can mount the opposite bushing. Since clearance with the motor isn’t an issue this bushing doesn’t need grinding. By my calculations 35mm across at the rear minus 4mm for the spur gear minus 1mm for washers/spacers leaves me approximately 30mm across – but I will be cautious and give myself even more wiggle space. Using more wire wrapped around the bracket I solder in the second bushing:
 Then I secure both bushings to the rear of the bracket with more wire. I use two separate pieces of wire, one for each bushing:
Finally I add another wire at the top in between the bushings to prevent any deflection. The bracket itself is done and cleaned.
Jig Setup
Time to start on the chassis. My finished wheels measure 20.5mm x 7.5mm (they are actually a touch (or hair) more than 20.5mm which gives me some wiggle room). The other basic dimensions for my chassis – I measure the body leaving a few mm’s clearance for the width of rolling assemblies (err on the narrower since it is easier adding spacers). We already used the rear rolling assembly measurements when making the bracket… My form is handy for this.
For this Lotus 30 body my basic chassis dimensions were measured to be:
- Front Axle Total Width: 48mm (33mm);
- Rear Axle Total Width: 50mm (35mm);
- Wheelbase: 73mm;
- Distance of Guide to Rear Axle: 85mm;
Now I set up my jig according to the above. As for chassis clearance I am aiming for a hair more than 2mm since this will accommodate the guide and give me good overall performance so I select the front and rear wheel blocks accordingly. After I set up the jig I always fit the body over everything to double check the position of the guide and axles. If it looks good then we are ready to measure, bend and solder the rest of the chassis together (Part II).
The Happy Canadian Scale Modeler!
February 8, 2019 at 7:04 am in reply to: Lotus 30 – DArt Body & Scratch Sidewinder Low Power Motor Chassis #10562Continuing along…
One preliminary recommendation – if you need to rush this or any build then you shouldn’t start it. Race deadlines are great incentives but there’s no prize money – so take your time, measure twice & cut once, eyeball, clean, test fit and double check everything before gluing or soldering. I wouldn’t start this project less than 5 days away from a deadline unless you are prepared to pull an all nighter or two.
Wheels & Tires
After gathering all of the remaining bits & pieces I’ll need for the build my first step is ALWAYS to mount the tires to the wheels. I chose the smallest and narrowest 13″ BWA wheels and selected four DA2011 tires which look great with them. To help seat the tire for best fit I removed material from the inside of both wheel flanges using my Hudy and a Dremel cutting disc. After gluing the tires on I set them aside overnight to dry before truing.
[You can proceed to The Body (below) while the glue dries…]
I trued all four tires to the same diameter – a hair over 20.5mm – and then placed them inside the wheel wells to see if they looked proper. In some cases it may be helpful to use a couple of axles and mount the wheels then drop the body on top to get a feel for what you are up against. Again, don’t rush this step, especially since this body has deep and narrow wheel wells… Given that this is a low power motor build the overall diameter of the tire is important since ratios are limited. Satisfied with the diameters I finished each tire (profiling it) on the Hudy and set all four wheels aside.
The Body
I cleaned up the lightweight body, opened the front vents, and cut the fore and aft body post locating stumps then ground them down. Since the plastic is very easy to work with a dremel cutting disc applied at low speed (use the side of the disc to grind the rest away) cleans away the unneeded stubs nicely. Be careful if you are using side cutters to cut the body post locating stumps – they will pull the stump as they cut into the post and possibly deform or tear the plastic base. If the locating stumps don’t interfere with your chassis then you can just leave them be.
I would use two brass side plates to help mount the body – so the kit’s #226 styrene tubing was sliced into 4 pieces and the base of each piece was cut at an angle for maximum contact with the body and to ensure the post would remain perpendicular relative to the chassis. If it remains in the position you want without glue then it will with glue. Again, no surprises next morning. For the front two posts I used an X-acto knife to cut away a small section from the edge of both front tubes to lower them beyond the bottom edge of the dashboard. If you have one of these kits you will know what I mean…
I used the Clear Gorrilla Glue (see workbench essentials thread) which I applied to each stump to secure all four posts. This should be quite strong and is lighter than epoxy – but if you are in a hurry and can’t wait overnight for it to dry then use a quick cure epoxy instead. As I slid each tube down over the stump there was enough glue on the post to leave a filet around the base of the post/body which is what I wanted. After positioning each tube (by eye) straight up (since everything is upside down) I left it alone (again, flat and upside down using some silicone spacers) overnight to dry.
 After the posts were dry I cut .024″ brass plate strips for each side. I planned to solder a hinge to each of these plates once the rolling chassis was complete. The hinge would allow some body float and since I wasn’t too concerned about lowering the body’s CoG (by using heavier side plates) these lightweight plates could be snug up under the seats to give flexibility with the chassis design.
 I used the side of the cutting disc to trim the tops of each body post so that they were flush with the bottom of the seats. After installing the brass inserts (just pushed them in – no glue) I fitted the plates. I wanted to remove material from the plates that might interfere with the motor/chassis so I marked and removed the plates to do so, then gave them a final sand and re-installed.
The Chassis (next post)…
The Happy Canadian Scale Modeler!
Not having used them myself perhaps if you try clear coating them with a few coats of Crystal Clear that may hold them together a little better…
The Happy Canadian Scale Modeler!
We found a mirror from Felix’s 312PB & a 2-56 stainless steel countersunk screw from who knows? Those items will sit in the ditch with other bits & pieces near the Esso billboard until claimed…
The Happy Canadian Scale Modeler!
I will mark that date on our group calendar…
DB – I took a quick look around for that windscreen but it did not turn up. I’ll go over the track this weekend to see if I can find it. It is a fairly big piece. Ken is picking up his Lotus 30 body kit today so I’ll enlist his eyes too….
The Happy Canadian Scale Modeler!
-
AuthorReplies