
Forum Replies Created
-
AuthorReplies
-
Yup. The devil is in the detail.
Over the Christmas break I finished a 1963 Honda T360 track maintenance pick up truck and used flat black to paint my inserts. I added another coat of Citadel ‘Nun Oil’ (a black wash) to make the basic spoke detail on the insert pop in certain light before adding other colours for the lug nuts. So basically I painted black on black. Was it worth doing? It definitely was.
The Happy Canadian Scale Modeler!
I know it will turn out fantastic… :good:
The Happy Canadian Scale Modeler!
😥 It is sad to see such a nice little model go under the knife…
The Happy Canadian Scale Modeler!
Thanks Joe! I ordered from the website (see link above) before and paid with paypal and don’t remember any issues like you describe but it was a while ago… Are you sure it was the same website?
The Happy Canadian Scale Modeler!
If I do I will let you know Ken. :mail:
The Happy Canadian Scale Modeler!
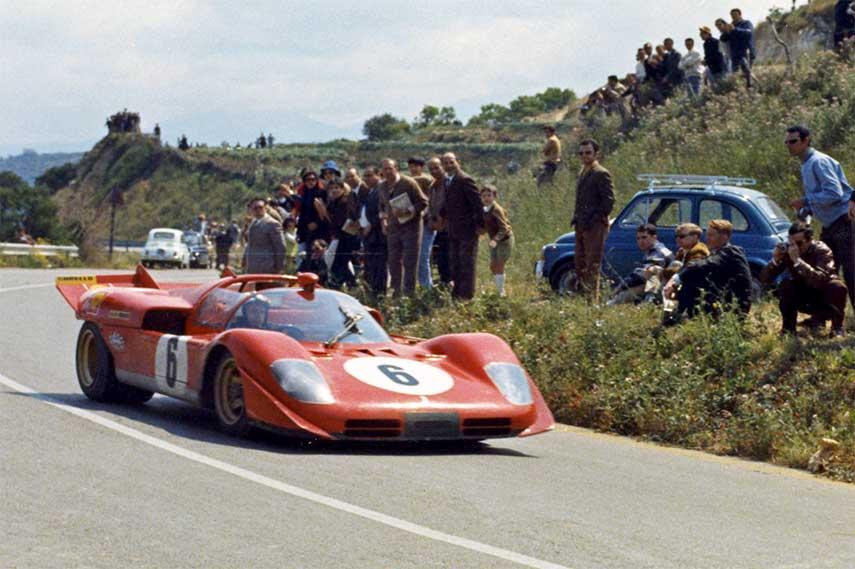
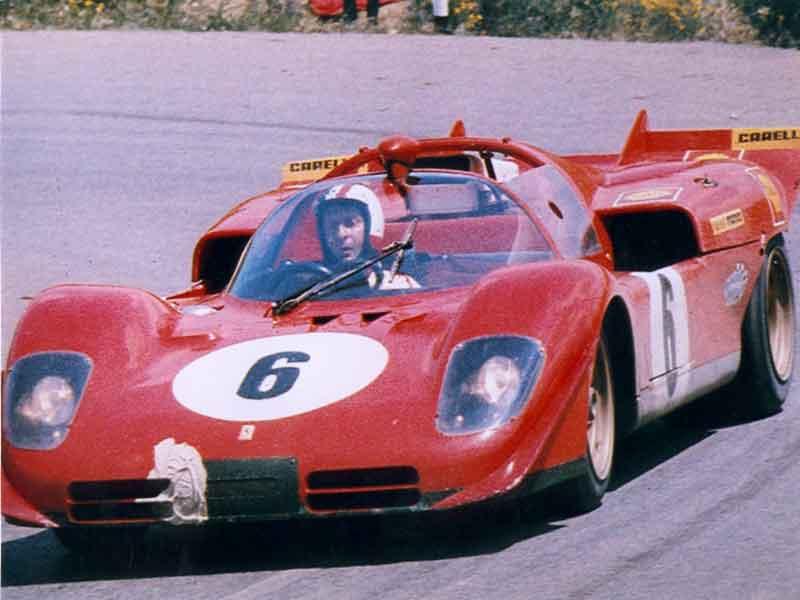
Great choice! A traditional livery too – as it raced here in 1970 – with Nino at the wheel!!!
The Happy Canadian Scale Modeler!
Looking forward to seeing it soon! :good:
The Happy Canadian Scale Modeler!
Hi Ken, having seen it in person it looks great and handles very well already. As it is that car is already podium bound. I wouldn’t say that my red Dodge passes it without any trouble though. I suppose the real test will be tomorrow night regardless… BTW, outbound weight wouldn’t be a bad thing.
The Happy Canadian Scale Modeler!
December 8, 2018 at 2:52 pm in reply to: 1934 Aston Martin Ulster kit for the Pre-War GP series in S32 #9690Looking forward to any update Felix. :scratch:
The Happy Canadian Scale Modeler!
December 2, 2018 at 10:22 am in reply to: 1934 Aston Martin Ulster kit for the Pre-War GP series in S32 #9620What’s progress like on your Ulster Felix?
The Happy Canadian Scale Modeler!
Any progress on the T59 DB?
The Happy Canadian Scale Modeler!
Nice build Ken. :good: I like the look of that black hood!
The Happy Canadian Scale Modeler!
Looks very nice Ken! :good:
The Happy Canadian Scale Modeler!
Looking good Ken!
The Happy Canadian Scale Modeler!
Looks great! Too bad no black hood!
The Happy Canadian Scale Modeler!
Looks great Ken – well done! I love the colour and numbering!
I take pictures from the front, back, and sides of every model eligible – pretty much at track height – so those sorts of things will become very obvious.
Applying a generic chassis to every sort of model is very hard to do.
The Happy Canadian Scale Modeler!
Looks great!
The Happy Canadian Scale Modeler!
I’m really looking forward to seeing this one go Ken! What does it weigh right now? :yahoo:
The Happy Canadian Scale Modeler!
Looks very nice DB! :good:
The Happy Canadian Scale Modeler!
Too bad you missed the last Meisterschaft or Carrera Panamericana JMSracer… that motor isn’t too much depending on how it is geared…
The Happy Canadian Scale Modeler!
That’s quite a jump in motor! Excellent!!! Moving from school boy shorts in SP to big boy pants in SP+… I can’t wait to see how this one goes! :good:

The Happy Canadian Scale Modeler!
November 9, 2018 at 9:33 am in reply to: Vanski – Death Row – May, 2019 Execution – Sportscars Only #9329This decision was made by me after many years of feedback and consideration. When we discussed our hot rod class many years ago this was already an issue. We agreed back then to limit the motor for hot rods to one which was available – as we did more recently with our PGP class.
I’ve gone through complete bans like was done with Ortmanns. I’ve gone through the inclusion of better motors which rendered existing motors obsolete, such as the NC1. In both of those transitions those with a ‘stash’ were basically screwed. This is not the case here – since the Vanski is still the best slim can (FF050) motor allowed in the sportscar class and therefore the opportunity and incentive to use them in that class remains very high. So I see no reason for anyone who has a stash of Vanski motors to complain.
As for grandfathering – consider the implementation deadline I suggested in my topic header – May, 2019 as the cut off… call it grandfathered or a deadline – I don’t see the difference since it is far enough away.
This is one of those few topics where a majority or consensus approach will never work – it needed to be done and we’ve delayed that decision long enough. Other groups will still permit the use of that motor in their Grand Prix cars so there are plenty of other opportunities out there. Other groups have searched for a replacement Vanski already – which has only led to chaos.
Newer builders and racers have enough challenges to deal with already. They don’t need the disadvantage of a slower motor nor be at the mercy of others for handouts. The frustration they feel far outweighs the slight inconvenience of swapping a Vanski with a BWMS050 motor for the rest of us.
Over the past year I’ve given away brand new & UNTESTED Vanski motors as door prizes and I’ve sold brand new & UNTESTED Vanski motors to anyone who wanted them – I even sold some at the last Group25 show. To the best of my knowledge no one else has offered up any of their Vanski motors either for free or for sale…
To date no one has offered a satisfactory alternative nor long term solution better than what we are finally doing…. so be it – whether any of us like it or not.
The Happy Canadian Scale Modeler!
Looks really good Ken. There are a few tricks you can use to paint those details after the rest of the model is painted – without masking anything. Before you joined our group we had a workshop on doing them. It is much easier to demonstrate but regardless we’ll go over some of them together when I see you later tonight… you did a fine job!
Remind me to give you a pair of Ferrari logo decals (from Pattos)…
Are you planning to change those wheel inserts to a 5 spoke (in black still)?
The Happy Canadian Scale Modeler!
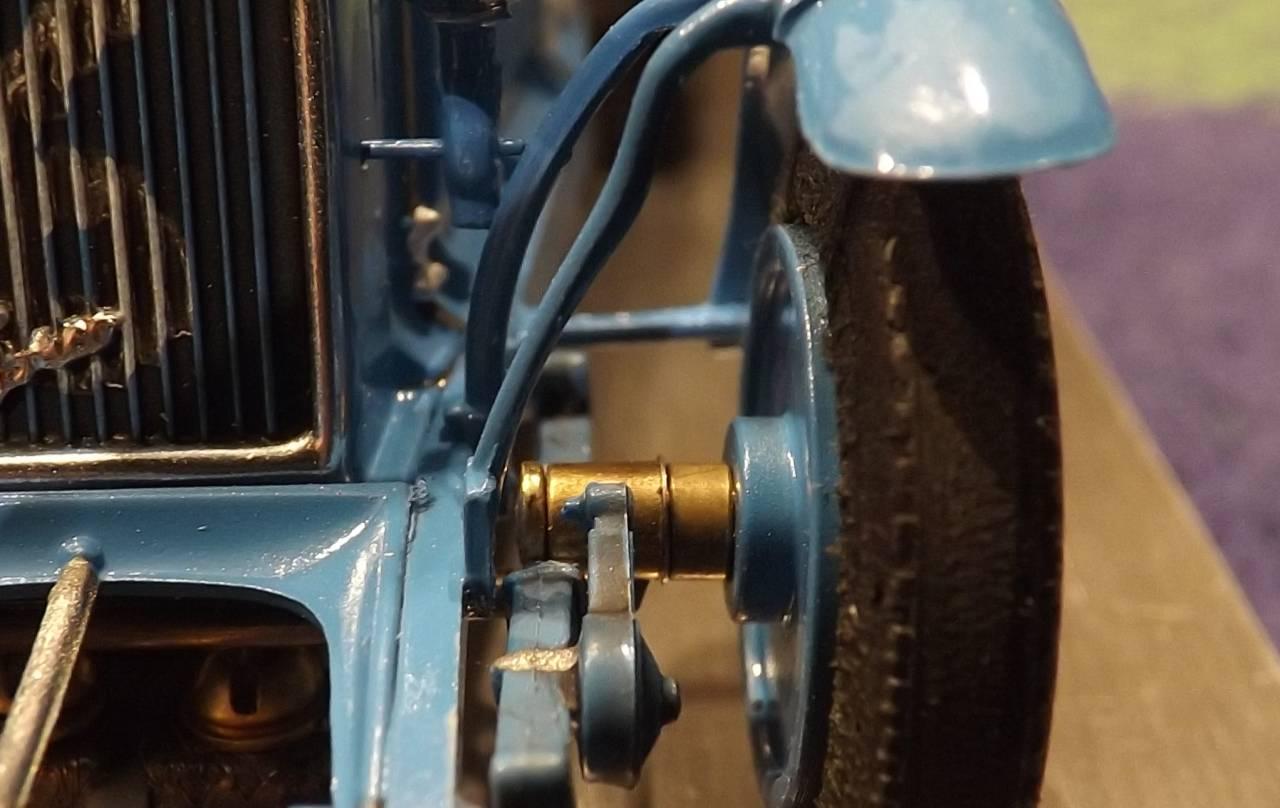
Those suspension pieces are nice details and I’m thinking of how to replace the ‘pins’ with either short 3/32″ axle stubs or full axles drilled through… either way they appear to be very formidable pieces! But first I need to finish the tractor….
Late last night I had a chance to take a closer look at a vintage Ford 600? 1:32 tractor/trailer kit… a north American style Ferrari team transporter to be precise – which might be something to seriously consider building for this genre… it isn’t for all – but boy do they all look great!
The Happy Canadian Scale Modeler!
Returning to the build thread…
The outside tires on the duel configurations were trued slightly smaller to allow easier turning…
…and since you can’t buy axles this wide I used 3/32 piano wire… :good:
The Happy Canadian Scale Modeler!
Bing Bing Bing Bing!!!! Jackpot!!!! Excellent! That tanker is awesome! I’m already on it! How to get it to go around the corners and under the gantry/bridges – perhaps either cut into an articulated trailer or just chopped into a short one… hmmm… since it is supposed to be flammable filled with lighter fluid… to clean the tape… hmmmm…. that would definitely complete the 18 wheels!
You’ve been way too generous so far Ken – I’d be happier sorting out something like a suitable trade or the like…. we’ll discuss when I see you next – Thank you for picking it up! :yahoo:
The Happy Canadian Scale Modeler!
Looking good Ken!
The Happy Canadian Scale Modeler!
Good to know – thanks!
The Happy Canadian Scale Modeler!
Good Work Ken!
Let us know what driver they require… and are they black oxide, stainless or steel? I’ve never stripped a 2-56 set screw and because of their slightly larger size they are vastly superior to the usual slot.it M2 set screws.
You can fix/correct M2 ‘botch’ jobs that are stripped by re-tapping them to 2-56… no need to re-drill them provided the wheels are made from a good quality aluminium. 2-56 tap are easy to find – every scratch builder should have a tap for each size of set screw they use regularly too.
Now that I build more scratch models than plastic RTR models I’ve come to realize that I would rather drill and tap the wheels I buy for the set screws that I prefer (and also provide myself). 😉
The Happy Canadian Scale Modeler!
It only allows images in any common format – regular files are not supported. If you convert your file to an image then you can upload it.
The Happy Canadian Scale Modeler!
Thank you for the kind words!
The stub axles were cut from a leftover axle that was bent and instead of using a dubro #2 washer which would be too large in diameter I soldered a slice of brass tube (I believe it is the 1/8″ brass tube – the same stock that I used to sleeve the pin) to the end of each one and then filed each one smooth to make them run as well as I could. Using the jig & wheel blocks I soldered a bent .055″ wire to both the chassis and the brass sleeves to secure the front wheels/pins.
For low power cars I tried using sliced styrene tubing to mount bodies before and had good results – Using a slightly oversized tube you get perfect body movement – but you need to plan your basic chassis to accommodate the position of the tubing. Sometimes it just isn’t possible to do. In this case it was clear that three points would work just fine with the body/interior as it was – two along the rails and then one large one at the rear. Rear sideways play was controlled using shims or by removing material from either the body frame or the tube itself. If you use some plastic weld or crazy glue followed with clear epoxy the tubes become one with the body. The snap fit doesn’t need to be that tight – just enough to keep the body on the chassis when it is picked up or handled. The tricky part is fitting the pieces – but if your chassis is complete and you snap on your tubing to the rails and rear end of the chassis and then position it where you need it to be under the body so that everything lines up it is much easier. You may need to add shims underneath the tubes to make sure that the height of the model is correct and clearances are maintained. It is imperative that there be no rub with any moving parts whatsoever and to ensure this the chassis and unpainted body must be thoroughly tested on track. After paint if anyone needs to resort to a file or worse yet the dremel then shortcuts are usually to blame.
A future workshop might be a good forum for body mounting techniques. Perhaps something after the snow falls.
Cheers!!!
The Happy Canadian Scale Modeler!
As always – feel free to share this thread with anyone who enjoys our hobby!!! :yahoo:
The Happy Canadian Scale Modeler!
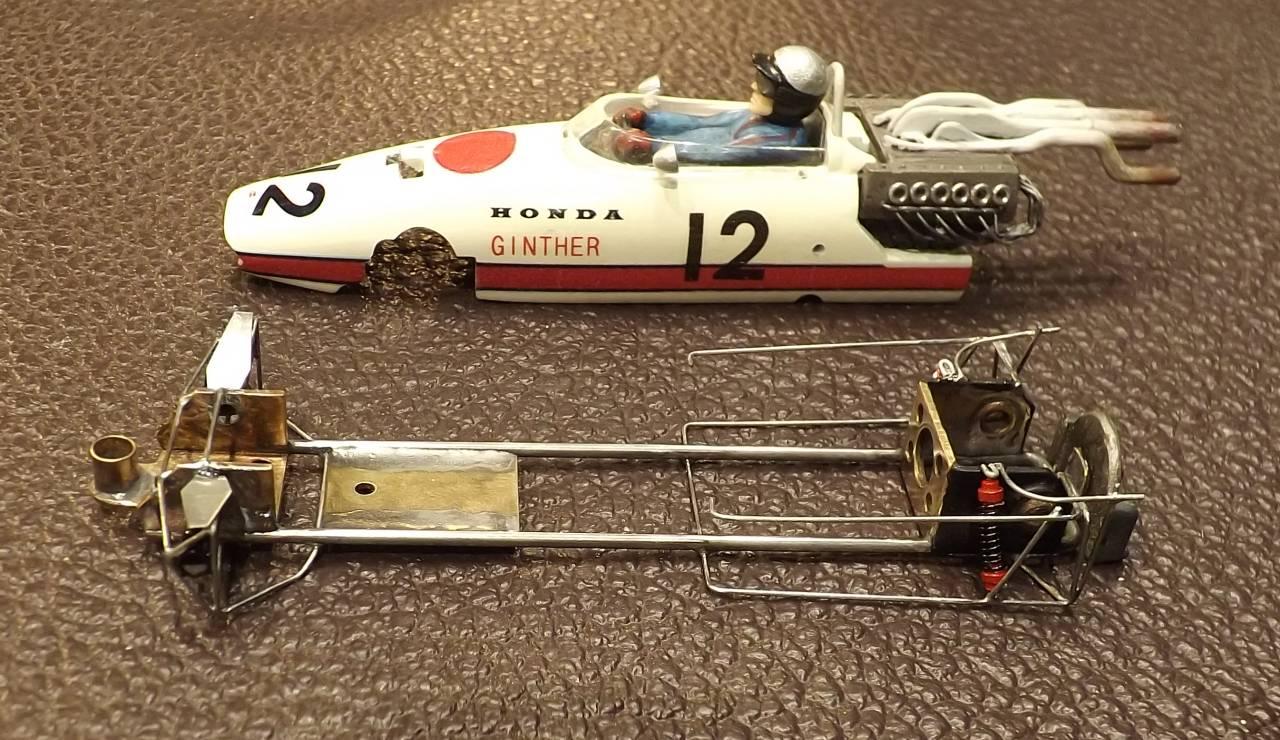
This build – both chassis and body – are not for the newbie – make sure to ask if you need help… but first and foremost make sure you enjoy the build… BTW, this complete model weighs in at 64.7g…

The Happy Canadian Scale Modeler!
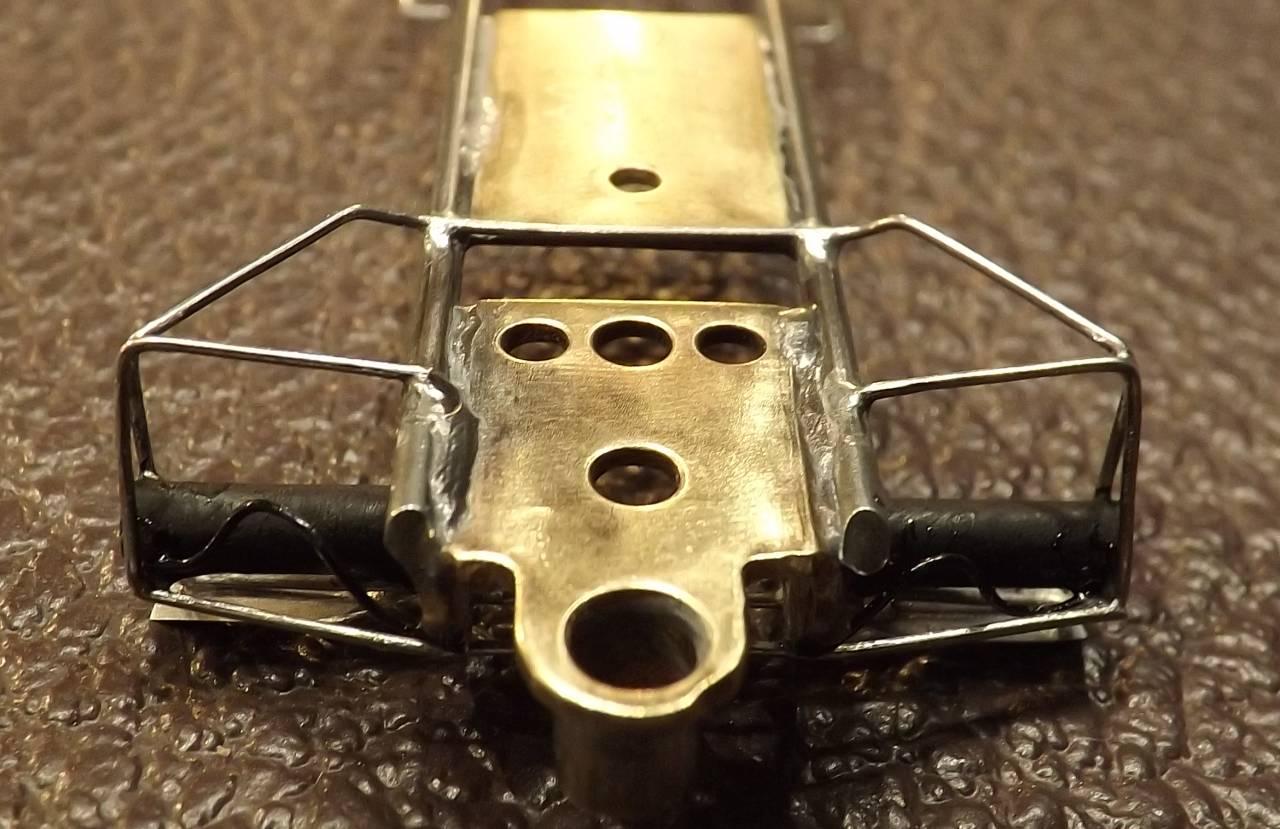
I try to avoid complexity when it comes to mounting bodies. For this one I decided to float the body on the chassis using cut out styrene that would snap into place.
Here is the rear end…
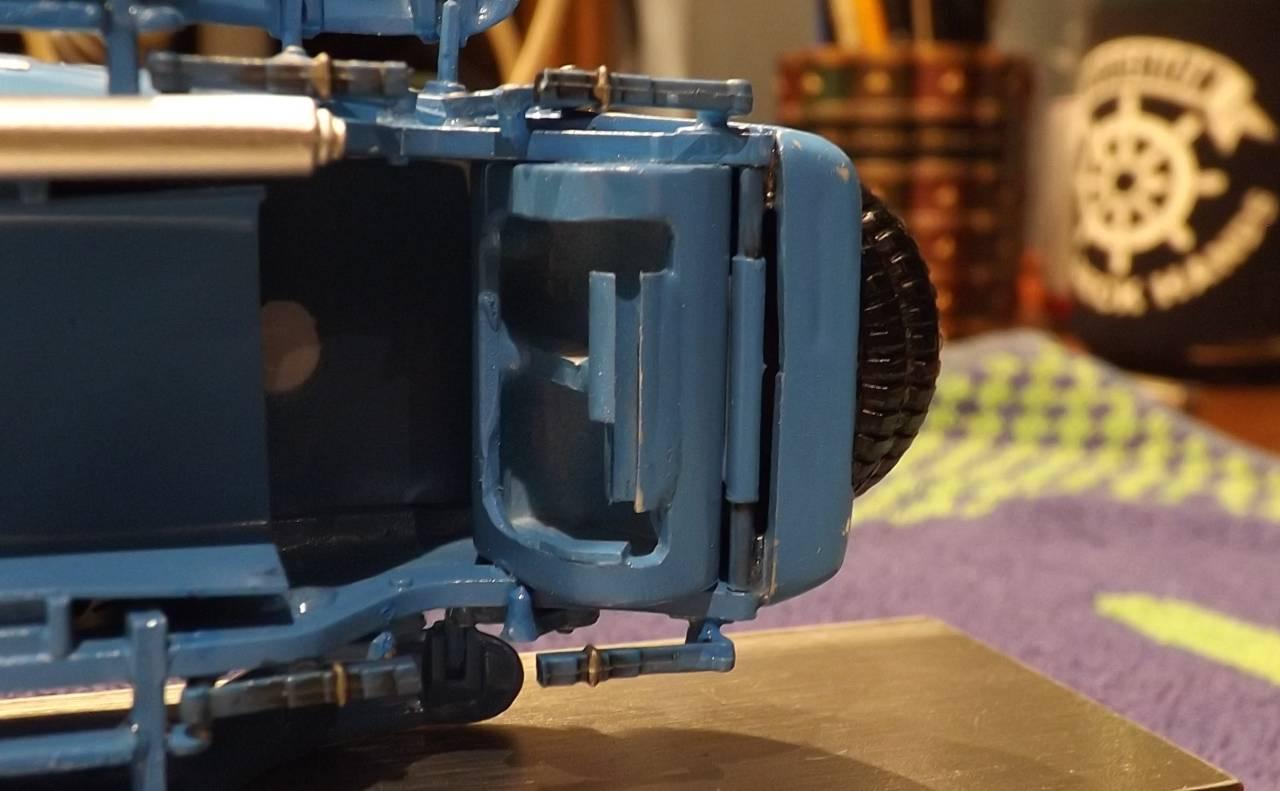 Nothing fancy, but still allows plenty of body float…
 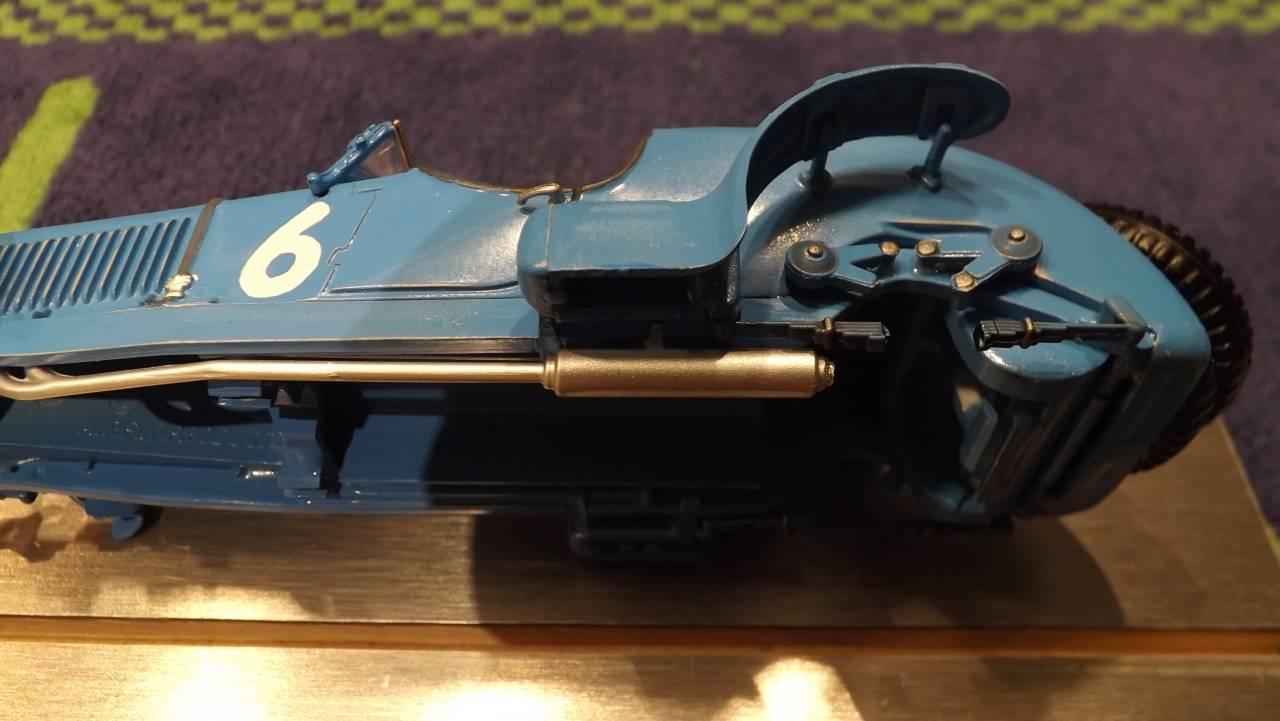 Getting back to the suspension detail provided… old school…
 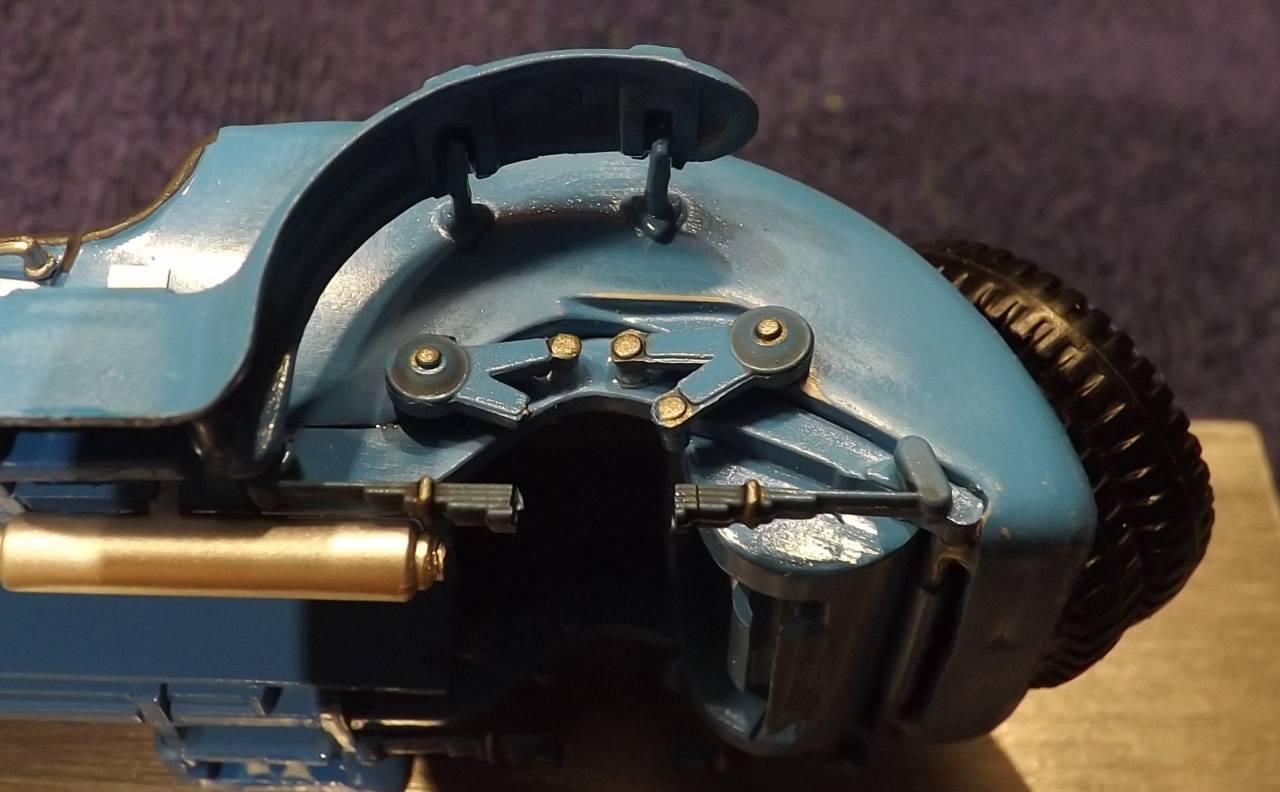 …and back to the front end…
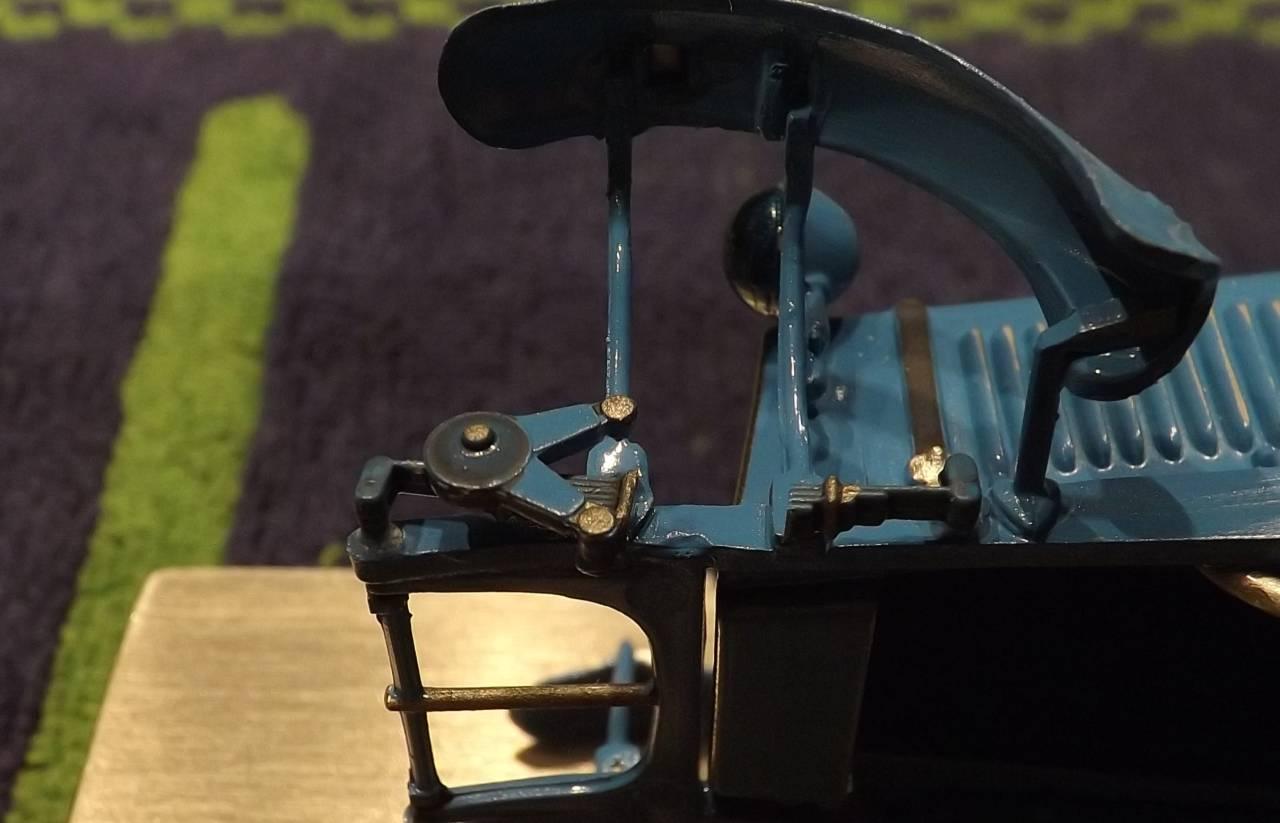
The Happy Canadian Scale Modeler!
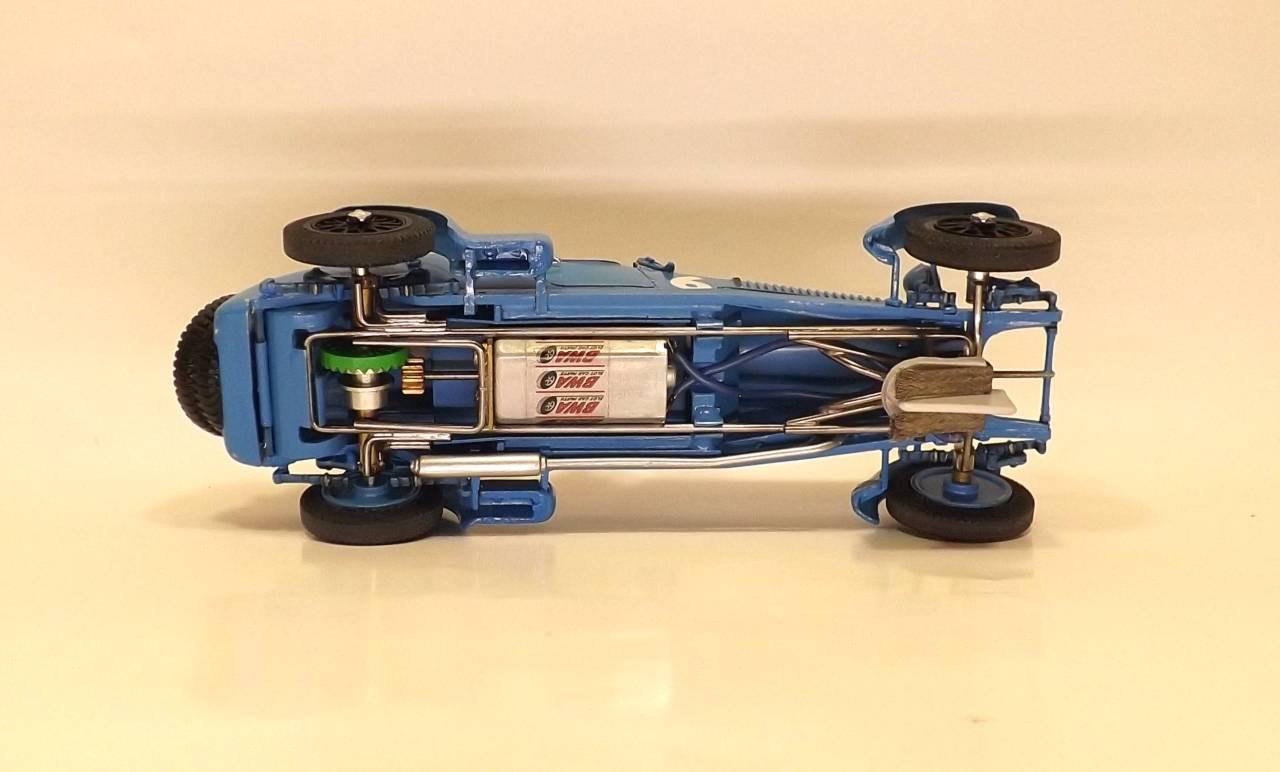
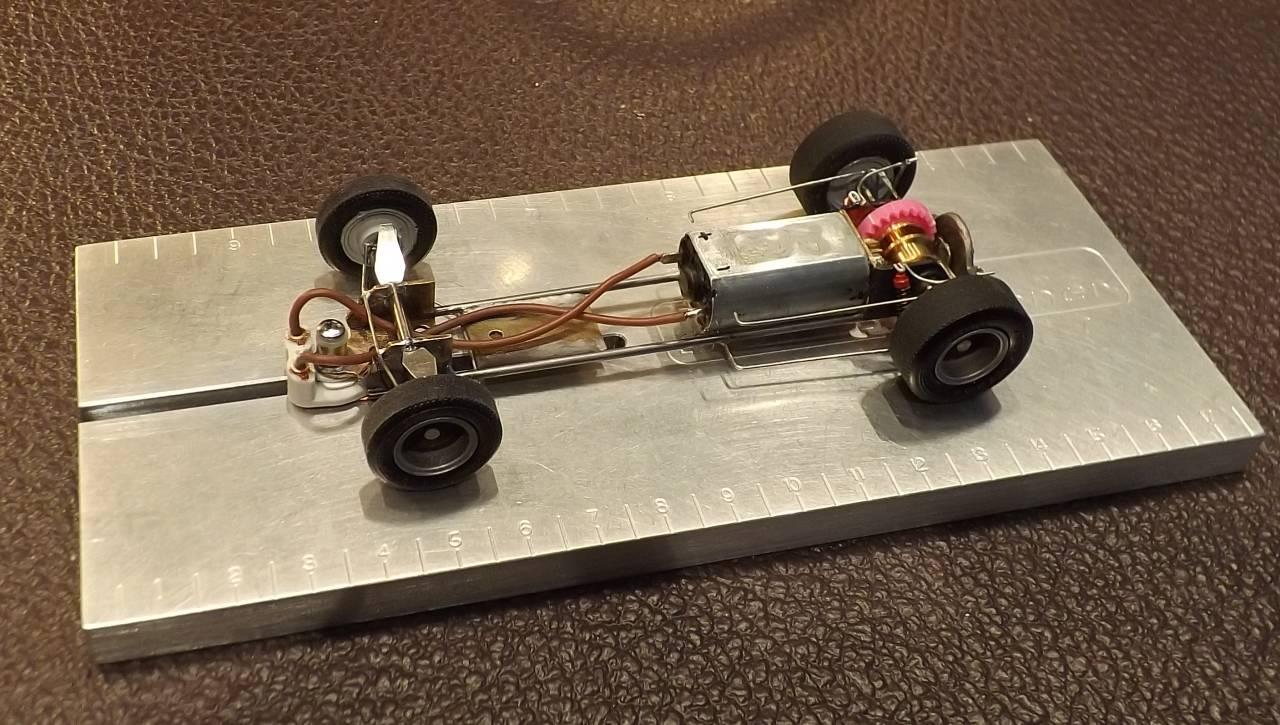
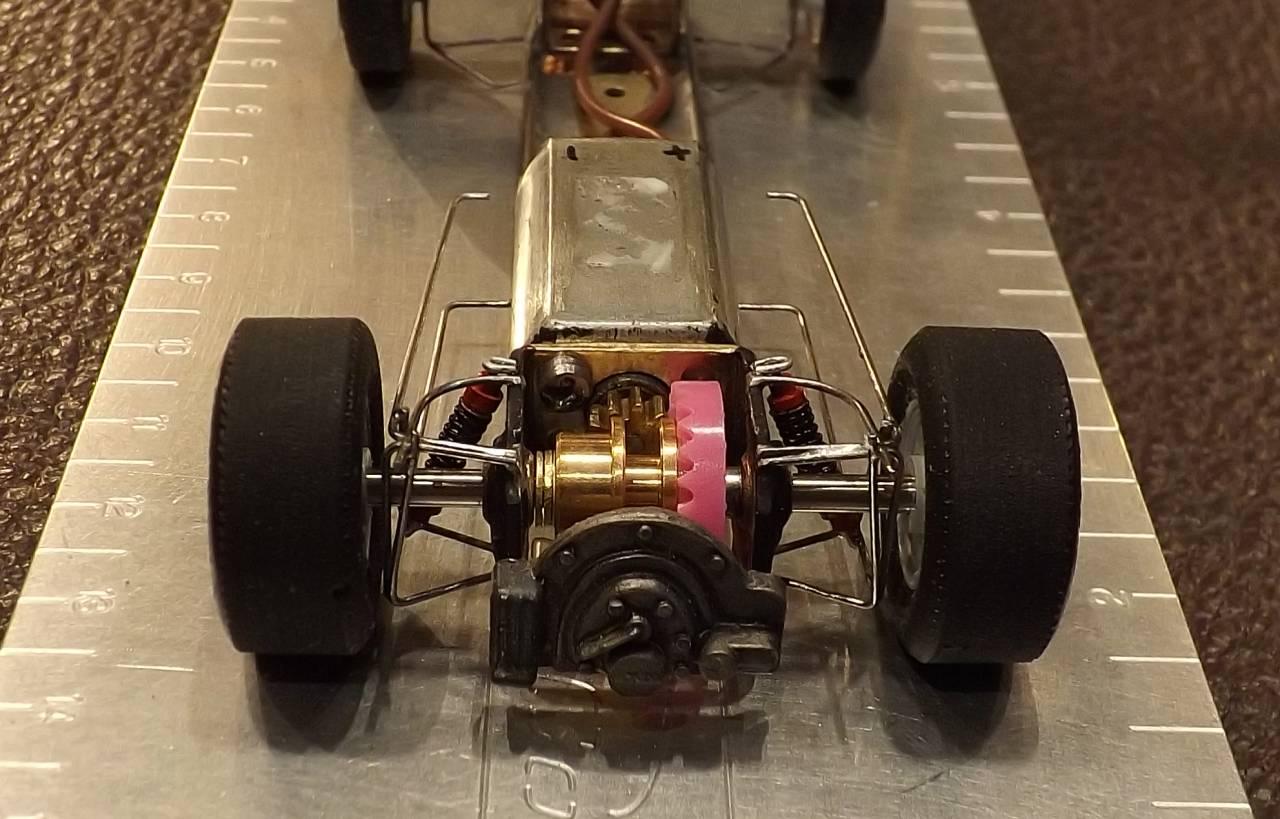
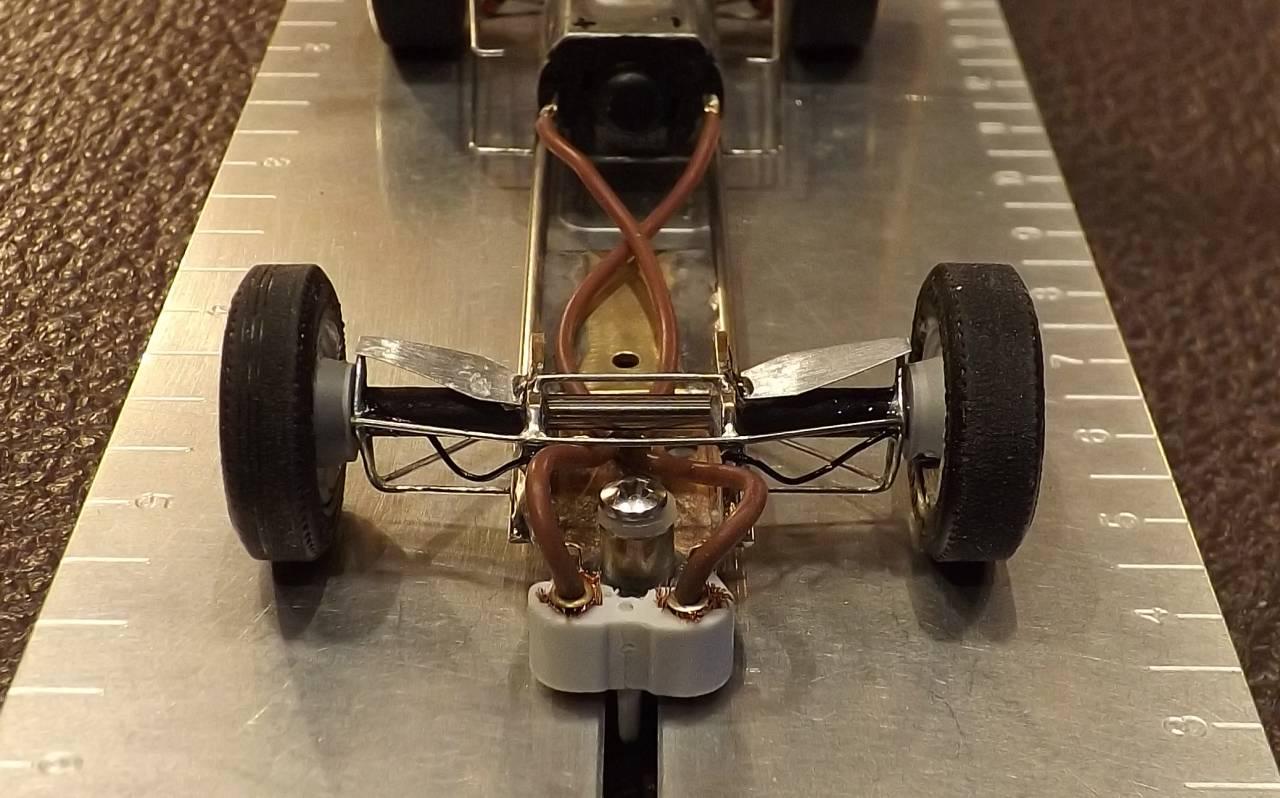
The chassis consists of a standard rear end but using Slot.It small bushings so that they can be placed anywhere – why make this build more challenging than the others – performance? No need…
To keep the front end of the plastic model true a straight axle couldn’t be used – so stubs were fabricated which would rotate within brass tubes soldered to a bent .055 piano wire…
 Independent front pins but fragile… note the model’s weathered suspension detail…
 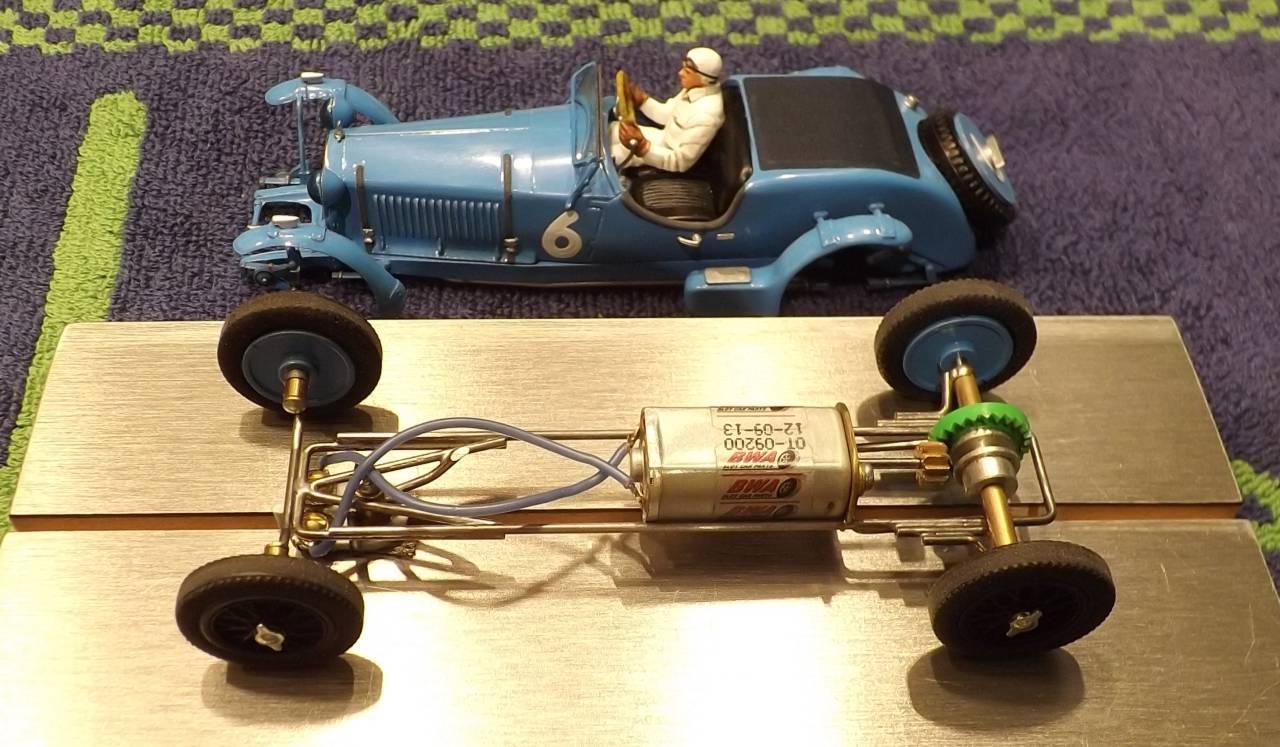 Nothing unusual in this chassis build.
  Vintage guide held in place with a brass tube soldered into place and reinforced by a few triangles of wire… note the insulated stop wire to prevent over-rotation of the guide…
 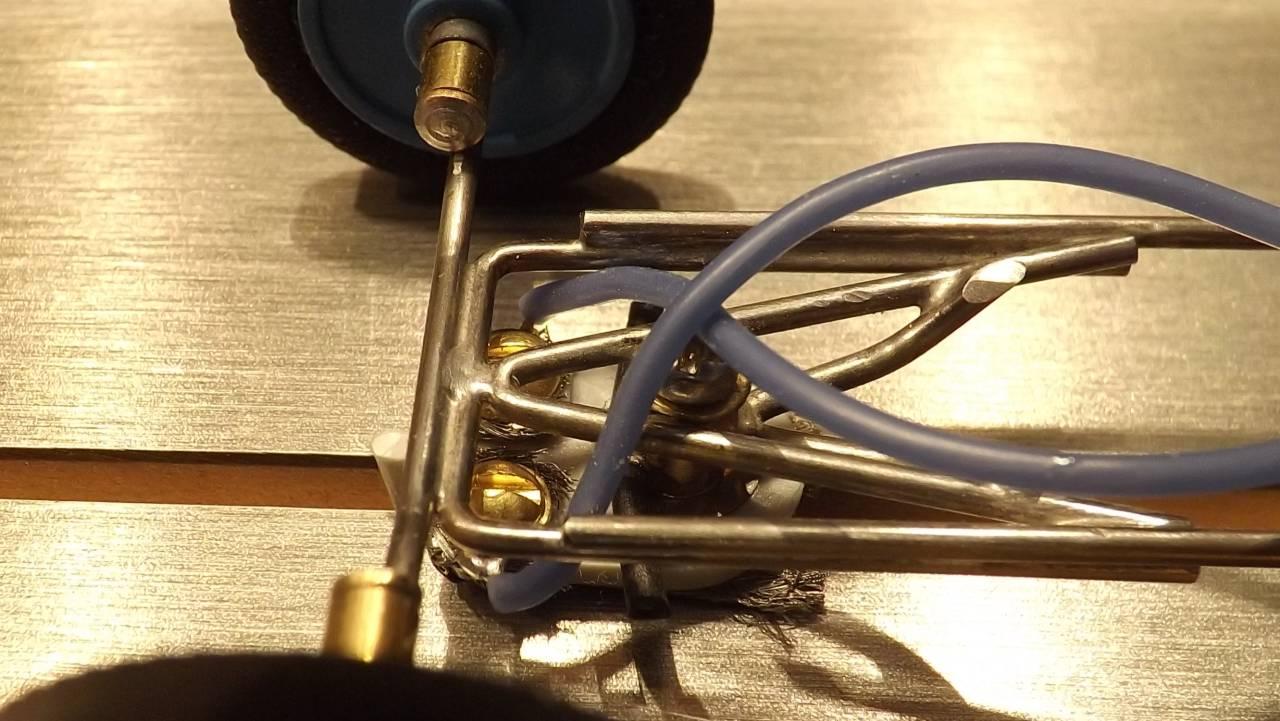 Motor lead wire soldered to brass washers which were placed underneath the brass screws – and positioned through holes into the braid…
  Front pin spacers aren’t painted – I’m not a fan of painting them since contact with oil gums up the paint – a chemical solution is best – but still searching…
 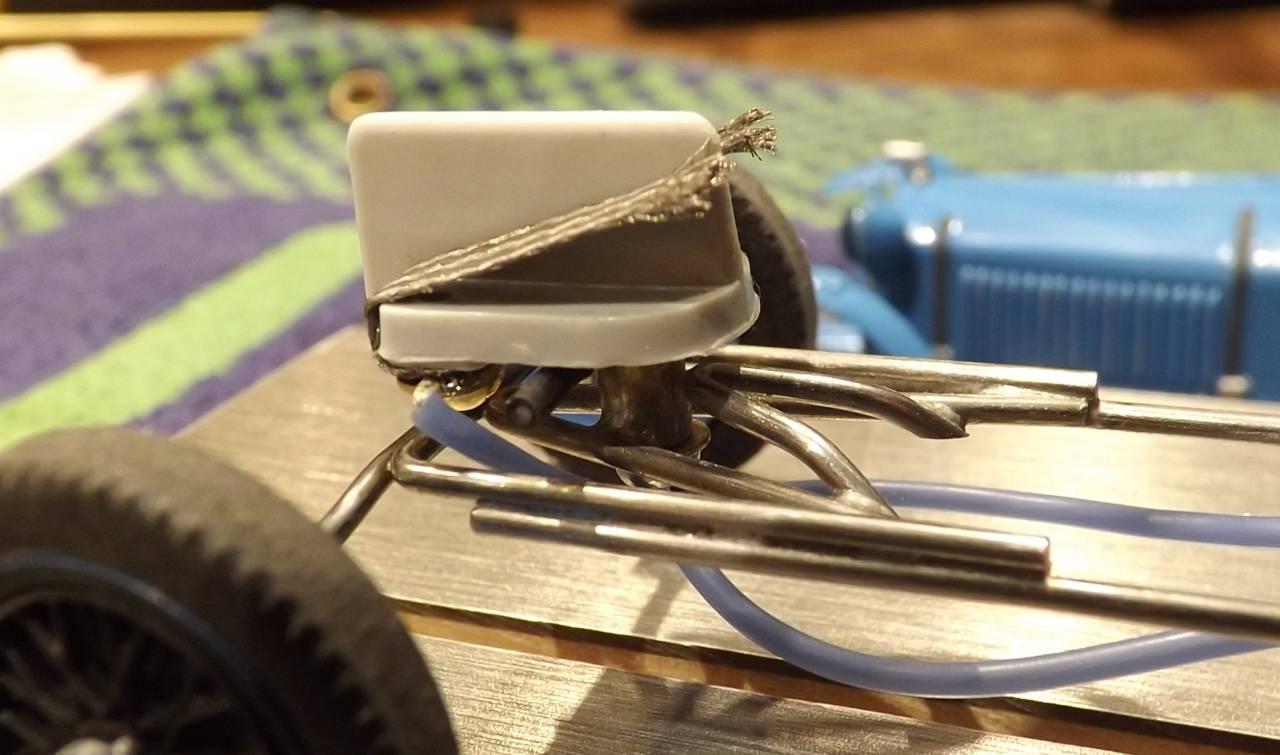 Guide is old-school…
 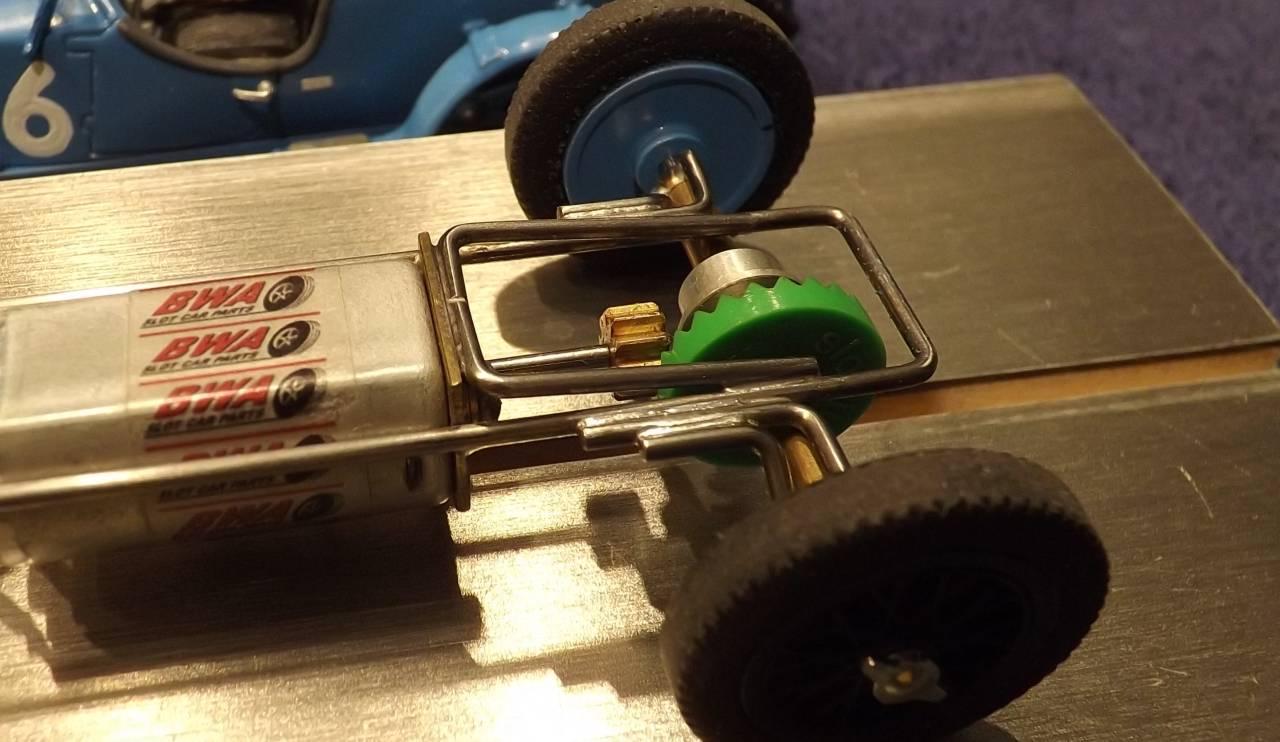 Very basic rear end…
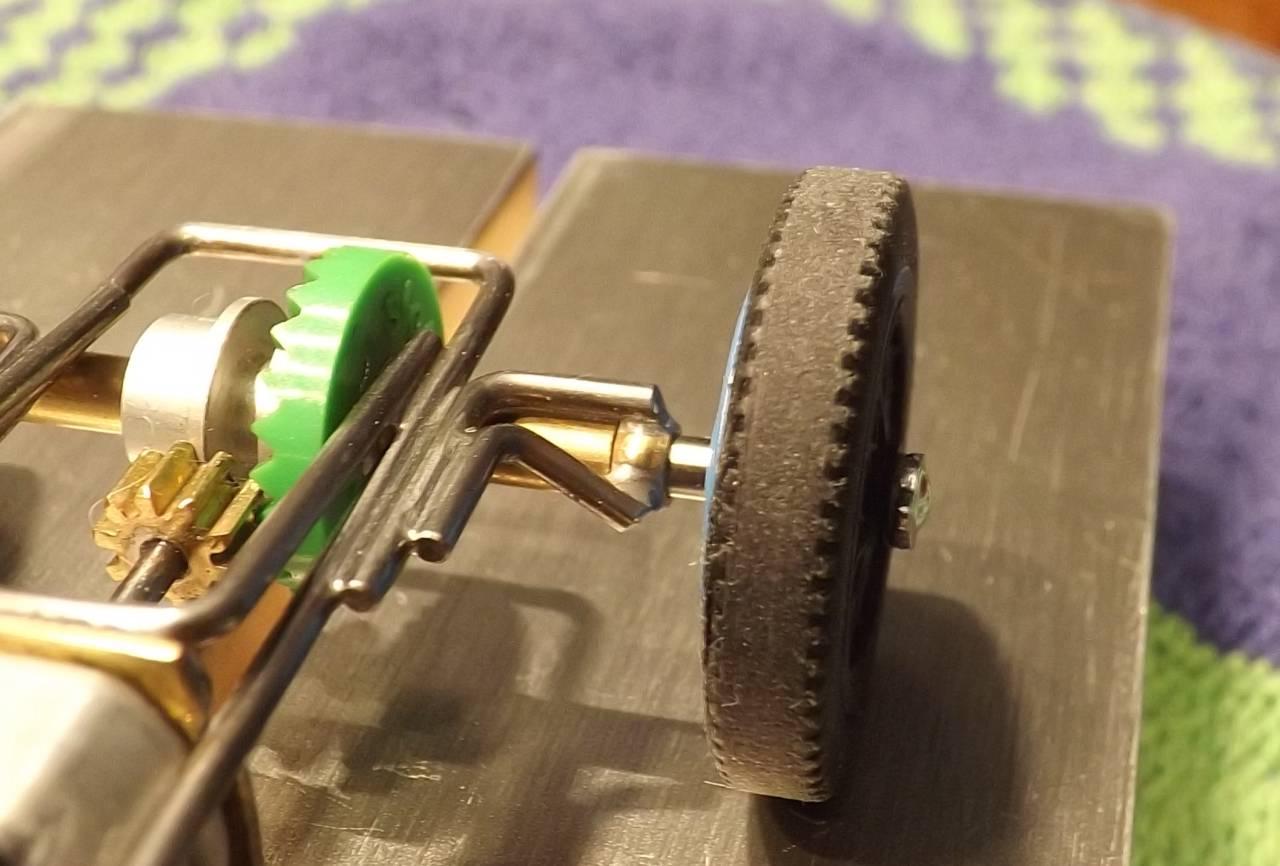
The Happy Canadian Scale Modeler!
Measuring twice so that I cut once…
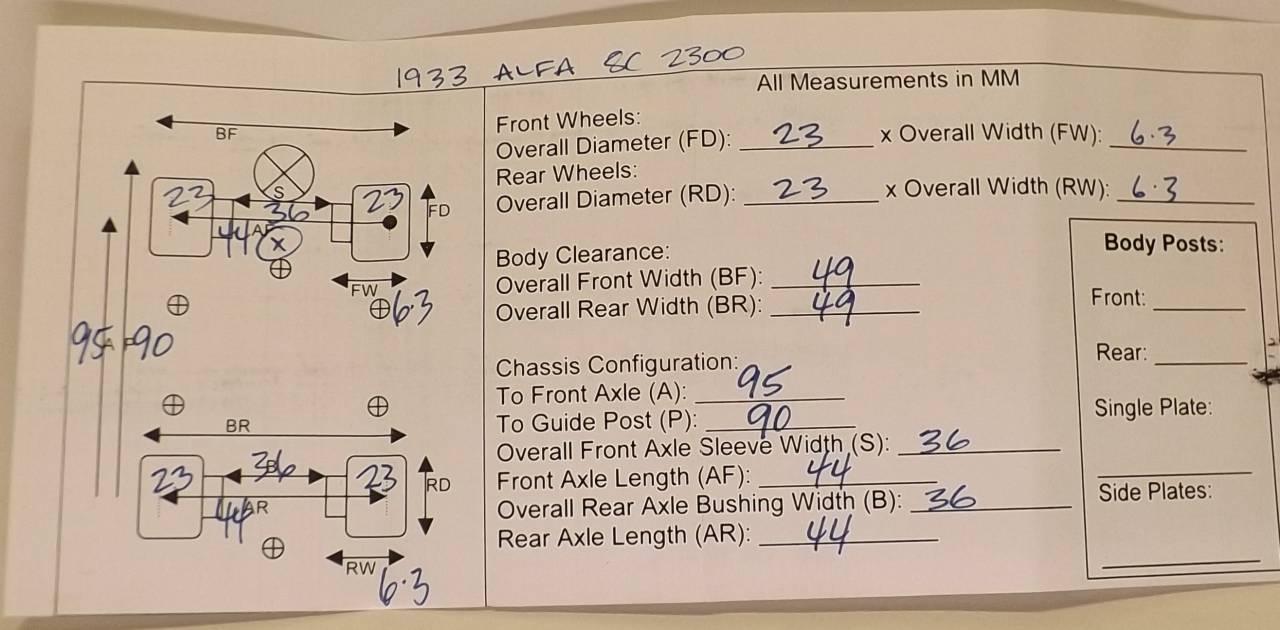 [visit our academy workshop chassis build session to download your copy of this printout]
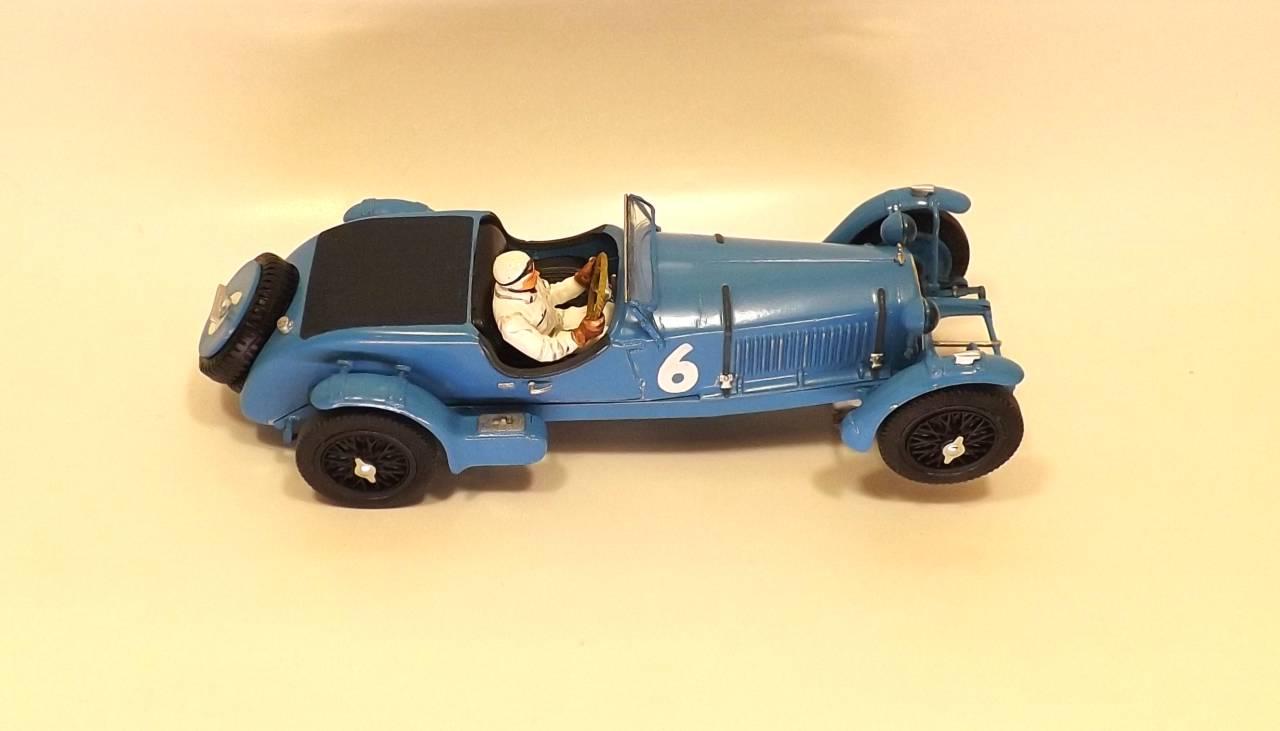
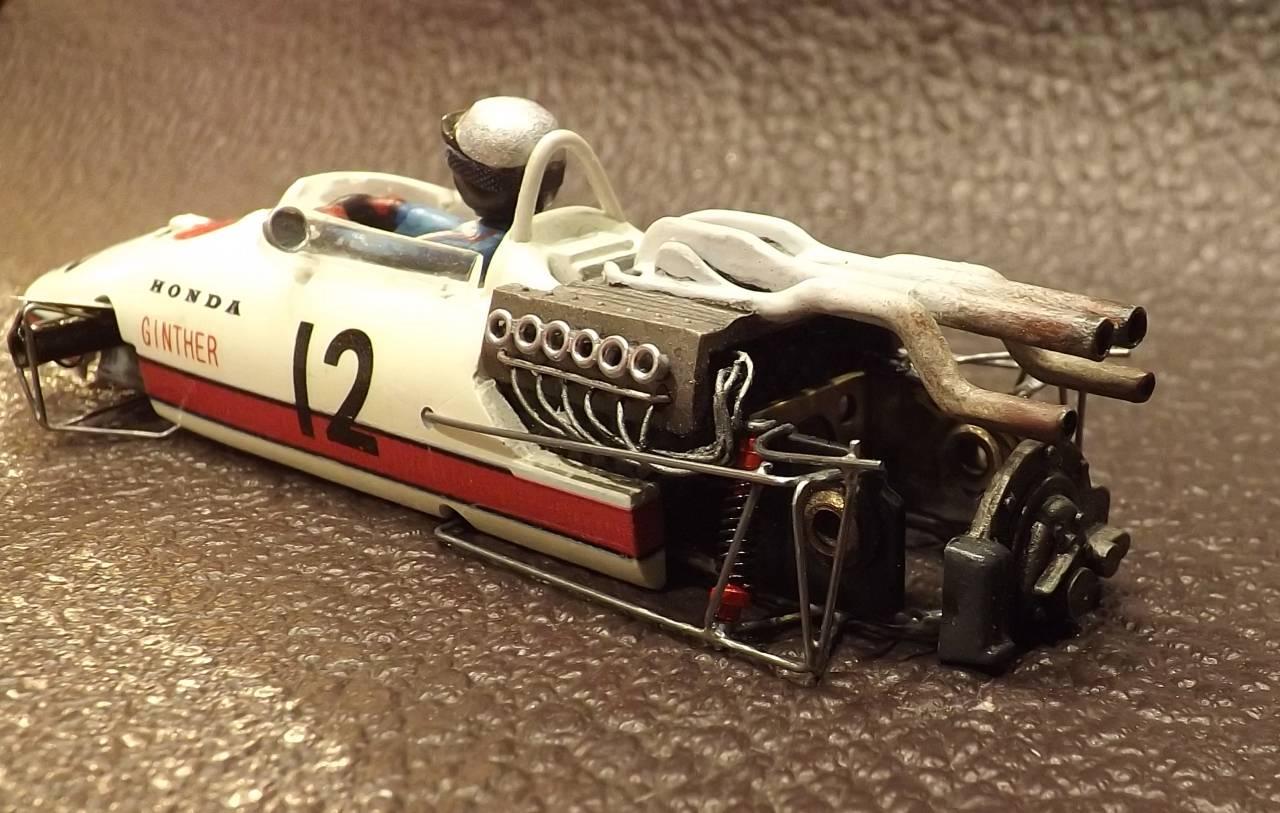
 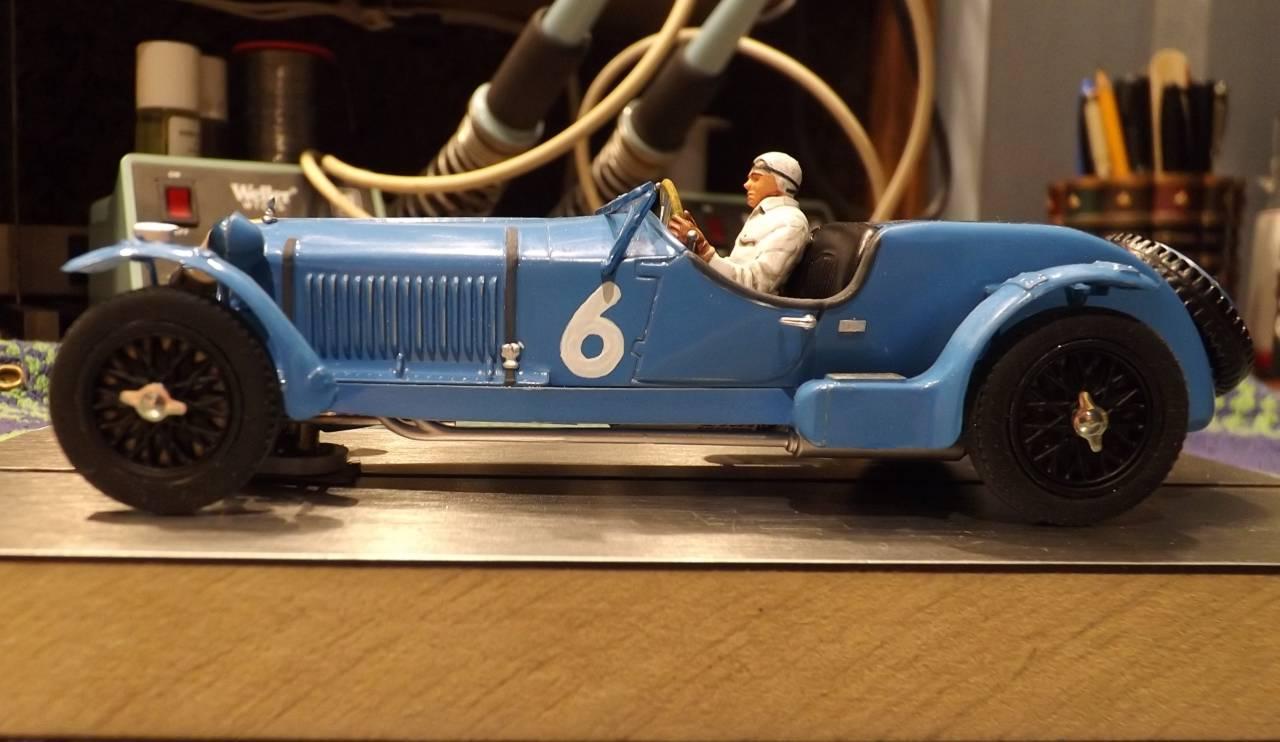 Motor has approximately 6mm clearance and the body exhaust detail is just a ‘c’ hair over 5mm clearance – making it a true PGP eligible model.
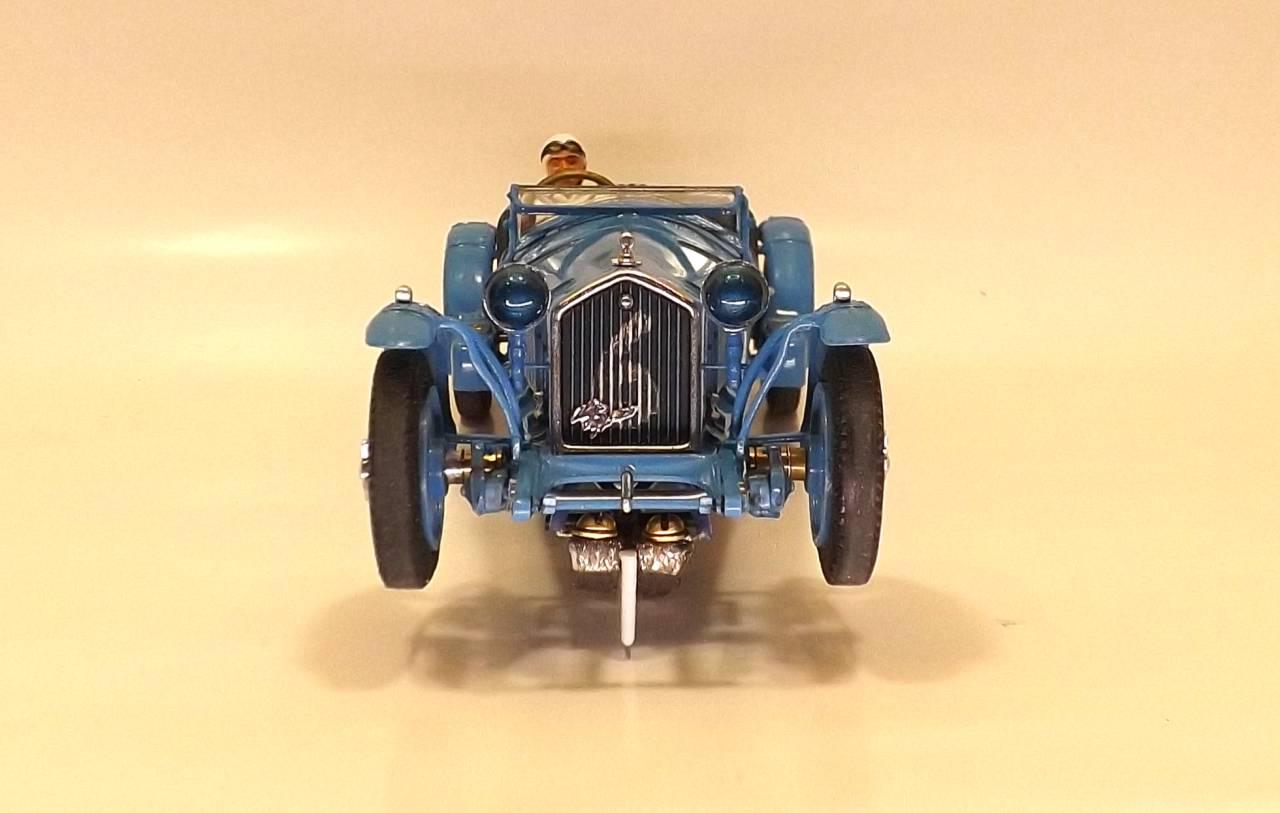
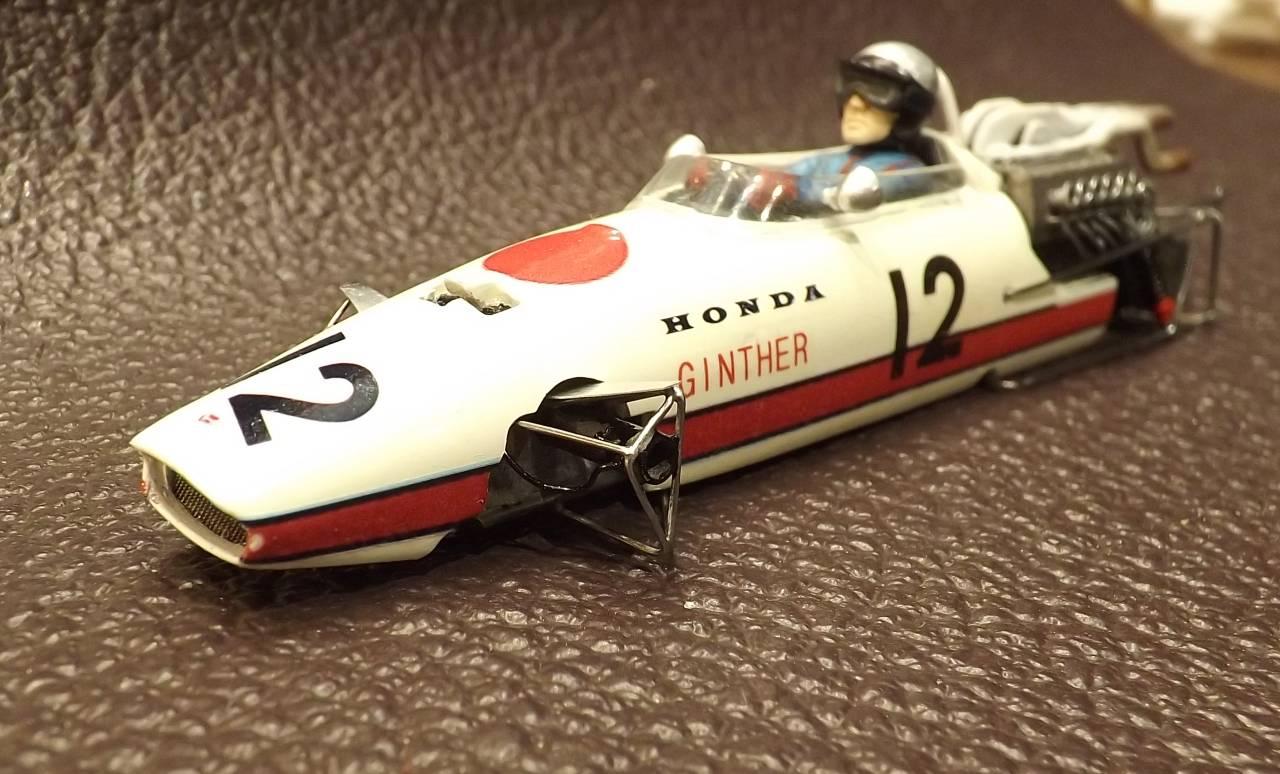
 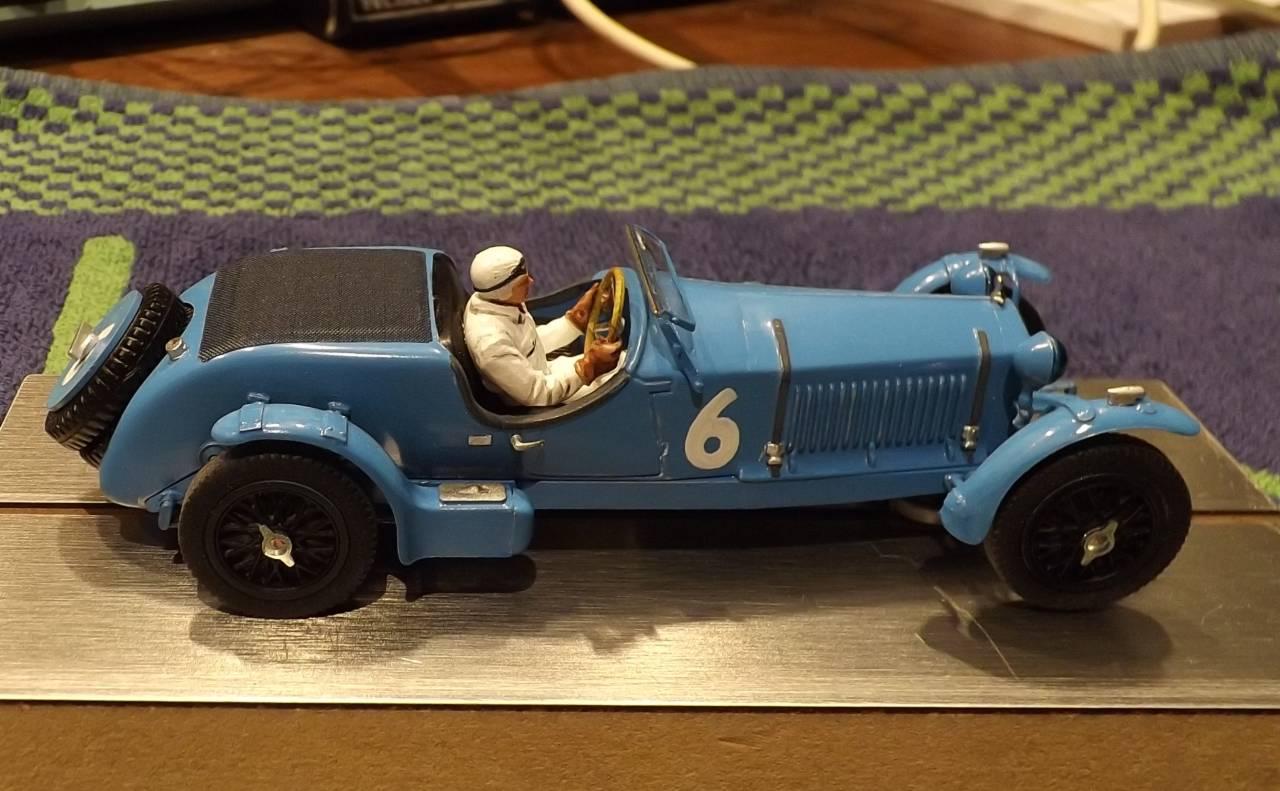 Driver figure in white [Chiron] took legs, torso, head & arms from four separate driver figures to fit properly into the seat with heat treated arms/hands to hold the steering wheel properly – 3 hours of fiddly unsatisfactory effort – until the final result. I typically glue the steering wheel into the hands of driver – as done here.
 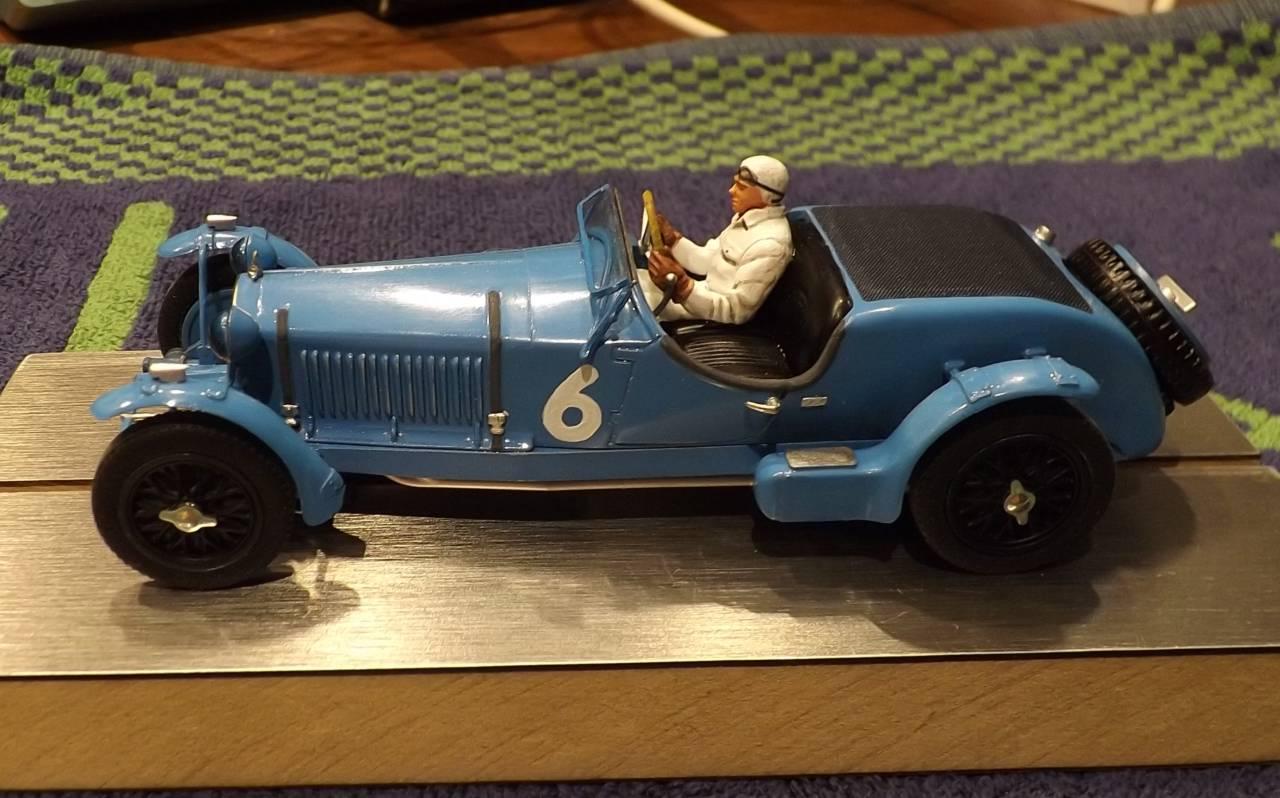 Without white number decals that I was happy with I decided to paint all four by hand – most things never improve by reading about them – you need to practice for real.
 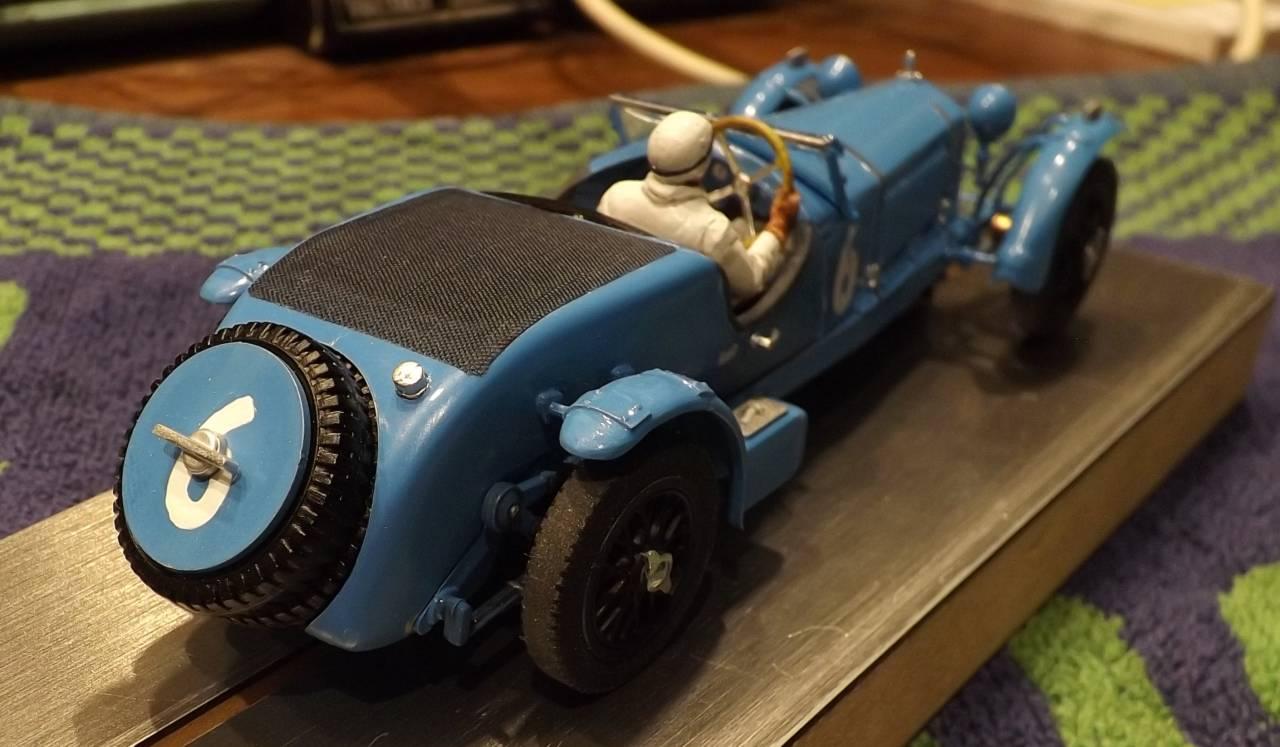 Extra tire and flat aero piece added to this model for a ‘LeMans’ look.
 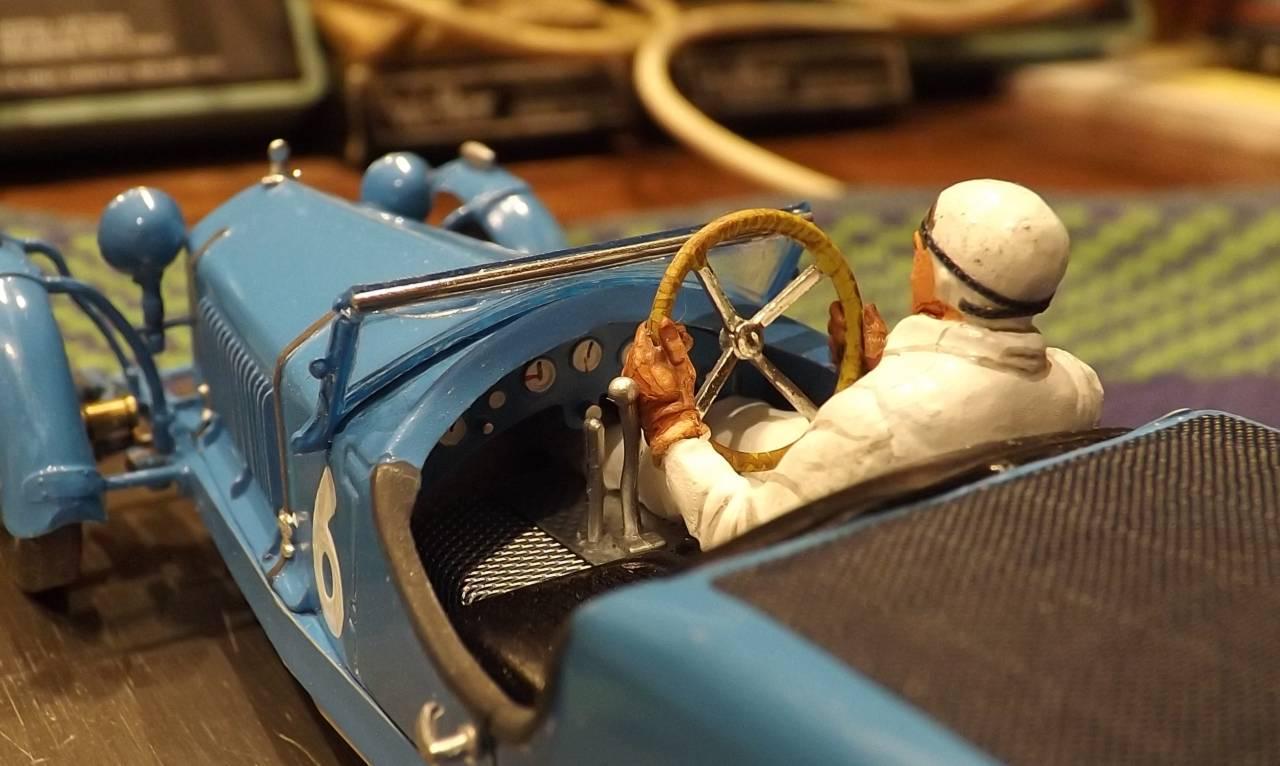 Painted gauges, hemp wrapped steering wheel and other detailed interior pieces added. Clear epoxy used to glue everything.
 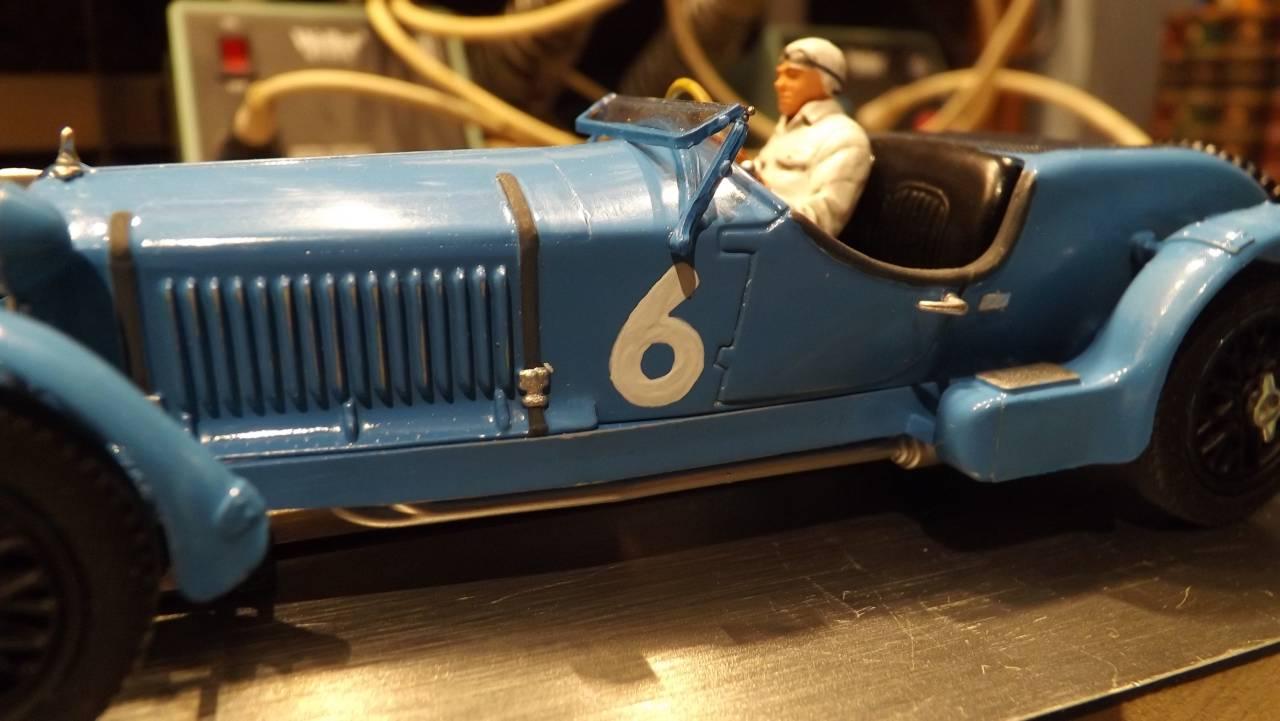 Body details painted by hand – all using Tamiya acrylics.
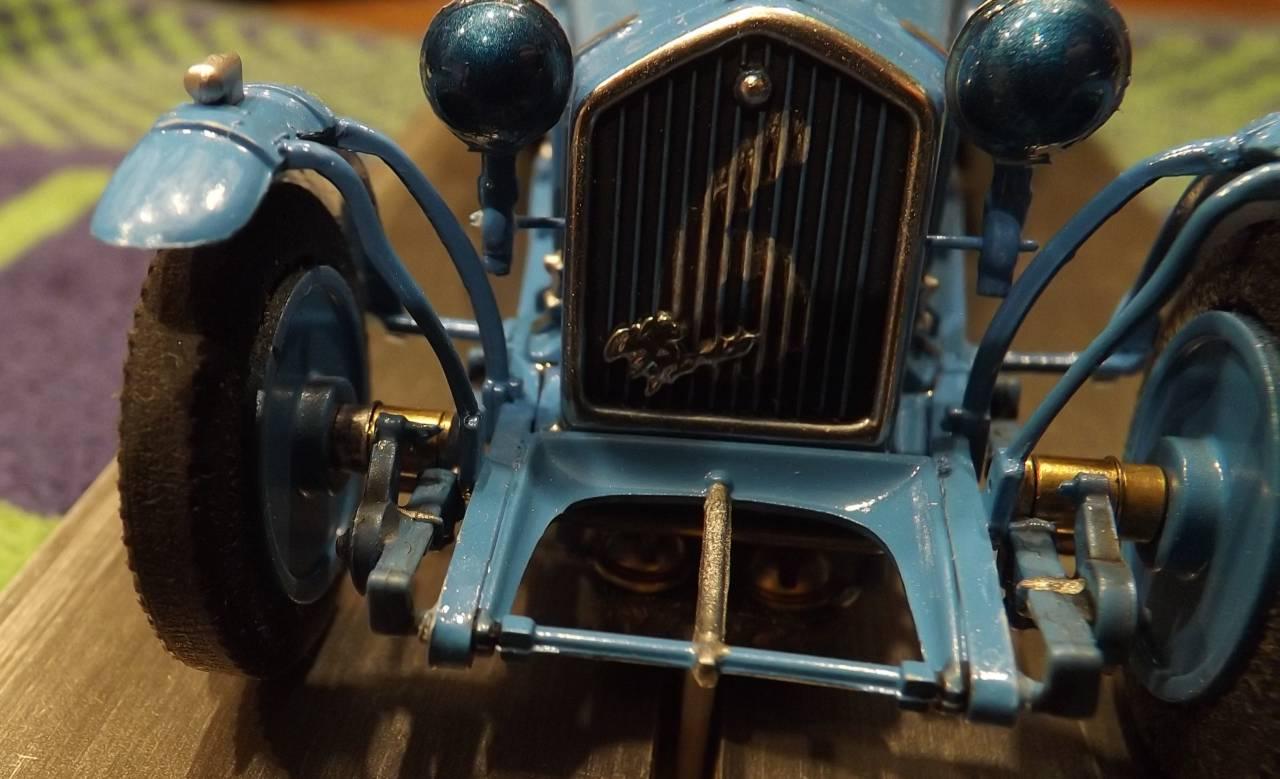
 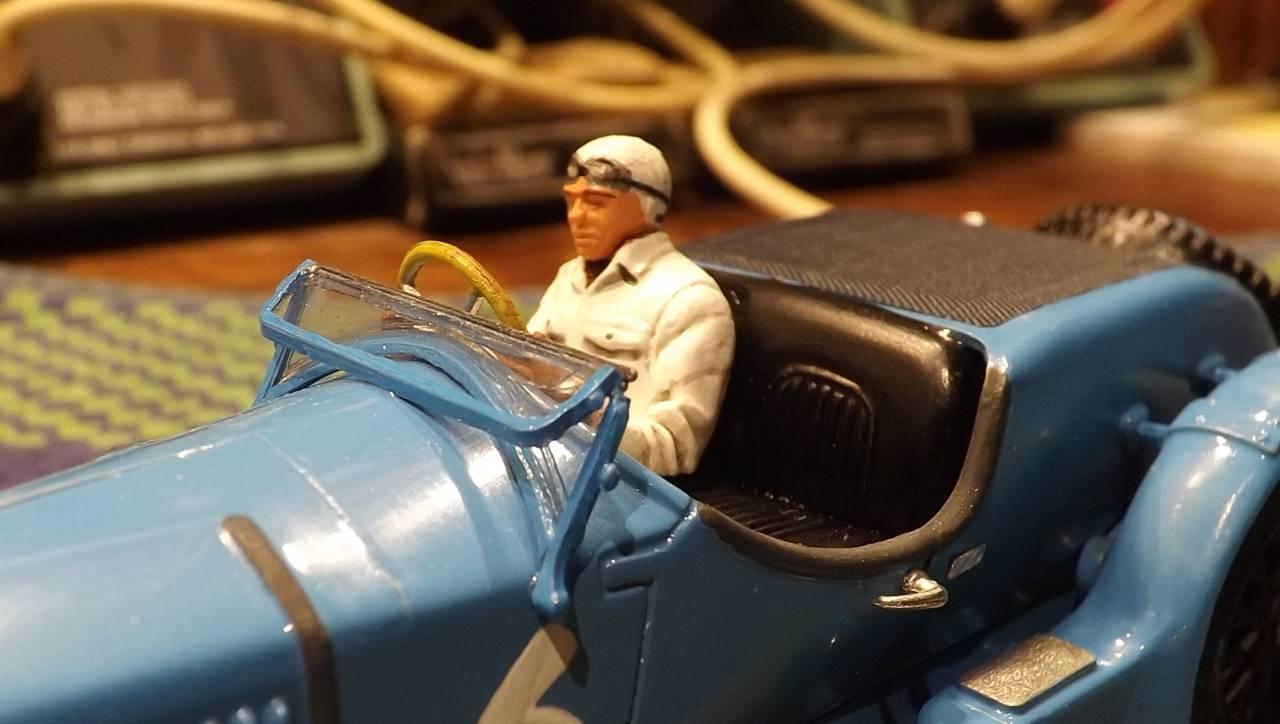 Windscreen detail that came with the kit was chopped into two pieces so that it could be folded down and the frame painted a body colour – the upper folded portion dipped in ‘Future’ – and clear epoxy holds everything in place, including two piano wire rods which clean up the joint.
  Front grill number hand painted with acrylic, then washed with Citadel, then Molotow chrome added by hand… don’t try to do too much. Headlamp covers made from inventory headlight bezels painted in a metallic blue acrylic – I was contemplating molding a set of clear blue tinted bezel covers but opted not to.
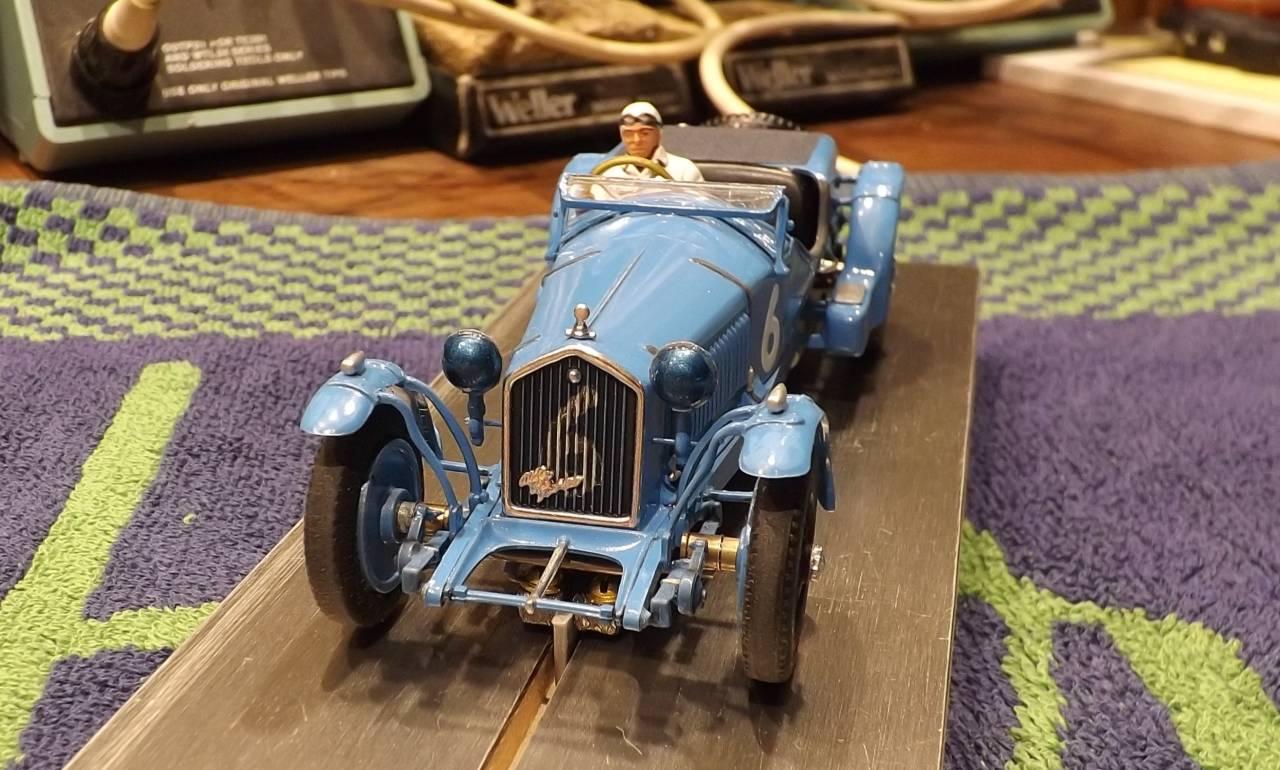
The Happy Canadian Scale Modeler!
Alfa is being painted today so I’m getting to work on the SSK… I’m not sure which # yet but have narrowed it down to either #8 (German G.P.) or #34 (Monaco)… either way it will be Caracciola as pilot… in the Monaco race it looks like he is just wearing goggles and a tweed cap…
The Happy Canadian Scale Modeler!
At the Coppa D’oro Trials f1nutz tested/raced one I believe… visit the topic here.
I’m sure there will be many more to come – I’m on the hunt for a kit myself… B-)
For PGP classes fantasy period liveries are also allowed but it is nice to see everyone focusing on raced liveries…
Enjoy your build!
BTW, I believe you had some RS Slot Wheels suitable for that project but if not I do have a few sets of wheels/inserts/tires for that car if you do need them – just let me know…
The Happy Canadian Scale Modeler!
Awesome f1nutz! Another project for the pile… :yahoo:
The Happy Canadian Scale Modeler!
From my discussions with Tony and some others the fuse that the controller comes with doesn’t protect the brake pot because it is rated too high – so that is why adding the inline lower rated fuse was done – and I recall one occasion when John blew Tony’s fuse during a race and replaced it – so it appears to have worked in that instance… but I don’t know much if anything about electronics so I’ll leave it at that.
I again reviewed the instruction sheet that came with my PM controller and it is too bad that they don’t suggest this tip there (ie. full brake when hooking up). It won’t help unless you notice you are hooked up wrong BEFORE you adjust/use your brake pot but that is life…
Thanks for sharing this Ken.
The Happy Canadian Scale Modeler!
Great looking model Ken! Someone’s been very busy! BTW those wheels look the part – I wouldn’t use anything narrower for that racer. Sweeeeeeet!!!
The Happy Canadian Scale Modeler!
Great looking Corvette Ken. It will no doubt be a smooth runner…
The Happy Canadian Scale Modeler!
September 24, 2018 at 9:52 am in reply to: Drilling holes in aluminum for 3/16" single flange bearings #8774Thanks for sharing your technique Ken! :good:
The Happy Canadian Scale Modeler!
Nice work Ken. Nothing beats a fine throwback wooden slot car box. :good:
The Happy Canadian Scale Modeler!
It looks really good DB! Those decals are a very nice touch too! :good: A great addition to the hot rod class if you choose to swap the BWNC1 for the BWMS050… :scratch:
The Happy Canadian Scale Modeler!
I’m anticipating a Coppa D’oro scheduled in September for our new PGP/PGP+ models so this build has been moved up the priority ladder.
Regarding this model one more thing – I plan to locate the guide slightly behind the front wheel assembly to make sure it remains hidden… we’ll see – I should have it finished in a week or so… :good:
The Happy Canadian Scale Modeler!
August 2, 2018 at 7:12 am in reply to: 1934 Aston Martin Ulster kit for the Pre-War GP series in S32 #8126It is the journey that makes this hobby fun! Don’t even consider quitting this one Felix… no matter how long it takes! If I had to guess spindles (or stubs) up front then brings pivoting, camber and toe in/out into the equation which I’ve seen once in 1:32 but never dared to attempt myself (I wish I took a picture of that chassis.). Keep the details coming! :yahoo:
The Happy Canadian Scale Modeler!
By The Way… Cheers!
The Happy Canadian Scale Modeler!
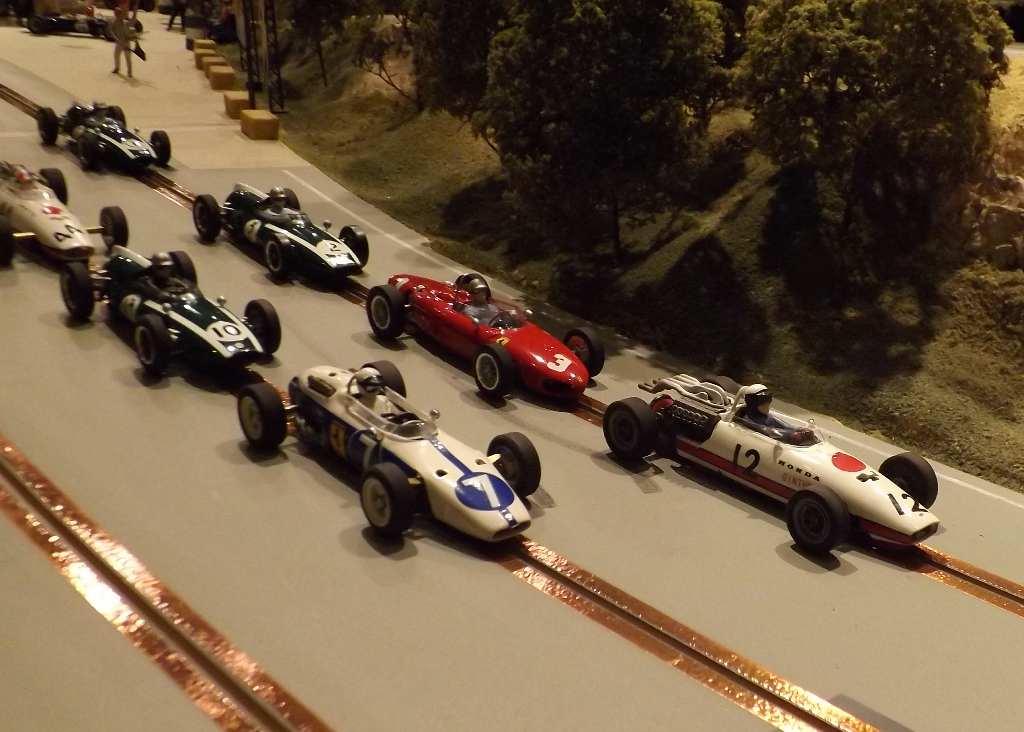
There are more photos of the Ford and #8 Bentley elsewhere… but so far we’ve only got those three scratch built models ‘race ready’. The others are untouched vintage Scalextric models brought for comparison and discussion (as well as pictures).
The Happy Canadian Scale Modeler!
Carrera Panamericana! Cheers!
The Happy Canadian Scale Modeler!
I pulled the trigger on an Alfa 8C 2300 – there are a few notable LeMans models that ran in ’33 so I was thinking of doing the Chiron light blue model… but will gladly defer…
The Happy Canadian Scale Modeler!
I can’t wait to see what you can come up with for your first CP build!!!
BTW, part of the exercise is the journey… well done!!!
Art
The Happy Canadian Scale Modeler!
Thanks for posting the link MiA – I remember reading this some time ago – interesting to know what others do and the lengths they go to… :wacko:
The Happy Canadian Scale Modeler!
July 19, 2018 at 12:28 am in reply to: Ford V8 Special – #32 – Ireneu Correa – 1935 Rio Grand Prix #7941Cheers! The extra spare will be just a tire underneath the existing spare to better hide the crown gear cover – so no performance biggie I’m guessing. Like MiA I’m surprised at how well a car with 5mm clearance handles… gearing is my focus now – either to help determine a fixed preference for the class or what simply works best…
The Happy Canadian Scale Modeler!
There appear to be no comments, concerns or further suggestions so we’ll update our Scratch32 rules to v4 online – and they will take effect immediately. Cheers! :wacko:
The Happy Canadian Scale Modeler!
That’s great DB! I’m assuming it is #199 in your original build thread here picture below…
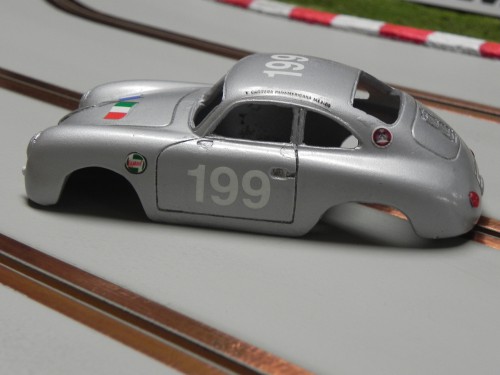 Is it an SP or SP+ car?
The Happy Canadian Scale Modeler!
That’s a really nice build so far KenZee! Your testing went really well too from what I recall… fast and smooth… Can’t wait to see it with the interior and decals done! Let us know what the overall weight is too when the interior is added! Cheers! :good:
The Happy Canadian Scale Modeler!
Hi DB,
While the Scratch32 group is working towards all scratch builds we need to walk before we can run – so as of right now if either the body or the chassis has had significant effort dedicated to its creation then it will qualify – so in the case of your 356 the body is a kit that you assembled and painted so you’ve met the criteria already regardless of chassis… and therefore your 356 is eligible for any Scratch32 appropriate class…. hope that helps… :good:
The Happy Canadian Scale Modeler!
Here is what I hope to be the final draft of v4 of the Scratch32 rules. I’ve done my best to incorporate all of the changes/considerations noted above, including the addition of a new PGP/PGP+ class. If I’ve missed anything please let me know.
Attachments:
You must be logged in to view attached files.The Happy Canadian Scale Modeler!
Of course it does – thank you for the very helpful information DB! Your accuracy and attention to detail will help us all in sorting out Scratch32 pre-war requirements…
Cheers!
The Happy Canadian Scale Modeler!
Thanks for the heads up DB – many uses for these – could be the subject of an awesome barn buried find too – weathered with some parts missing in a barn or wrecker’s yard diorama!
BTW – what’s the overall diameter of the wheels/tires?
Cheers DB! :good:
The Happy Canadian Scale Modeler!
Interesting to note that the frame of the car is visible on the ‘higher’ ones – and on the lowered ones it is wrapped over / covered by the body panels…
The Happy Canadian Scale Modeler!
This braid sanding (polishing) binge by those not in our group requires cleaning immediately afterwards – and that compounds the problem. Sanding must be a spillover from 1/24…
Why if racing on clean copper tape anyone needs to resort to this is beyond my understanding… Worn braid should simply be replaced – it costs next to nothing.
Those that are compelled to resort to these things to save a few cents or to gain some perceived advantage should re-visit their reasons for racing with friends…
The Happy Canadian Scale Modeler!
Some great looking cars you’ve pointed out – we will see an Alfa like that racing sometime soon…. love it!!!!
The Happy Canadian Scale Modeler!
Well put MiA!
I would be happy to make models to run in two sub-classes for pre-war – one with a minimum ride height of 5mm (I think the years would sort themselves automatically) and another with none…
Unfortunately many read our topics and replies but never log in to respond – so we can only guess what they think – why is that? I don’t care what they think. On the one hand we’ve had those who have harped until death to make changes (like Chuck and the Ernie gear) while others never chime in (like those who monkeyed Chris’ choice to eliminate NASCAR)… and now finally we’ve got a website forum dedicated only to our group for free membership… I guess the cost is still too much for some… when people don’t show up to race and discuss nor participate in these forums they shouldn’t be surprised when rules are made without their input. So be it.
The Happy Canadian Scale Modeler!
In order to avoid any confusion the updated draft rules will explicitly exclude using sandpaper to polish/clean braid even though they already only permit one ‘thing’ to use with braid – Ronsonol…
The Happy Canadian Scale Modeler!
Trying to combine models right up to 1939 is somewhat of a problem. It was pointed out to me that some are lower and don’t look right sitting up so high to meet the minimum clearance – so we’ll need to bring the year of eligibility forward perhaps to 1936 or 1937 to exclude those models… or leave the rule as is and just enforce the clearance…
The Happy Canadian Scale Modeler!
Hi MiA,
I admire your eagerness using the form even though there is no official class nor event yet…
Your model looks great!
But I think the fenders are letting down the overall look of your model – they seem to suggest an exaggerated circumference for the tires beyond what the photos suggest – which in turn draws attention to the fact that the diameter of your tires are smaller by 1-2mm… it is all about optics with models…
BTW – will you be painting your DArt wheels green/black too (like the original)? I hope so…
The Happy Canadian Scale Modeler!
Just another reminder that as F1Nutz has done make sure your guide is not exposed when you look at your model from above. This may mean choice of guide is important not to mention placement behind the front axle may be necessary…
The Happy Canadian Scale Modeler!
Thanks for the additional info MiA. I think we have enough of a direction now to allow everyone to start building with confidence. :good:
The Happy Canadian Scale Modeler!
Please also note:
Fantasy period liveries are permitted in any scratch32 class, which would apply to our pre-war class as well. This has always been the case with the exception of La Carrera Panamericana or Targa Florio events for which an actual livery (number may be changed provided the font is the same) must be used. I bring this up only as a reminder for some… I think it best to include a line regarding this in our general rules section which I will also add to our draft…
The Happy Canadian Scale Modeler!
I will incorporate the points from my post on May 26 & June 4 (above) into a revised draft unless anyone has any other comment/suggestion… :mail:
The Happy Canadian Scale Modeler!
Thanks MiA.
- Instead of just a minimum clearance we could adopt a ratio (say 10:1) to determine minimum clearance based on width (track). I’m not a fan of this methodology but it could work; and
- With gearing ‘open’ technically we do not need a maximum overall tire diameter but given that 11t (or 12t) pinions for a 1.5mm motor shaft are both harder to find and do not mesh as well with the go to slot.it crown gears I’m not yet convinced that we can do without a maximum overall tire diameter – in which case that would leave us with needing to define a maximum. 23mm appears to work with 2 of the 3 models canvassed so far. I can make a slightly taller tire if necessary.
In any event, I’ve tweaked the above class proposal for further discussion:
- Model Eligibility – Any model that competed in a state or club sanctioned road, rally or endurance race or Grand Prix anywhere in the world before 1939;
- Motor – BWMS050 ‘low’ power motor in an inline configuration (any gearing);
- Tires – Front & rear tires must be DArt DA0210;
- Wheels – 16.2mm x 5.5mm maximum;
- Minimum Clearance – But for the guide, wheels/tires, bushings/bearings & crown gear no part of the chassis, chassis components or body may be less than 5mm above the surface of the track;
- Maximum Width/Track – The width of front and rear rolling assemblies may not exceed 54mm in width, excluding fenders, inserts, nuts or knock offs which may extend beyond – within reason; and
- Maximum Overall Tire Diameter – Front and rear tires must not exceed 23mm in diameter.
The Happy Canadian Scale Modeler!
For Item #6 above we have a measurement of 54mm overall width of rolling assemblies/track (excluding insert/nut/wheel detail) which I’ve taken from Felix’s topic so far… any others to consider?
The Happy Canadian Scale Modeler!
June 3, 2018 at 12:56 pm in reply to: 1934 Aston Martin Ulster kit for the Pre-War GP series in S32 #7166Felix, the front track/rolling assembly width looks wider than the rear (53.3mm) to me – is it?
The Happy Canadian Scale Modeler!
June 2, 2018 at 3:08 pm in reply to: 1934 Aston Martin Ulster kit for the Pre-War GP series in S32 #7152That’s a great looking model! Thank you for posting all of the detailed measurements too – they seem to accord with many that we’ve discussed so far and will surely aid in completing rules for this class… Cheers! :good:
The Happy Canadian Scale Modeler!
A Pre-War Grand Prix Class Proposal:
After discussions last night it appears that we are making considerable headway towards a pre-war class and the rules that would govern. For the benefit of those who had to leave early or who could not attend here are the suggestions so far:
- Model Eligibility – Any model that competed in a Grand Prix before 1939;
- Motor – BWMS050 ‘low’ power motor in an inline configuration (any gearing);
- Tires – Front & rear tires must be DArt DA0210;
- Wheels – 16.2mm x 5.5mm maximum;
- Minimum Clearance – But for the guide, wheels/tires & crown gear no part of the chassis, any of its components or body may be less than 5mm above the surface of the track;
- Maximum Width – The width of front and rear rolling assemblies may not exceed ??mm in width, excluding inserts, nuts or knock offs which may extend beyond – within reason;
- Maximum Overall Tire Diameter – Front and rear tires must not exceed 23mm in diameter.
Subject to further clarification from several who have built or are working on pre-war models we will try to incorporate this class into our next version of the scratch32 rules & guidelines. For the time being any pre-war class will be treated as a separate event. Because I know how important deadlines are we will schedule a first pre-war event sometime in the early fall – there should be enough rainy days between now and then for some of us to cobble something together… Thanks to those who have contributed to this discussion and especially F1nutz for being the first one to succeed in building a gem of a model for this challenging era… :yahoo:
The Happy Canadian Scale Modeler!
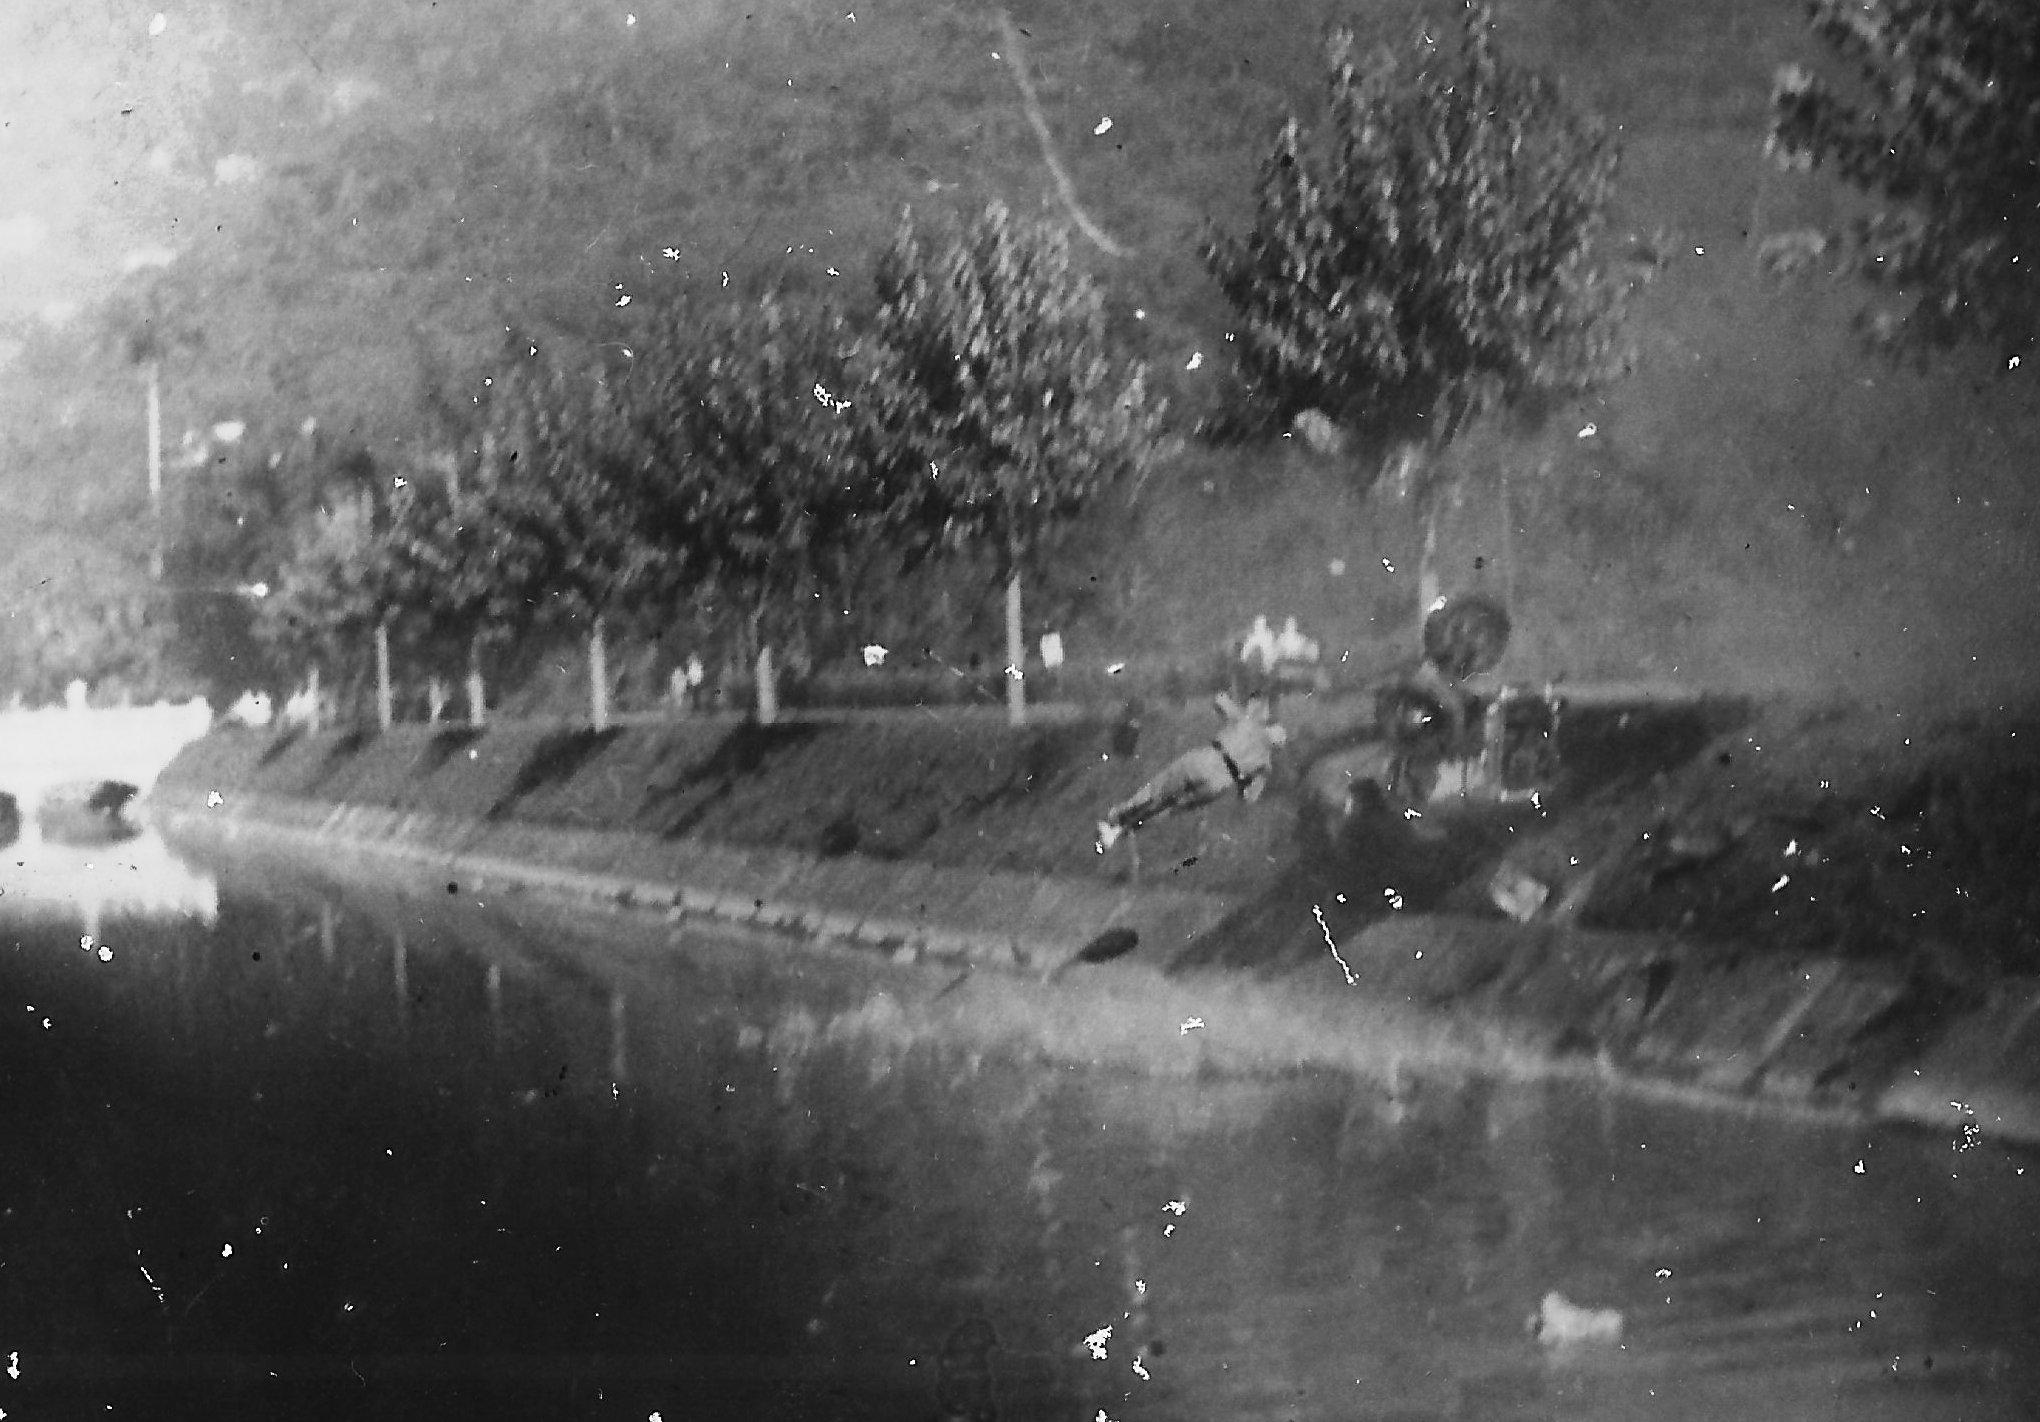
1934 winner Irineu Correa’s fatal accident on the first lap of the 1935 Grand Prix in Rio – he and his car catapult into the canal:
The Happy Canadian Scale Modeler!
Note: Because some reputable aftermarket 1970’s Grand Prix era replacement rear wheels measure 12.4mm in diameter and therefore although slightly beyond scale the 12mm maximum which was believed would cover all possibilities for this class should be increased to 12.4mm… this is merely a maximum allowance and everyone is still encouraged to make or obtain wheels that are as close to scale as possible – the problem with 1970’s era wheels is that to the best of my knowledge most of the readily available replacements are well beyond scale… :wacko:
The Happy Canadian Scale Modeler!
Like everything in life nothing comes easy – depending on the guide you’ll use you should have a few sizes of brass tube on the ready. Because I recycle a lot of original plastic guides the posts are all over the map. I find that I use 4.0 and 4.5mm brass tube a fair bit and often drill out the tube to give the guide post room to rotate, especially for slot.it guide posts… now that a slot.it guide is approaching $8 each I’m happy to try alternatives… and for most of the lighter and ‘low’ power motor classes (ie. 50GP, 1.5L GP) I use my own DArt guide which is nearly identical to the Ninco classic guide…
The Happy Canadian Scale Modeler!
Great Gatsby! Beautiful gem! Wonderful picture of the interior! Thanks for sharing this DB! Enjoy the rest of your Florida trip! :bye:
The Happy Canadian Scale Modeler!
April 16, 2018 at 2:58 pm in reply to: Building in Upper and lower A arms and rear and front springs etc #6524Putting it all back together…
 This model was put back together using the original Vanski motor and adhering to the 1.5L class rules although the body is no longer eligible for that class – it can still race in the 3L era and perhaps pick up a few scraps in any race despite the low power motor. We’ll see…
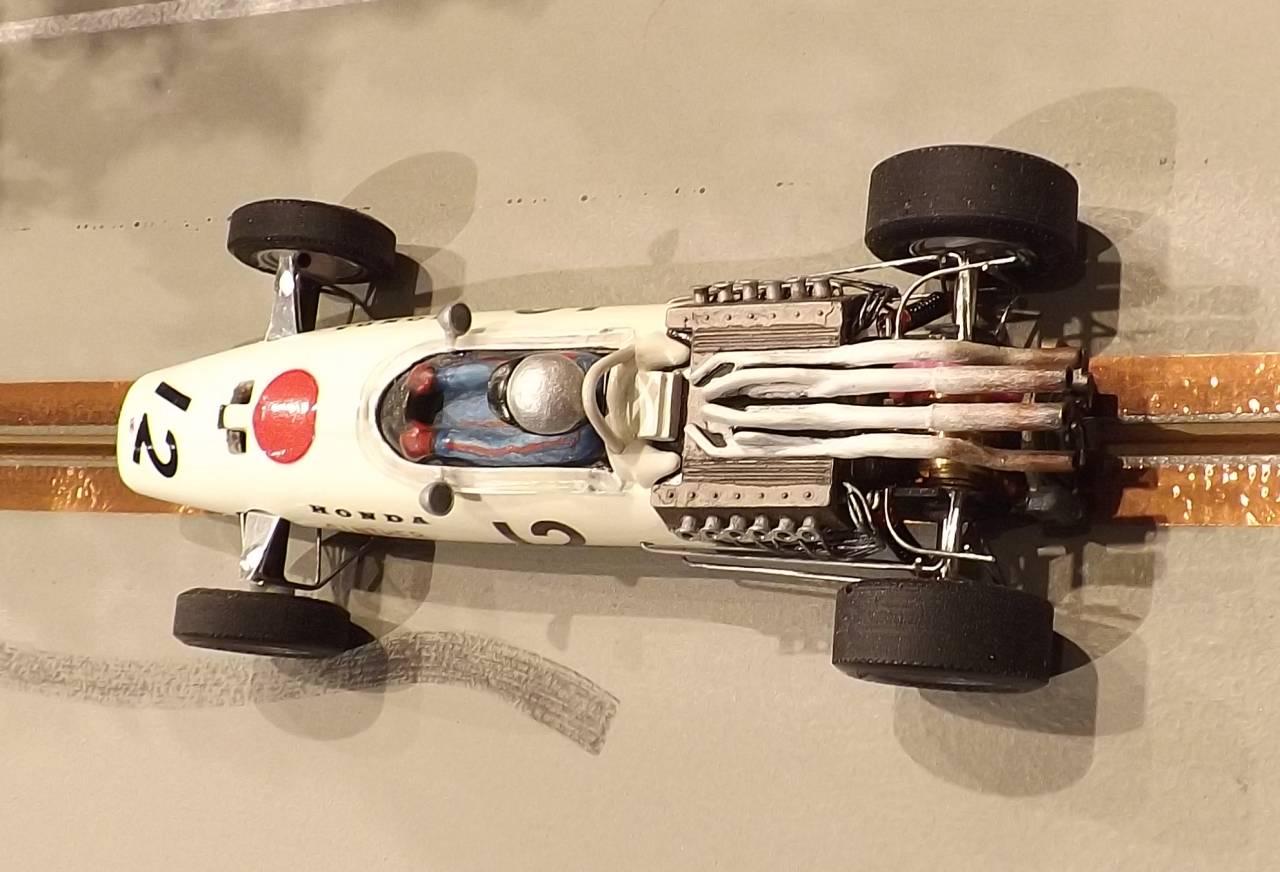
The Happy Canadian Scale Modeler!
April 16, 2018 at 5:33 am in reply to: Building in Upper and lower A arms and rear and front springs etc #6522…its been a while since Part I but the weather outside rendered most of the weekend perfect for a Part II…
Building Your Suspension (Part II) – The Rest (Front & Back)

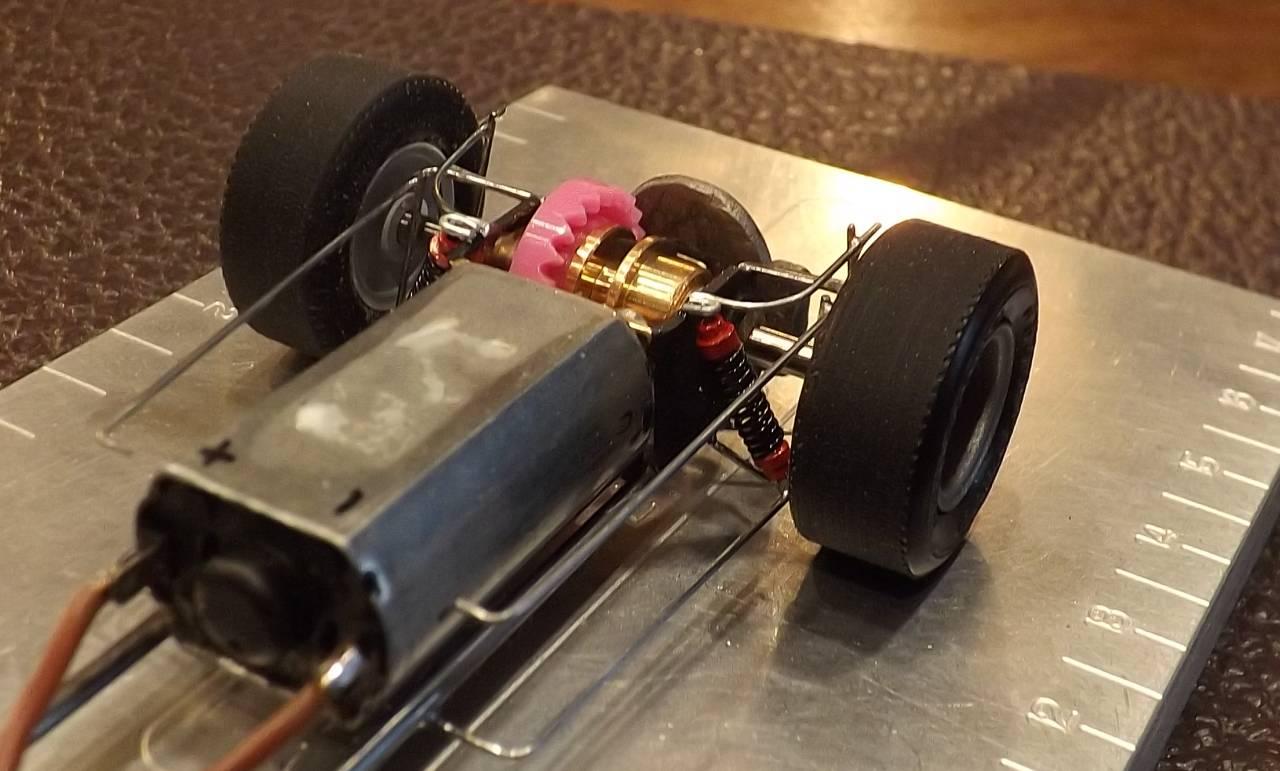
Let me qualify this by stating that I am in no way an engineer nor rivet counter – my focus is on the overall look without impacting performance and because we use bulky axles often housed in an even bulkier tube/spacers there is only so much that can be done – but that doesn’t mean that it should not be done or that it still can’t enhance the overall look of the model – otherwise there is no point. Because my own ultimate test is how the model looks going around the track suspension detail is not something that I regard as necessary (since I at least can’t see these details when it is moving so quickly). Nor is this something that is for everyone to attempt. But it does make the model look better when in the paddock. And all of that suspension detail although fabricated using a very flexible .020″ dollar store wire when soldered in place proves durable too.
Some of you may recognize this particular chassis/shell from SS32/R32 races of the past – it was one of my first soldered chassis using BWA front and rear brackets and the very first DArt body kit that I manufactured and completed. It is the model that quite some time ago we travelled on board with to complete a lap at The Ring on the darthobbies.com website.
This Honda RA 273 had the old clear coat stripped and replaced with two fresh coats of ‘Future’ (Pledge) acrylic floor shine applied by brush. Since it was already apart and the chassis had also been stripped and cleaned I figured this was a good specimen to upgrade.
What I Used
For this part I would use both solder and clear 5 minute epoxy (see the scratch32 topic 9 essential adhesives for details) to fix everything in place.
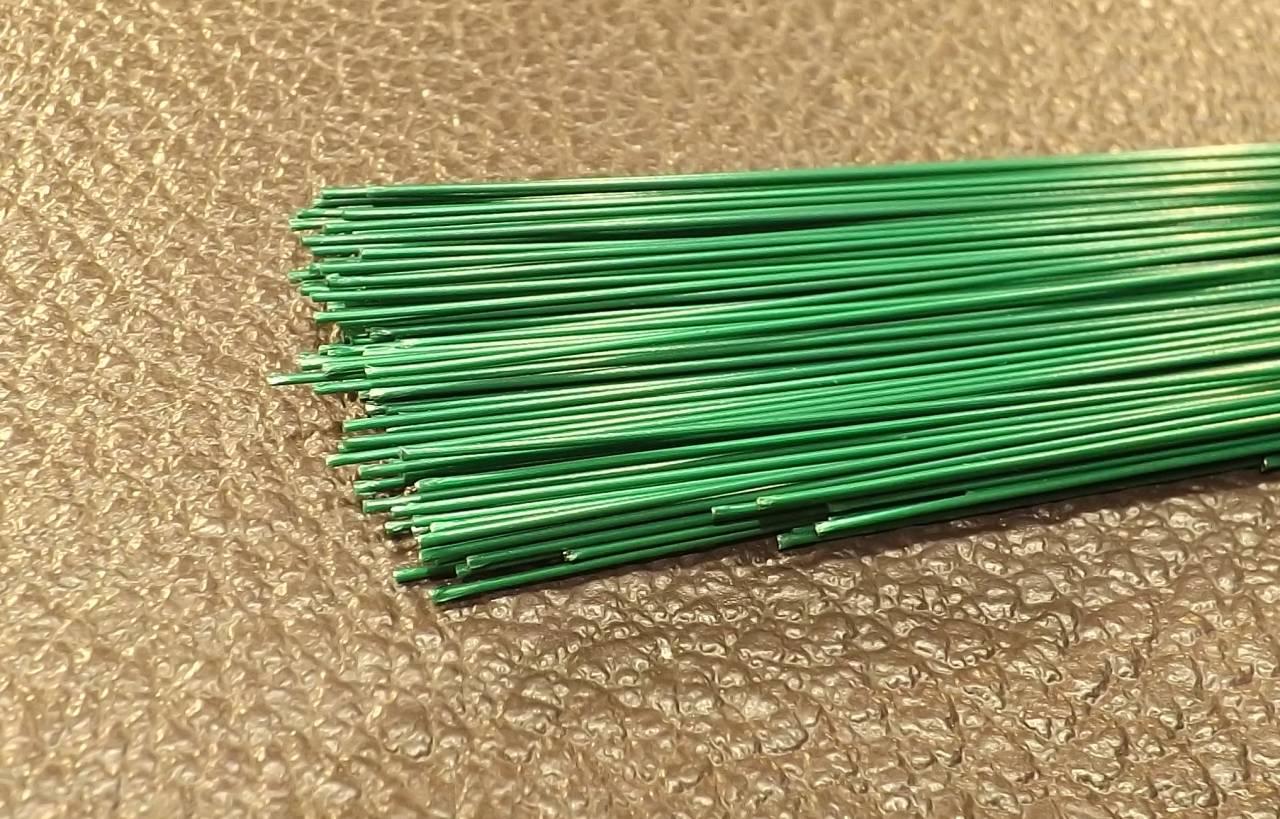
For all of the suspension pieces I used the very flexible dollar store wire (.020″) mentioned above – you get 200 pieces for a buck – but you need to remove the green plastic coating which I did by running an exacto blade (hold it nearly flat to the wire) the length of the wire then peel off the green vinyl which is easy to do.
For the two front uprights I used some very thin brushed aluminium sheet which could be cut to shape using just scissors.
And for the front brake lines as well as the coils I used a very narrow gauge decorative wire with a black finish.
The Shock Absorbers
The shock absorbers I made at the beginning of this thread were slightly too large for this application and will instead be used for my 70GP Shadow DN1 – so I made two narrower but taller shock absorbers for the rear end using the same basic technique. These shock absorbers were simpler – and used just 3 parts (upper, lower & coil) which would later be fixed to a wire soldered in place during the rear suspension build. I had some very narrow gauge decorative wire already finished in black which was perfect to make the coil. The upper & lower shock pieces each consisted of two parts – one narrow brass tube cut about 3mm in length onto which a larger diameter tube just 1mm in length was fixed. I painted both of these pieces red and while that paint dried I tacked the suspension.
The Suspension
The trick is to use longer pieces of wire and to solder them to the chassis first. Most will be bent after they are soldered, but you need to make sure you can make crisp bends. It is also much easier to trim or grind away the excess after it is soldered in place. I won’t specifically describe each wire and how it was shaped since the pictures do that. It helps to use graph paper underneath your chassis to line up your suspension wires. Solder a single wire for both the left and right sides at the same time – you can always trim away the centre later.
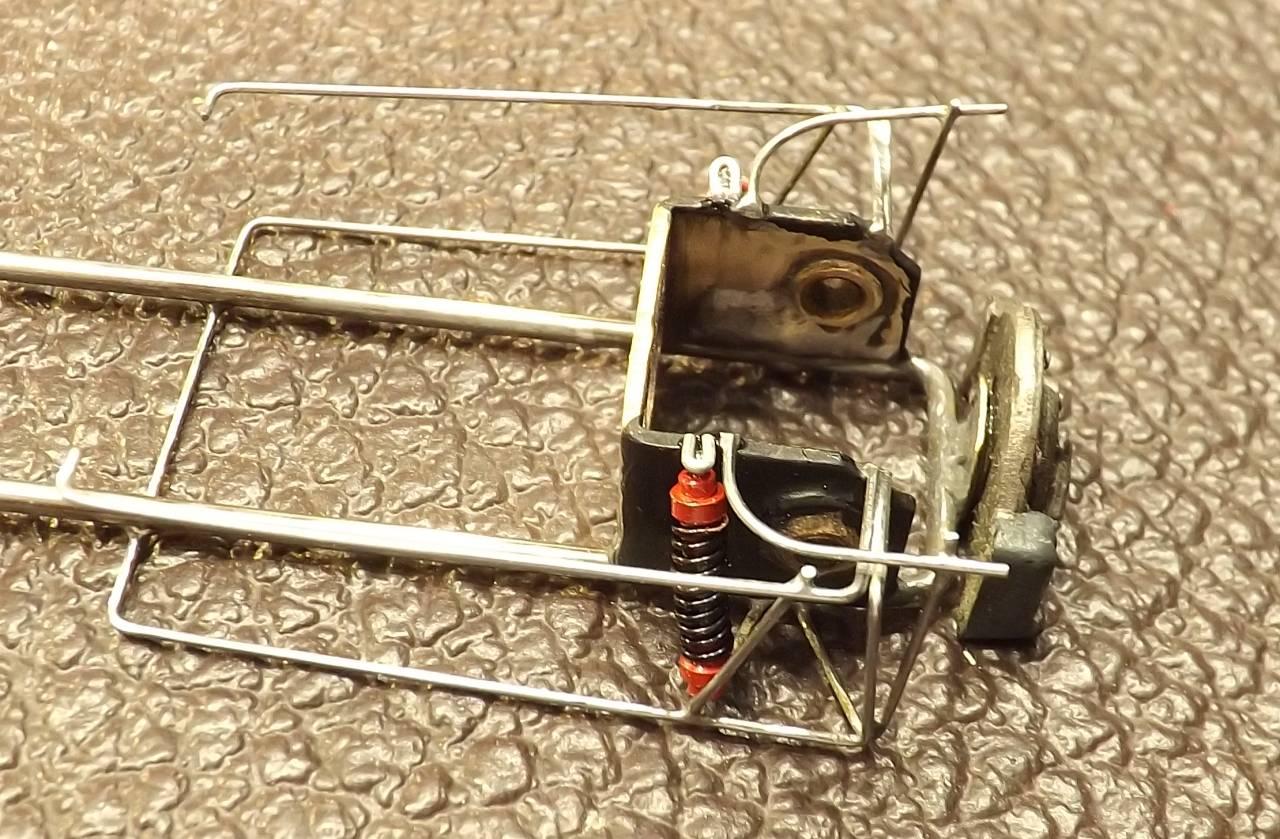 The front suspension was fairly simple and done first. Since I planned to glue the aluminium upper arms to a support wire well above the front axle tube I needed to incorporate such on both sides.
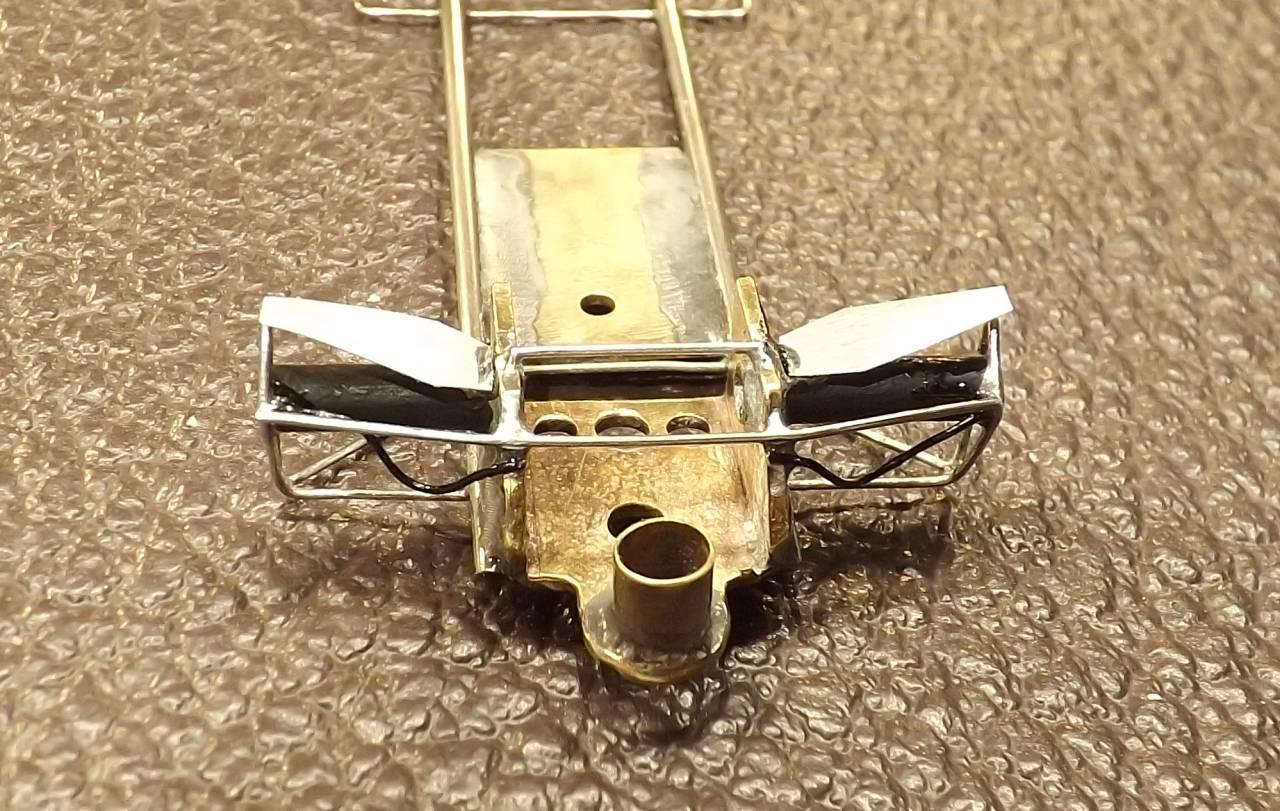
 The rear suspension had two considerations to sort out – how to fix the shock absorbers and how to fix the lengthy upper suspension arms to the body. Both left and right upper suspension arms were bent out of one piece of wire that was nearly rectangular in shape, soldered into place on the rear motor bracket and then cut both at the joints with the rear motor bracket and finally just after the bend at each side towards the front. I left those cuts till the end to avoid mangling either arm. Those forward arms would simply slip into two holes drilled on either side of the body. Since they line up with the bottom arms measuring was simple.
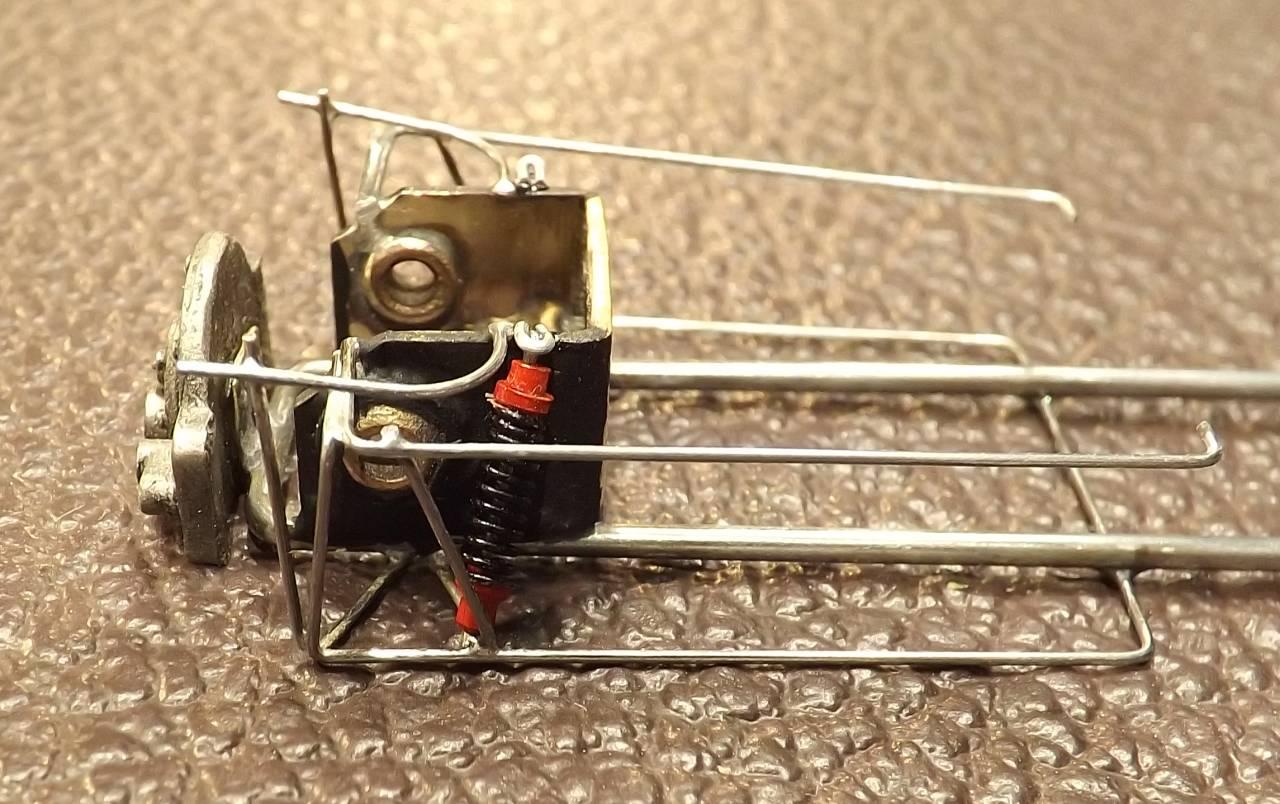
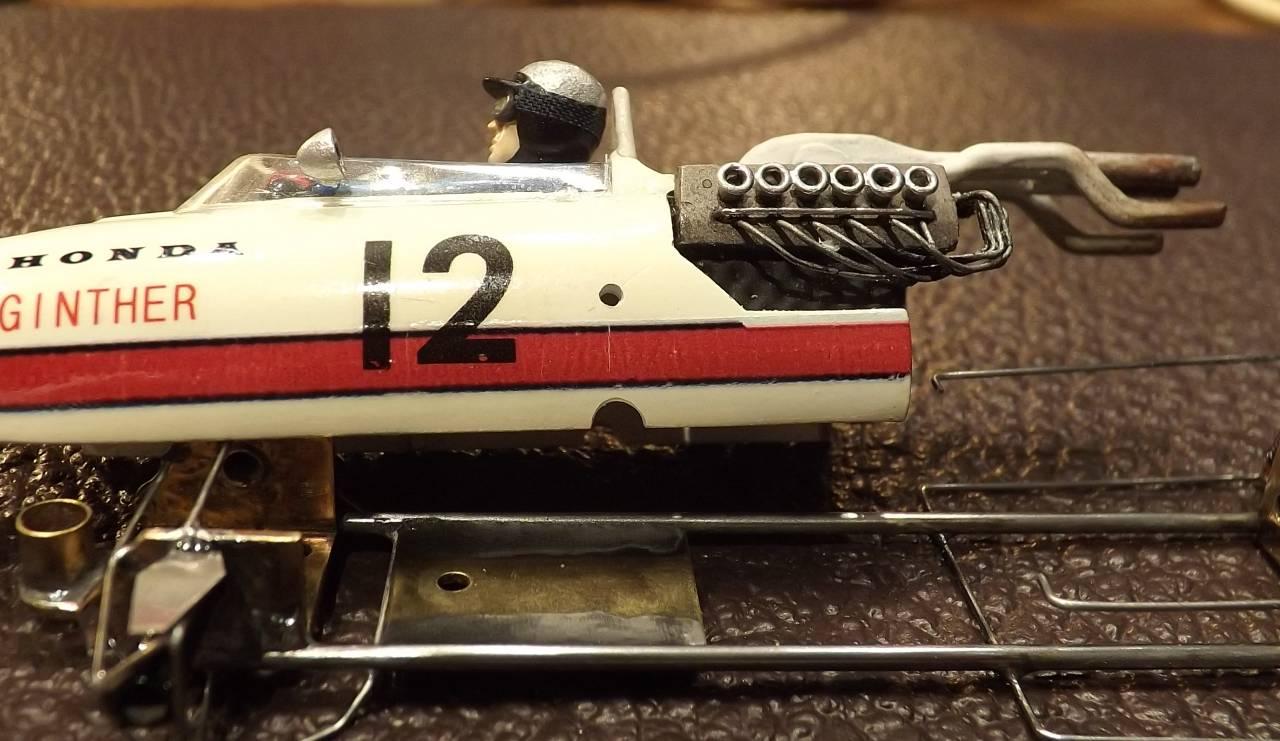 To mount each rear shock absorber I took a straight piece of wire and soldered it to a corner of the lower rear ‘A’ arm and then trimmed it at the top flush with the motor bracket without fixing it to anything. The shock absorber pieces (lower, coil & upper) could later be added by sliding them onto the wire after everything was cleaned and polished.
I carefully painted the exposed tubing and rear bracket sides flat black.
Time to add the shock absorber. I applied a tiny amount of clear epoxy to the wire ‘post’ near the bottom and slid the lower shock piece into place, followed by the coil. I applied a tiny amount of clear epoxy to the wire ‘post’ near the top and slid the upper shock piece into place making sure it fit snuggly into the coil. I adjusted the wire ‘post’ (now shock absorber) to make sure it leaned close to the top of the motor bracket and then bent another small piece of wire in a ‘U’ shape to cap the shock and fix it to the top of the motor bracket. A small amount of clear epoxy dabbed to the top of the shock absorber wire ‘post’ and the motor mount would fix this ‘cap’ permanently.
Front upper arms fashioned from the aluminium sheet were glued in place using clear epoxy. So were the front brake lines.
 Now time for final assembly…
The Happy Canadian Scale Modeler!
Thanks Bill!
The Happy Canadian Scale Modeler!
A really nice model that runs superbly F1Nutz! Cheers!
I see the makings of a new class here – perhaps:
- mandatory years of eligibility TBD;
- mandatory ‘low power’ motor (such as a BWMS050) TBD;
- maximum overall width TBD;
- minimum clearance (except for the guide the balance of the model and chassis must clear a block) TBD [perhaps 4mm?].
MiA is working on another pre-war model and we’ll compare… For the time being F1Nutz – could you provide the clearance and width of your model?
FYI – DArt has the same Bugatti inserts and a more generic wire insert with centre hole to accept any knock off – both measure 14.30 mm (.564″) in diameter…
Great Model!!! :yahoo:
The Happy Canadian Scale Modeler!
I’m hoping we’ll see this little wonder at the next Meisterschaft Dave…
The Happy Canadian Scale Modeler!
Hi SV,
The banners for each event are convenient links to the registration thread so everyone who plans to participate in any event can go to the registration thread in advance and tell us about the models that they plan to enter in the race – some historical information including pictures – background and other details which I then can use in the report. If new, the models will also be entered into our model database which provides details regarding all the parts used. The point of the database and of registering models in advance is to share information. It also makes putting together the reports much easier for me. It is an additional way that some can give back to the hobby. To encourage registering I offer door prizes and other incentives (ie. reserved pit spaces, customized pit boards, etc.). So far no penalty has been applied to the results for failing to register, but that will change. Right now, the only penalty we apply for scratch32 events is the loss of a lap for every de-slot or ‘off’ regardless of fault.
The Happy Canadian Scale Modeler!
It will be nice to see your model in person DB – looking very good! As Ken says it is wonderful how we can all inspire one another… thank you for contributing and posting those pictures DB.
The Happy Canadian Scale Modeler!
Looking good DB! How heavy is that body? Do you have the door handles and other trim pieces for it? Are they white metal?
The Happy Canadian Scale Modeler!
That’s funny – the layout is almost identical to KK’s – just smaller… great how they gave the impression of a much larger track in the video – well done!
Thanks for sharing the link Drew.
The Happy Canadian Scale Modeler!
:wacko: I love the track and the sound effects. Perfect setting for those cars too – That is certainly inspirational… getting my router trigger finger twitching …and quite professional… I can definitely appreciate all of the time and effort that must have gone into shooting and editing that short video. Awesome! A must watch for any hobbyist! :yahoo:
The Happy Canadian Scale Modeler!
If it isn’t dragging on the ground it isn’t low enough! :yahoo: Good work!
The Happy Canadian Scale Modeler!
Looking good Marius! :yahoo:
The Happy Canadian Scale Modeler!
February 3, 2018 at 5:30 pm in reply to: Motor Restrictions & ‘Slow’ Motor Classes for Scratch32 #5590As far as the Vanski motor goes – popular opinion suggests to leave the status quo, especially now that everyone in our group has at least a few Vanski motors now (or models powered by Vanski motors). For future 1950’s and 1.5L Grand Prix classes I will begin posting results based on motor in addition to class as I’ve already done in sportscars… and looking forward the target or preferred slow motor which will eventually replace all others in both of these classes (unless we source another identical Vanski motor equivalent) will become the BWMS050 since we have many and they are cheap at only $5. As a group we will now need to put a tighter leash on these motors to preserve the future integrity of our slow motor Grand Prix classes since it is clear no one in our group wants these classes to be any faster than they already are. In 1950’s Grand Prix we will also slowly phase in a move away from S-can or other larger motors to just the FF050 slow motors – like the Vanski or the BWMS050. Because I am one of the biggest supporters of this move all of my future builds in both of these classes will be using the BWMS050 motor instead of the Vanski, BWNC1 or NC1. I would strongly encourage others who’ve already built Vanski powered models for both of these classes to do the same with their future builds, especially those who’ve already built very quick models. Cheers to everyone that reached out to me to provide their opinions on this topic whether in person or otherwise! :good:
The Happy Canadian Scale Modeler!
February 2, 2018 at 8:54 am in reply to: Motor Restrictions & ‘Slow’ Motor Classes for Scratch32 #5585Before anyone jumps too far ahead I would have a small sample of those motors tested first to see if they perform the same. Nevertheless great sleuthing MiA!
The Happy Canadian Scale Modeler!
February 1, 2018 at 9:19 am in reply to: Motor Restrictions & ‘Slow’ Motor Classes for Scratch32 #5578I saw several Vanski motors for sale online on ebay this morning… not cheap though…
The Happy Canadian Scale Modeler!
February 1, 2018 at 7:29 am in reply to: Motor Restrictions & ‘Slow’ Motor Classes for Scratch32 #5577I have a few very quick 1950’s Grand Prix models that have a Vanski soldered to the wire chassis. Rather than try to replace the motor I will sell the chassis (minus anything that can be removed) to anyone interested who races with another group. Just email me.
The Happy Canadian Scale Modeler!
February 1, 2018 at 7:24 am in reply to: Motor Restrictions & ‘Slow’ Motor Classes for Scratch32 #5576I like this second solution and it would easily work for our group. In fact, if it would help get everyone in our group on board I will provide a free BWMS050 motor as a replacement for every Vanski or S-Can in our 1.5LGP & 50GP models to help facilitate the switch over. If we make the BWMS050 motor a single mandatory motor for our 50GP, 1.5LGP & Hot Rod classes wouldn’t that be simple!
The Happy Canadian Scale Modeler!
February 1, 2018 at 12:03 am in reply to: Motor Restrictions & ‘Slow’ Motor Classes for Scratch32 #5574Hi DB, if we implement this my intent would be to run both on the same night whenever that class is scheduled but keep them separate as best we can. We’ll flush this out more over the next month – no rush…
As you and everyone else in scratch32 already know I’ve gone to great lengths to provide separate results for subclasses in SP already – depending on chassis configuration, specific motor, weight, etc. I haven’t done this yet for the open wheel classes but it would be easy enough to do for the motors too since we have the model registration form and the event registration thread…
I have more than enough BWMS050 motors to keep our group going for my lifetime at least – in fact I am willing to replace any Vanskis with BWMS050 motors in my relevant Grand Prix class models but I can’t speak for others. If the others agree then we could eliminate the Vanski from the 1.5L class and leave the rest ‘as is’. Viola – problem fixed! [If we do that then I would also eliminate the S-Can motors and Vanski motor from our 1950’s class since it makes no scale sense for them to be faster than our 1.5L class.] …the more I think about it the more this makes complete sense for us to do…
I used to think that we should keep the rules for our open wheel classes uniform so that others could once in a while participate but both the past year and recent word from many leads me to be skeptical about that possibility – now that the fork approaches maybe instead of trying to keep things the same as other groups’ in our open wheel classes we should bite the bullet and do the best thing for our group which would be to eliminate the S can and Vanski motors from 50GP and 1.5LGP…
The Happy Canadian Scale Modeler!
January 31, 2018 at 5:47 pm in reply to: Motor Restrictions & ‘Slow’ Motor Classes for Scratch32 #5567I’m home all evening MiA… making my GT40 chassis for Friday…
…back to the ‘slow’ motor situation…
In my opinion motor restrictions are artificial, difficult to maintain over time and hard to police. ‘Slow’ motors are just a band-aid. Perhaps it is time that we take a deep breath, put our big boy pants on and finally rip that band-aid off once and for all. At least it would level the playing field for good.
Firstly, a pilot’s choice of motor has no impact on the track nor does it adversely impact the performance of others in a race so there is no need to restrict motors just to keep racing ‘fair’.
With grip already restricted there is only so much motor any model can handle – and there are already a plethora of available motors that out perform the available grip of the models we race on the tracks we’ve built, and with the advancement of technology that list should only get longer. On reflection artificial restrictions such as limiting an NSR model to just a 22k motor is designed for one purpose only: to save participants from themselves.
Focusing on the 1.5L Grand Prix class for which the Vanski motor issue is most prominent what would be the result of removing any motor restriction? Would the racing be unfair? Certainly not. That would leave the level of grip, the performance of the chassis, and the pilot’s own racing ability as the limiting factors for how much motor to have. Physics and ability. Just as in a free market why not leave it up to the pilot to decide what is too much motor in every case? Must we always save us from ourselves by imposing artificial and what are now unfair restrictions?
The arguments in favour of ‘slow’ motor restrictions are many: reduced cost, scale speeds, driveability, closer racing and the simple fact that it is easier for a novice to build or tune a fast ‘slow’ motored model. I can’t argue with these. But I also didn’t create the Vanski shortage nor am I responsible for the growing list of ‘unobtainiums’ – no individual is.
Short of having large club purchases of different hand out motors every season I see no other way to resolve the ‘slow’ motor challenge.
Looking forward the fairest overall long term compromise I see involves adding a ‘plus (+)’ class for every ‘slow’ motor class which would have no motor restriction at all, like in our SP class where we now have both SP and SP+ sub classes. Let physics and ability dictate what motors everyone chooses in the SP+ sub class. The + classes would promote innovation, chassis building and fast yet gentlemanly racing while the existing regular classes would remain as is and cater to the novice builder and those purely recreational gentlemen pilots. In addition, the race format for the existing regular classes could be adjusted to take away the Vanski advantage (something akin to a bracket) so that a 2 or 3 second penalty would be imposed for every lap below the set breakout lap time (and three breakouts = loss of one lap). The regular classes will promote casual yet exciting and close racing for many and at the same time accommodate existing ‘slow’ motors. With two alternatives and each being scored separately I do not see much of a downside – and no need for anyone to change or build anything new if they don’t want to. How can that be a bad thing?
The Happy Canadian Scale Modeler!
-
AuthorReplies