
Forum Replies Created
-
AuthorReplies
-
Brilliant! Thanks for sharing that tip Felix.
Thanks for the info Chris. I didn’t know they made neos for old scaleys seems like overkill to me. I like them as they are personally.
cheers
Bill
Thanks for the tips Chris. I’ve heard that the K&B motor magnets lose their force if you disassemble them from the metal flux pieces which would require rezapping them after reassembly, so I’ve been reluctant to do so. Is that the case in your experience?
Any that I have found already disassembled would confirm this but I have no specific before and after proof.
This could also be interesting…
hahaha How about this bad boy?
Sounds like a plan. I don’t think you would need 14 feet if the run off rails are isolated and shorted. I halved my runoff distance that way on the Ho track. Worst part is walking down to get the cars back but some use a return lane.
GI I’m planning on going with an appropriately raised chassis otherwise what’s the point? Ideally I’d like to see these drag raced rather than ‘lapped’ … maybe one day. I have an Ho drag strip, not the auto world one and it is fun. We run it for fun sometimes after our regular Ho race nights since it doesn’t take too long to run a bunch of brackets.
Hahaha I just noticed the booster neo magnets on Chris’s K&B motor. Do they give much boost Chris?
The chassis is made with 2 piece aluminum sleeves so you can adjust the wheelbase Ken and it has a pancake motor mounted on its side so you’d love it!
Nice work as always Chris! The stock chassis on mine actually performs fairly well but I will be building a chassis for the orange body.
I do recall another K&B you tuned quite well in the past. The quickest I had seen.
Glad you have the kit as well Ken. I’m sure yours will no doubt be completed first.
Nice job GI! Looks like you are well on your way to the scratch built addiction 😉
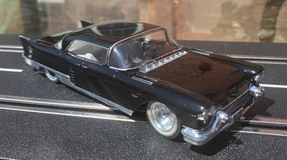
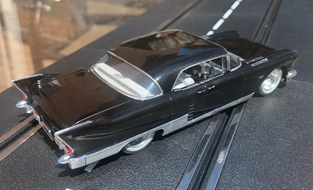
 It is a little worn but all there. The original plastic color is red but this one was painted when I got it years ago.
Ken you’re going to love the chassis 😉 your favorite material.
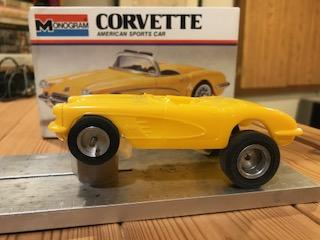
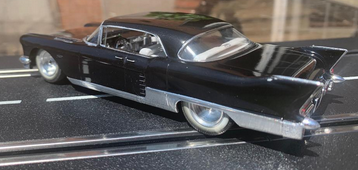
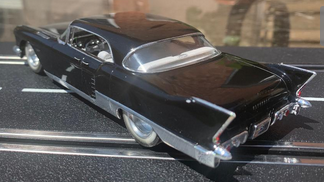
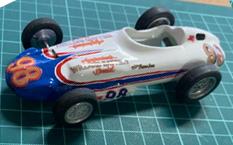
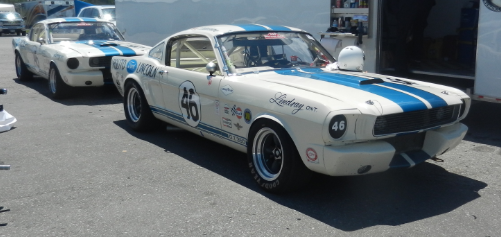
 Here is the original Aurora K&B slot car.
It was originally a slot car body by Aurora but inthink Monogram then released it as a model kit. Looks like the same mold.
It’s an old Monogram kit from the 70’s.
Now to search for some appropriate decals.
That could take some digging…
In case you’re wondering about the thread title…
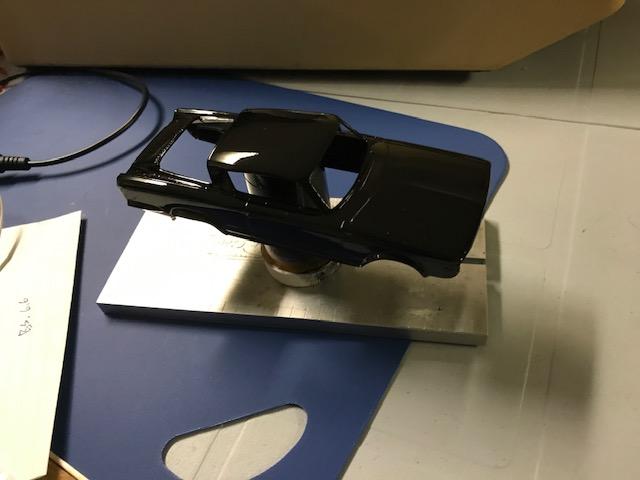 The weather was nice outside so I added a quick splash of gloss black.
Ok thanks! After a few hours of digging I think I have a few options. Let’s see how it shakes out.
Ok so I think I can probably find something in my basement to make a gasser out of. Are these things intended to go only in a straight line or are they going to be raced around a track?
Very sad to hear of John’s passing. Deepest sympathies to his family. I always enjoyed chatting and racing at his wonderful track.
Bill
Hey Drew
I just used a spare fan I had kicking around the house. The only thing I did different is I mounted the house on the wide side of the box so it sucks air out the top when the box is on its side and when I store it I toss everything in the box. There will still be some odour when spraying depending on the volume of spray as Steve described. Good luck with the project!
Merry Christmas everyone! Hope you have a great New Year when we can get back together.
Cheers!
Bill
Nice build Ken!
Another beauty Jim. Well done!
Need to get back to work on mine.
Nice job Jim! I did this livery in HO a few years ago.
Sweet ride Jim!
Beautiful build Chris. Much improved over the stock version.
Thanks for sharing.
Bill
Thanks for the compliments guys.
Hi Felix
Yes my body had the mold indentations as well, mostly on the inner wings. You can see in my rear 3/4 pic if you look closely. If it were to be a static model I probably would have filled them but decided not to bother as running around the track they won’t be noticed. I did remove and sand most mold lines though as I usually do this as part of my prep stage and it isn’t too much work.
When I do fill mold depressions where colour matching the plastic is not a concern I usually use crazy glue and drop in some plastic sanded filings sanded from the kit sprue. It isn’t ideal as the glued area dries much harder than the plastic kit but the drying time is very quick so it allows me to continue the project immediately.
I have used plastic cement/filings method in the past to match plastic colour when the model is not going to be painted but find the drying time takes way too long and often doesn’t harden as much as the original plastic.
Interestingly my kit came with 2 dashboards which allowed me to do the glove box conversion. It also came with 2 side details that would fit on the fins to make a different Caddy version?
Maybe some of these kits shared trees which allowed some flexibility for a few variations?
Less friction for the axle and more soldering surface for the uprights I would think.
I used the same on my Caddy
May 6, 2020 at 1:04 pm in reply to: Soldering Essentials for Chassis Building – What You Need #14718Great idea thanks Chris!
May 4, 2020 at 2:16 pm in reply to: Soldering Essentials for Chassis Building – What You Need #14705Thanks Ken. Professor motor are usually pretty good but I have had them forget to include items as well unfortunately.
I think I may be able to build using 3/32nd axles then swap out the oilites for 1/8th after the build without too much issue.
From pictures I’ve seen it seems most people favour the metric jig.
May 3, 2020 at 7:14 pm in reply to: Soldering Essentials for Chassis Building – What You Need #14699Does anyone know if either the Imperial or Metric jigs allow building with 1/8th axles?
I like to build using vintage part sometimes.
Nice kits Felix! I look forward to the builds.
In the past I’ve used metallic colours like silver or gold as a base coat to help prevent plastic colors affecting top paint colours.
I once built the 1/24 Whistler Mustang T/A car which was molded in red plastic but has large areas of white in the paint scheme.
I tried several times with multiple layers of primer and multiple layers of white only to have the white areas come out a little pinkish.
I stripped it down several times and once I base coated with silver and top coated with white the red no longer bled through.
Happy building!
Bill
Looks great Luis!
Thanks. Weight is 109 grams which is a little heavy but the interior is probably as heavy as the body. I used all of the interior except the lower part of the rear seat for motor clearance.
Mirroring the pattern on 2 sides of lexan is a great idea Felix! I’ll add that one to my knowledge base if I ever need to do one of these paint schemes.
Cool idea but if that is carbon fibre I’m not sure I’d want to risk inhaling any dust from cutting and grinding it.
I managed to find some smaller diameter oilites so I’ve continued to almost completion.
Still some detailing and polishing to do but thought I would post a progress report.
Here is the chassis which I had built a few years ago. Added a new front axle tube for the longer wheelbase as well as patented D’Art design wire body mounts. Thought I would give that method a try and it works quite well. It will also allow me to revert the chassis to fit the nascar body without much work.
The car is now a mix of vintage and new parts utilizing 1/8th axles to accommodate the larger aluminum rims along with a 60’s die cast crown gear.
I scratch build a replica of the glove box bar service option which you can see if you look closely through the passenger window.
Complete with a full ice bucket and tongs.

Front

Unfortunately I knocked the mirror off a few times and made a bit of a mess of the inside windshield but I’m hopful that a coat or 2 of future may minimize the glue smudge.
Driver’s side
Lower chrome and upper wing chrome were done using aluminum duct tape which can be a bit tedious but cheaper and more readily available than bare metal foil.
It is not perfect but acceptable.
Roof should also be brushed stainless but I decided to leave it black unless I can figure out a way to do brushed stainless effectively.
Cheers!
Bill
Beautiful build as always Chris!
Thanks Ken.
Unfortunately this build has stalled as I don’t have any 1/4 inch brass tubing to sleeve the bearings with.
What a beauty! Very intricate chassis design. Better not rear end any pintos you’ll get a double explosion with that fuel tank up front ;^)
April 22, 2020 at 1:01 pm in reply to: Slosh Cast Parnelli Jones Watson Willard Battery Special #14596Hey Ken
I used appropriate sized aluminum tubing for the exhaust. Usually I polish it first with very fine sand paper.
I bend the end to the appropriate angle for the front most header.
It helps while bending to insert some thinner copper wire to mitigate having the tubing collapse and flatten at the bend.
Copper wire can later be removed or trimmed and left in there if it gets too stuck.
I then cut and dress the other straight header pieces to fit the profile of the main tube (angled cut with sanded vertical concave profile) and crazy glue them parallel to the first header piece.
It helps when crazy gluing aluminum to lightly sand it in the glue contact areas first for better adhesion.
I then reinforce the underside with more crazy glue with baking powder sprinkled on it as aluminum to aluminum bond is pretty weak. The baking powder is pretty rock solid once it dries into the glue and won’t be seen much on the underside of the header (unless you’re a bad driver ;^)).
Test fit the exhaust piece in the body opening and add bends as needed in the rest of the length of the exhaust.
Trim to length and I usually gently ream out the tip with a small Phillip’s screw driver to make the pipe look more scale thickness and paint the inside of the pipe black.
I also added a thin aluminum strap cut from a beer can (Guinness in this case) as on the real car and fastened it just below the cockpit with a tiny amount of crazy glue. I used a piece from the bar code as it had a perfectly printed black stripe which added a nice extra strap detail I did not need to paint.
If you prefer a clean exhaust the aluminum can be polished to an almost chrome like finish or you can add further paint detail to represent heated exhaust patina as you may prefer.
I usually use a mixture of mostly clear with red, blue and/or purple and just wash it on gently in light layers near bends and joints in the pipe to add the patina. Oil based paints work best for this but in this case I tried citadel water based which goes on a bit too thick in my opinion.
I then clear coat with future to protect the finish.
Then in this case I added some matte burnt brown/black to the end of the pipe using dry brush technique to add further realism.
Cheers!
Bill’s Muffler and Exhaust Shop
April 21, 2020 at 7:23 pm in reply to: Slosh Cast Parnelli Jones Watson Willard Battery Special #14593Today’s progress, body complete.
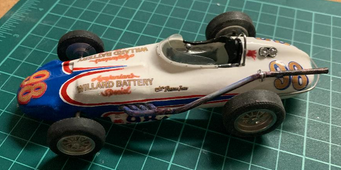
Had to fabricate the bumper, roll bar, windshield and exhaust.
Time to get rolling on that chassis!
April 21, 2020 at 2:23 pm in reply to: Slosh Cast Parnelli Jones Watson Willard Battery Special #14588The site also has great reference images for a lot of the cars.
Sorry I thought everyone was aware of Indycals.
April 21, 2020 at 2:09 pm in reply to: Slosh Cast Parnelli Jones Watson Willard Battery Special #14586Thanks guys!
Indycals sells a large variety of Indy decals Steve as well as other decals. They are quite good quality.
https://www.indycals.net/decals/otherindycars.html
I decided to hand paint the blue and red areas as the color usually pops a bit more when painted.
It was tedious though and takes a steady hand. Up close there are few wobbles but what can you do?
Another option would be to paint a clear decal sheet and hand cut the stripes but that can also be tedious to apply.
The decal sheet does come with red curved stripes but I wasn’t sure if it would fit and wrap easily around the contours of the body.
I also got my Matra decals from Indycals.
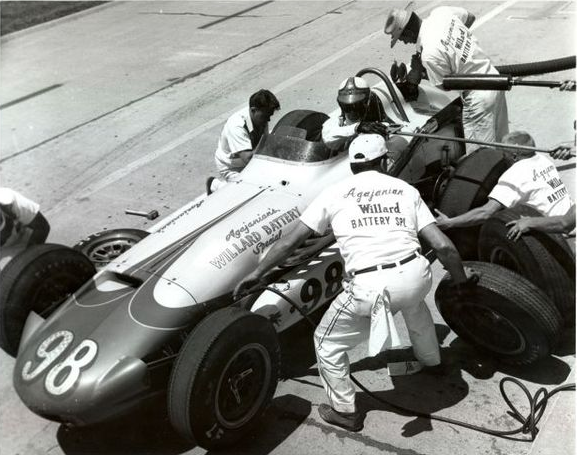
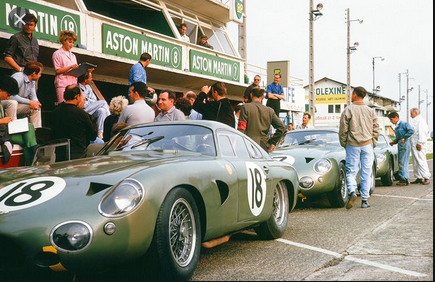
April 21, 2020 at 12:14 pm in reply to: Slosh Cast Parnelli Jones Watson Willard Battery Special #14583Some great pit stop action from ’63:
 April 21, 2020 at 12:01 pm in reply to: Slosh Cast Parnelli Jones Watson Willard Battery Special #14582
With a little bit of paint and decals it is starting to shape up

Still some more detailing to be added and build the chassis.
I’d like to offset the suspension as on the oval cars but since these will be run on road course layouts maybe that isn’t the best way to go.
April 21, 2020 at 11:57 am in reply to: Slosh Cast Parnelli Jones Watson Willard Battery Special #14581It is still a far cry from this but lets see what we can do.
Sorry thought I was posting in the Indy Roadsters are coming thread. Will start a new thread then.
Nice work Dave!
Thought I’d post a progress shot of the Parnelli Jones Watson Roaster.
Work continues on the chassis now.
I used to have a model of the Silhouette with the trailer but sold it at the show a few years ago.
I also had the pedal car from the start of the film when I was a kid but destroyed it James Bond style pushing it off a cliff in our backyard ;^)
Some great footage in there for sure.
Hope all are well.
Looks good so far Dave!
Another source for these kits sometimes is Hobby Linc Japan as well as the Arii Microace kits for less than $10 cdn. they occasionally have Gunze Sangyo kits for around $15. I’ve ordered from them before and shipping is reasonable and fast.
You have to keep looking though as their stock changes regularly. Don’t see any of them on there atm though.
Funny I watched that the other day. There are a bunch for different model companies. Interesting for sure.
That’s a nasty one John.
I thought the TP shortage was bad but 2 broken arms at once? I dunno how you managed that ;^)
It’ll be nice to have some Jaguar company on the grid Dave.
Nice job Luis That should add some variety to the grid.
Motorific also made a Ghia that is pretty close in scale to 1/32
Probably easiest to glue the whole base then cut out what’s needed from there.
I spoke too soon!
Look at these 2 monstrosities:
They might be a cheaper source for the kit though ;^)
Too bad it hasn’t been re-released recently.
It would look great in an historic livery!
Nice job Steve! I build one similar with a bathroom exhaust fan. It works great!
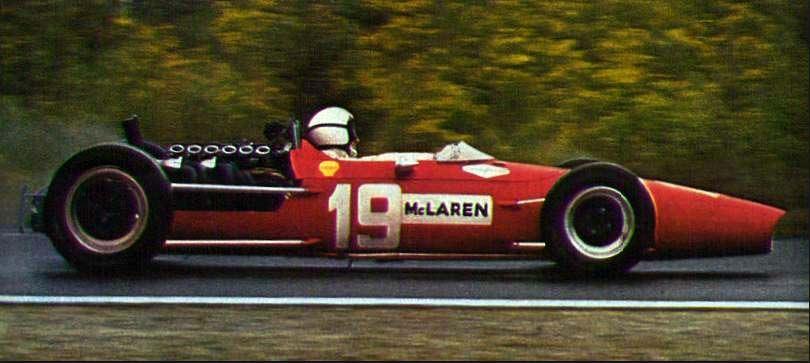
Looks like one of these. What a beauty!
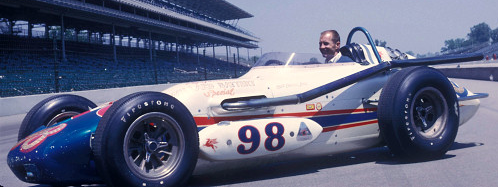
Watson Leader Card Special
note the offset suspension and starter tube in the front grill opening.
2 3/4 inches. How does that compare to the AMT kit?
HAha Interesting addition Ken. Funnily enough when we ran a street class in our HO racing group I ran a cop car ;^)
I also usually lost. I think it gave the other competitors more speed in out trying to outrun me.
Bingo!! I should have guessed it was a Cooper from the wheel inserts 😉
Looks like I’ll have to swap out the stacks for the shorter version.
Here’s a shot of the real car:
From an article here:
https://www.davemacdonald.net/gallery/closeups/kingcobralangcooperstory.htm
Thanks Ken
Motor is a standard vintage Monogram 16D. Chassis is vintage Monogram as well.
Progress on the slosh cast Watson Roadster.
I also found an earlier version in Lexan that may be able to be duplicated.

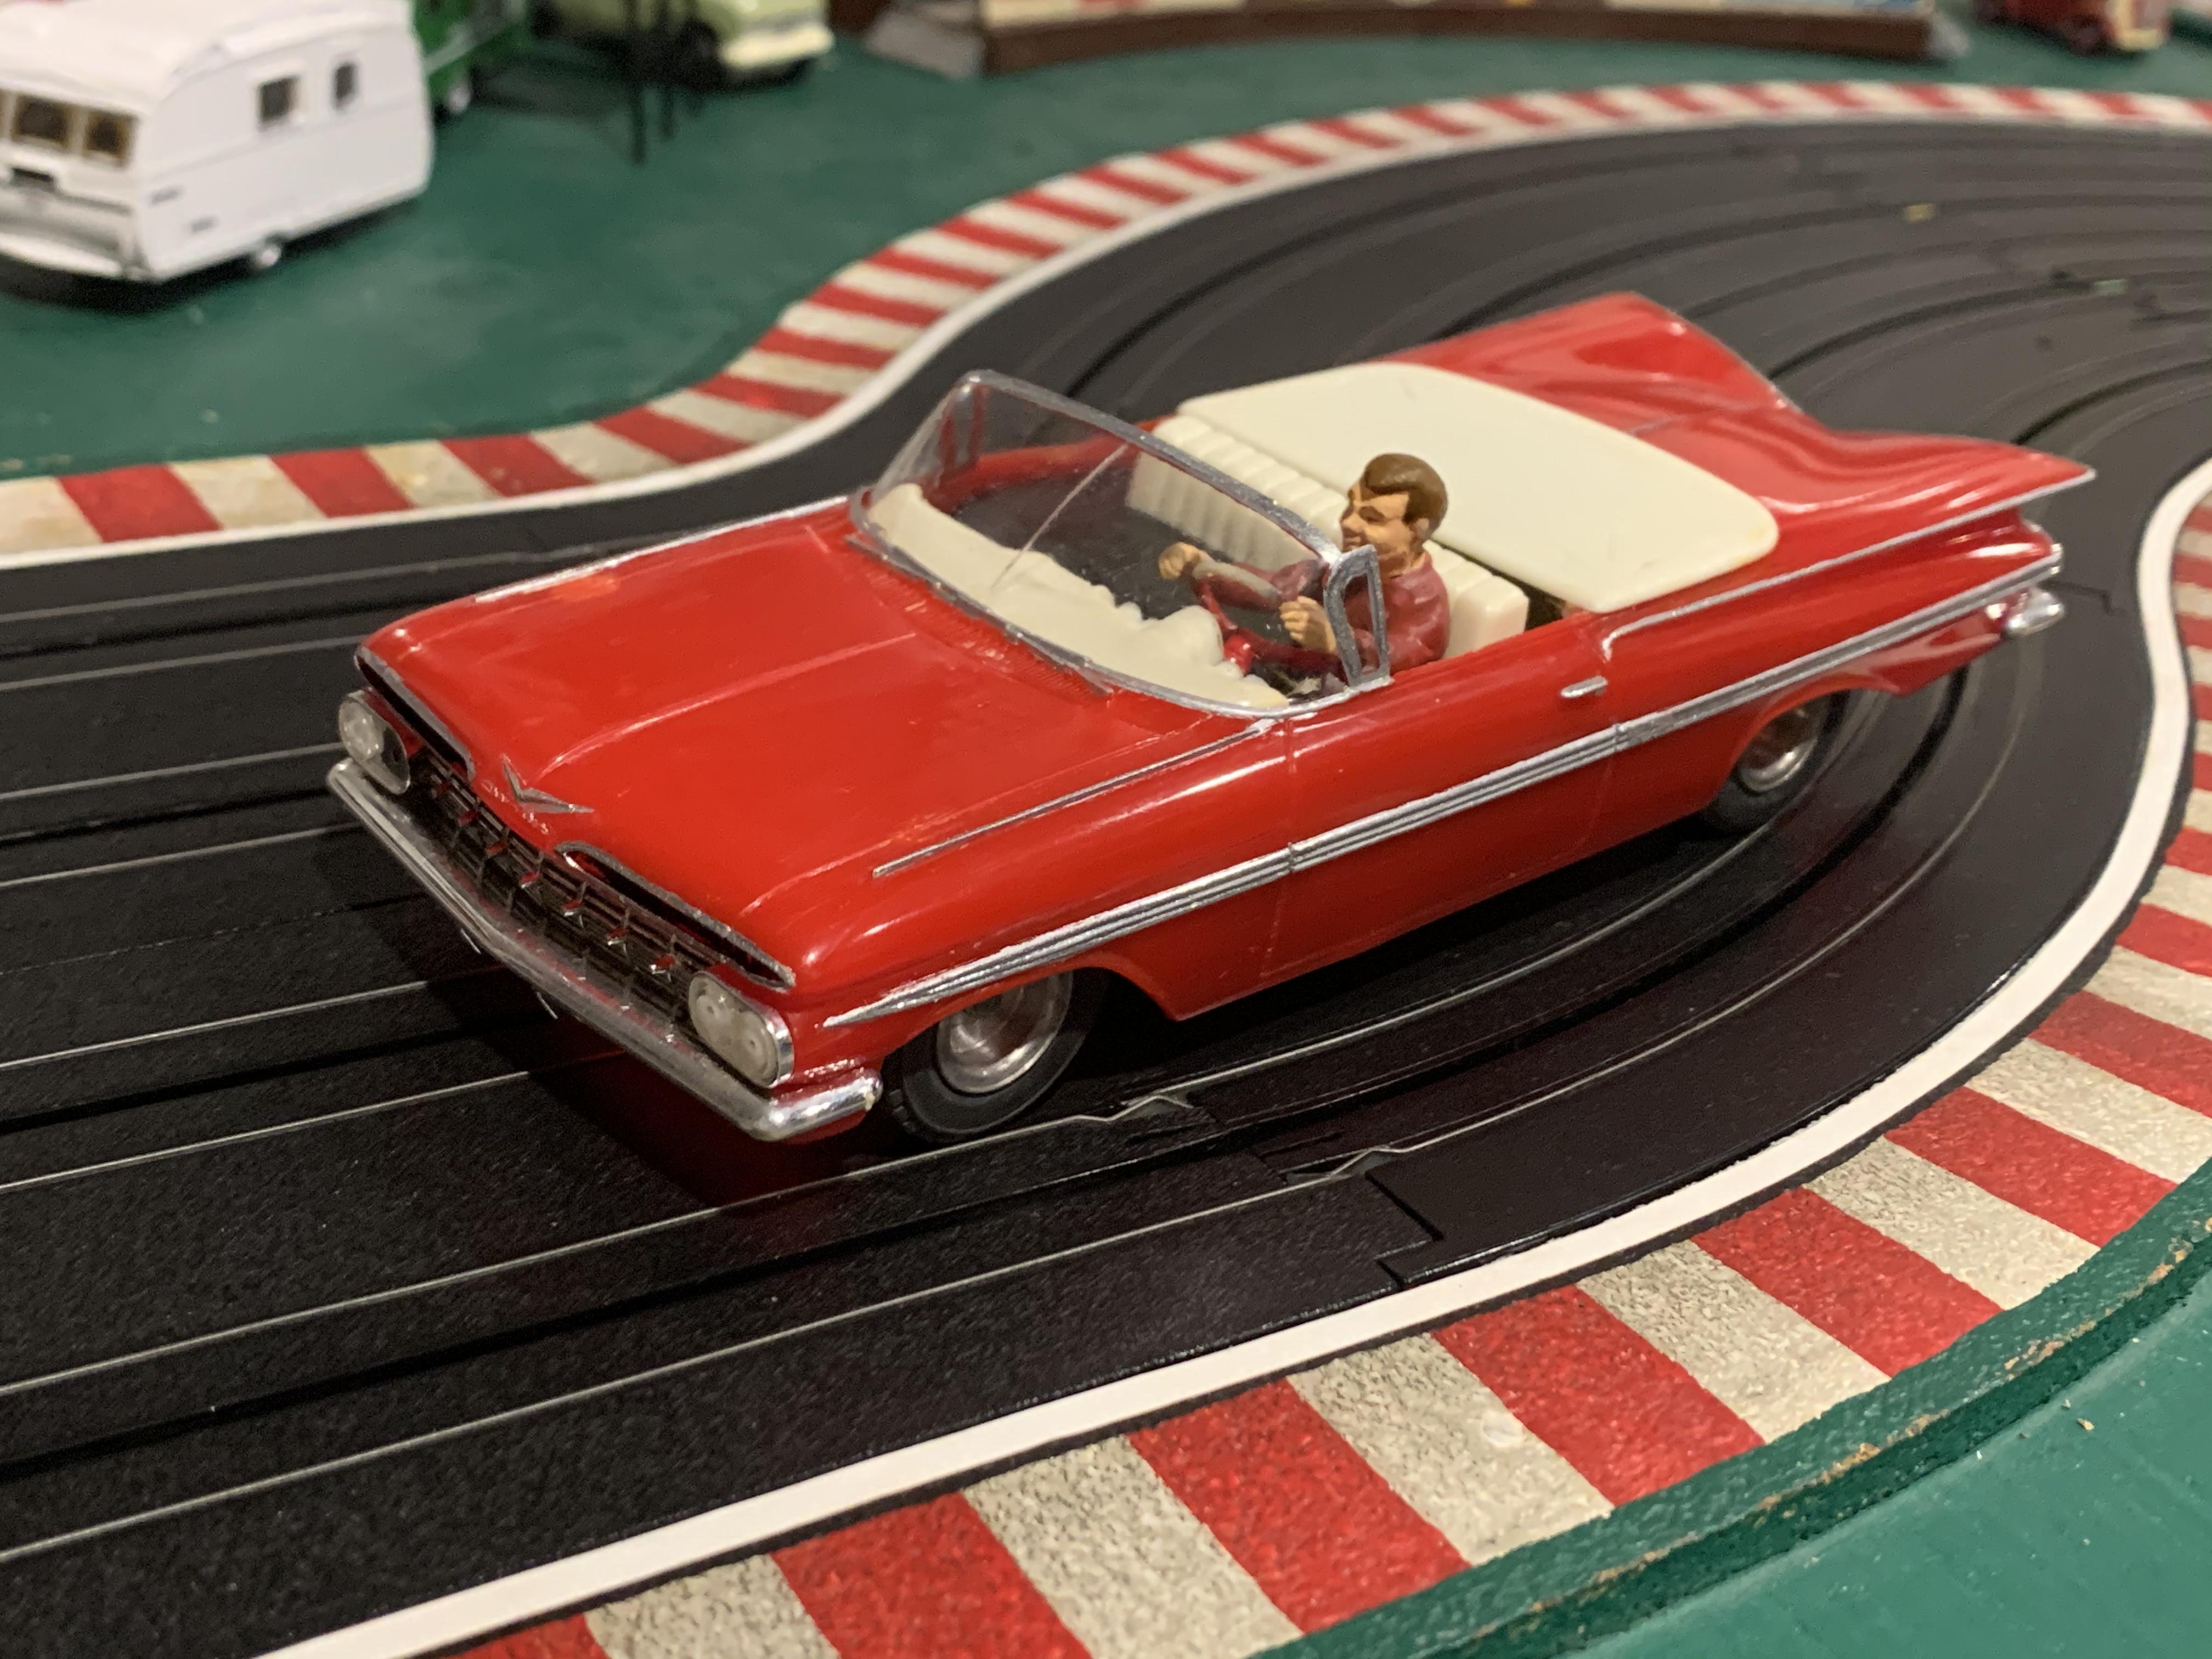
Impala Convertible on a Monogram chassis
.
Thanks Ken while I was not volunteering to do the order I can if you want.
I was planning on going with my slosh cast Watson in the end but will check if maybe there is something else I can order.
I don’t think you need a paypal account to pay for ebay stuff last time I checked just a credit card is good.
I will look into it however.
Nice I have the Impala already built up with a vintage Monogram chassis and managed to find the 57 Caddy at the show on the weekend. Both are great models.
No worries I’ll build something else.
Great idea with the carbon rod I actually have some of it already.
I can’t remember what I bought it for originally.
thx.
Nice find Ken! I was going to order that one but won’t now if you’re doing it.
That’s a tank of a body. Not sure if you’ll need to worry too much about breaking it ;^)
My slosh molded Watson comes in at only 13 grams but I suspect it will be much more fragile.
I’ll try to post pics on a separate thread later in the week.
Is anyone thinking of putting in a order of these bodies? If so maybe we can coordinate so we don’t all end up with the same car and also save on shipping? If so I’d be interested in getting one or 2.
I’ve begun work on a slosh poured resin body which I pulled from an old lexan body I had laying around.
Sadly it is the same Watson roadster made by AMT though probably much more lumpy in comparison.
I’m presently carving and sanding some of the more distinct details to hopefully de-lumpify it.
September 11, 2019 at 9:41 am in reply to: Watkins Glen Historic 2019 Howard Cohen's Picture Gallery #12368He also has many other galleries from vintage events to Indy etc. if you have the time ;^)
Looks great so far Ken!
Looks great Ken!
Did you strip or sand the original paint and or decals first or just paint over top?
Yes it sucks what Rogers are doing with the SN channels.
At least TSN has the F1 and also are showing highlights of the IMSA series.
Friday was fun and the biggest crowd I remember for a friday.
Surprising since you can’t watch the races on T.V.
Oh well.
ok have a good weekend!
Nice Job Ken!
Yes that “value’ is relative and may be for the slot car version which as far as I know doesn’t exist so best to enjoy it the way it was intended.
I look forward to seeing it on the track!
Here are some pics:
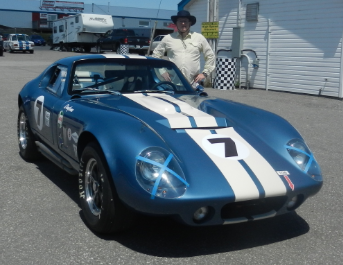
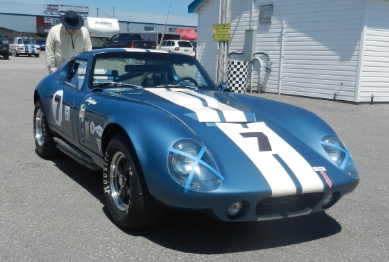
Cobra Daytona replica
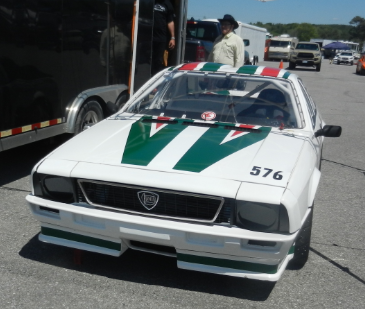
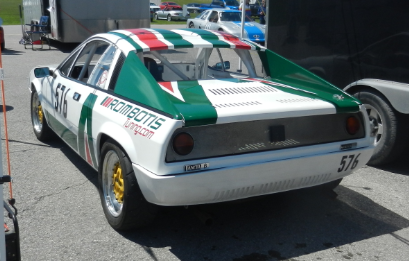
Lancia Scorpion
Polito Fords are there pretty much every year and at Walkin’s Glen, beautifully turned out.
I researched a little further and I don’t think the kit ever came with a slot car specific interior so likely it was intended for scratch building.
Here is a link to a French site that has good pictures of a few builds as well as pics of other Aurora slot cars and chassis.
There is also a pic from a price guide that shows the ‘value’ relative to other Aurora kits. Apparently it is quite rare.
http://slot-retro-forum.vraiforum.com/t360-K-B-et-Aurora-1-32.htm
Great find Ken!
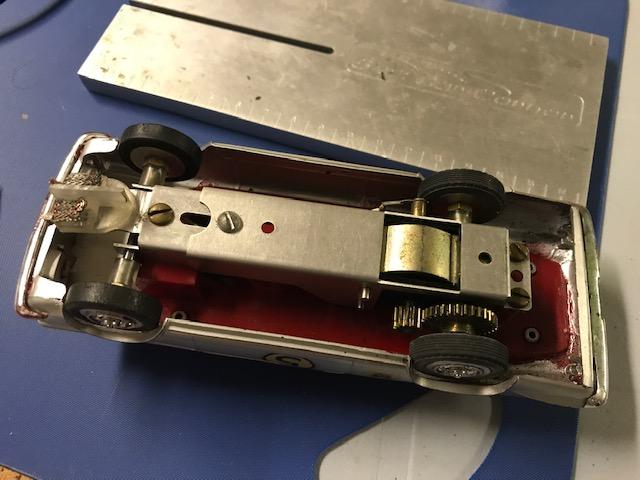
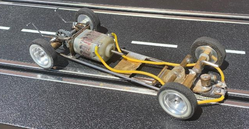
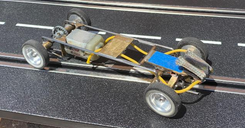
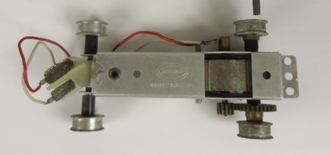
The chassis you’ve got is actually a Revell chassis and is not intended for an Aurora kit.
Aurora used the K&B (also made by Aurora) chassis which utilized a pancake style motor and was generally slower than the 16D which most other manufacturers of the day used.
The chassis mounting posts on your interiors don’t fit a K&B chassis or your body because they are also Revell.
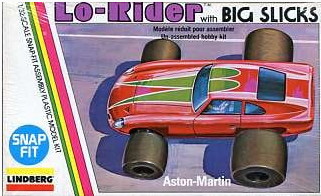
Looks like the green one is from an Aston Martin and the blue possibly from a Mercedes
The K&B chassis has 2 mounts at the rear fairly close together and one at the front.
Ironically it is an aluminum channel type chassis not unlike what you build.
Thanks for posting the research Michael. I remember seeing that Pathe film back in the good old days of Speedvision. ;^)
I went out Friday afternoon.
Not as large a field as other years but still lots of interesting cars to see.
Highlight was a Shelby Cobra Daytona replica out of Manitoba.
Also Lancia Scorpion in the Gilles Villeneuve Alitalia livery.
There was also a very nice Camaro Tran Am car from Quebec I hadn’t seen previously.
Nice job Larry!
Very cool!
I look forward to seeing the pieces.
I’ll bring up my M5A next time I’m there.
I’m pretty sure I used one of your existing helmets.
Thanks!
Hopefully you can see how the bits go together Art from the rear angle.
If not and you want to mold the engine parts I can show you next time I see you how they go together.
Unfortunately I can’t remove the other rear bodywork pieces because it is all glued together.
If you mold the body I can fabricate the pieces onto that if you want then people can remove them if they want to use the eagle chassis or keep them on for a scratch body.
or you could do them as separate pieces that get glued on?
Thanks It’s an oldie but I couldn’t find the post from when I made it originally so I thought I would repost it here.
Here’s Bruce in the real thing.
Looks Great!!
Even better in person
Yes these are really delicate decals. I’ve had better luck but have sometimes had them split.
I may try the clear coat on my next sheet.
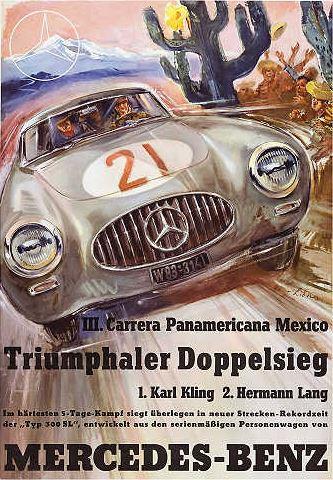
Here’s the poster I mentioned in another thread:
Nice!
thanks for posting!
Great reference for cars entered.
the Parrita Motel looks intriguing.
Lots of Cerveza sponsors for that race on all the bars and Motels along the route.
Here’s one I found a copy of.
If you missed the first Bugatti.
Here’s another. This one has the original style wire pickups rather than the race tuned guide. Missing the metal bar across the front though.
Here’s an auction for a green Auto Union which I’ve never even heard of. Not that that means much.
The More common white and yellow AU’s seem to be available in the $1k to $2k range
This guy has a bunch of ultra rare stuff.
Check out the original wooden Aston buck
Nice build Dave!
Ken Very few original Scalextric Bugatti’s known to exist.
Same with the Auto Union.
Thanks for sharing that info Ken!
I’ll have to order some of these.
Good to know. Doubt mine will be ready any time soon anyway.
Mine is an earlier type 35, though Michael is probably the only one who will know the difference ;^)
Good luck with the build. The Bugattii certainly dominated some grids back in the day so as Michael says the more the merrier!
I know there was a black Bugatti (may be a Type 35 I can’t remember) at the Oshawa auto museum.
They displayed it at the Toronto Auto show a few years back.
Not sure of its race history though. You should take a trip over and check it out if it is still there.
cheers
Bill
Also a nice model but as you said rare.
I printed out some of these plans and they would even look good framed.
-
AuthorReplies